Google+

contact us

Use the form on the right to contact us.

Day or Night, we are here to serve you. Leave your plumbing problem to us.


Tinley Park, IL

(708)845-7922

Residential and Commercial plumbers and plumbing contractors available in Orland Park, Tinley Park, Oak Lawn, Palos Heights, Midlothian, Oak Forest, Homer Glen, Mokena, Frankfort, and the surrounding Chicago South Suburbs. Emergency plumbers.

copper water lines.jpg

Kevin Szabo Jr Plumbing Blog

Kevin Szabo Jr Plumbing is Tinley Park, Orland Park, Oak Forest, Midlothian, Orland Hill, Homer Glen, Mokena, Frankfort, Crestwood, Palos Heights, Oak Lawn, local plumber. Read our blog for advice, tips, a good laugh, and basic home improvement.

**We are moving our old blog to our new and improved website. Too see all our posts visit kevinszabojrplumbing.blogspot.com

Filtering by Category: March 2022

7 Handy Organization and Home Upgrade Tips for the Elderly

RH Business Marketing Solutions

As we get older, the importance of having a well-organized and comfortable home grows. With age comes a decrease in mobility, strength, and agility, which can make performing day-to-day tasks around the house difficult. Fortunately, there are a number of house adjustments and arrangement tips that can make life easier for the elderly. This article will go over six useful organization and home improvement tips that can make living at home more comfortable and safe.

Declutter your home

Decluttering is the first step toward an organized home. Remove any items that you no longer use or require. This not only makes your living area appear larger and more inviting, but it also makes it easier to find things. Items that you no longer require can be donated, sold, or discarded. Decluttering can be a time-consuming task, so divide it into manageable chunks, such as a room or a cupboard at a time. Decluttering can have mental health benefits in addition to creating a more organized living space. A cluttered house can cause stress and anxiety, whereas a clean home can promote a sense of calm and well-being.

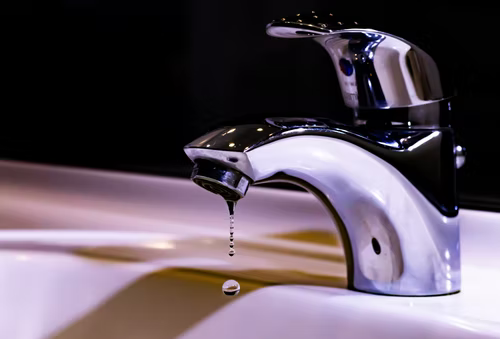
Advance kitchen and bathroom

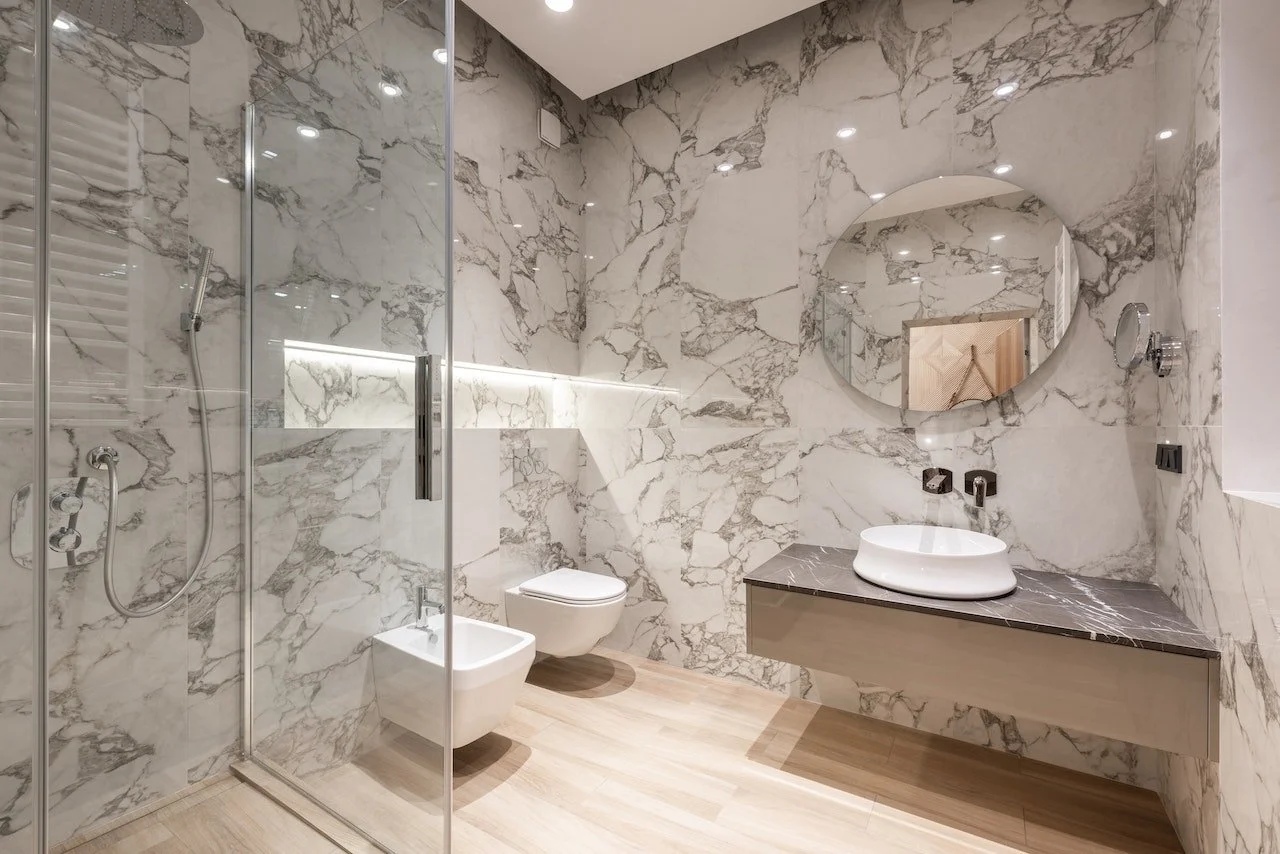
For the elderly, fully accessible kitchens and bathrooms are crucial. Some of the bathroom fixtures in an older property might be out of date. If so, think about replacing them with more contemporary models that are suitable for anyone who might need assistance using them. Consider getting rid of the outdated bathtub and instead build a barrier-free shower stall. That way access will be easier and there wouldn’t be any need to step up and over.

Your experience in the kitchen can be significantly improved by relocating or changing the height of the sink to suit your needs. A roll-under sink can be added so that those who are confined to wheelchairs can use it.

Install grab bars

Installing grab bars is an important home safety improvement, especially for the elderly. These bars can help prevent falls and provide extra support when entering and exiting the shower or bath, as well as when using the toilet. You can install grab bars yourself or hire someone to do it for you. It is critical that the grab bars are securely attached to the wall and can support your weight. When installing grab bars, it is essential to select the appropriate type of bar. Vertical bars, for example, are better for providing support when rising from a seated position, whereas horizontal bars are better for maintaining balance while standing.

Rearrange your furniture

Rearranging your furniture can give your home a new look while also making your living space more functional. You can clear any obstacles and move any furniture that is in your way. This can help prevent tripping hazards and make your space easier to navigate. Additionally, to avoid the need to climb or bend down, keep frequently used items within reach. It is also a good idea to remove any sharp or dangerous objects from your living area to avoid accidents.

Get a professional home assessment

It should be noted that not all homes are appropriate for the elderly. Houses that are not designed with the elderly's needs in mind can be dangerous, increasing the risk of falls and injuries. As a result, it is strongly advised that you obtain a professional home assessment. A professional can assess your living space and make any necessary changes to make it safer and more accessible. If your current residence is insufficient for your requirements, you may need to consider moving to a specialized independent living facility. These facilities are intended to meet the needs of the elderly while also providing a safe and comfortable environment.

Install proper lighting

A well-lit home is essential, especially for the elderly. Poor lighting can make it difficult to see clearly and increase the risk of tripping and falling. Installing bright lights in key areas such as hallways, staircases, and entryways can help improve visibility and make moving around your house easier. You can also install motion-detecting lights that turn on automatically when you enter a room. It is critical to consider the type of bulb and color temperature when selecting lighting for your home. LED bulbs use less energy and last longer than incandescent bulbs, while warm white or daylight bulbs improve visibility and reduce eye strain.

Organize your medication

It is common for us to require multiple medications to manage our health as we age. Keeping track of these medications can be difficult, so they must be properly organized. A pill organizer can help you keep track of your medication schedule and avoid missed doses. Additionally, keep a record of your medications, dosages, and any instructions from your healthcare provider. It is also critical to keep your medication out of the reach of children and pets, and to properly dispose of any expired or unused medication.

In conclusion, implementing these organization and home improvement tips can assist the elderly in living a safer, more comfortable, and independent life. You can maintain your quality of life and continue to enjoy your home for years to come by taking the necessary steps to make your living space more accessible and functional.

Guest Contributor: Chloe Taylor

7 Plumbing Considerations When Building a New Home

RH Business Marketing Solutions

Building a new home can be exciting but it can also be nerve-wracking. From deciding on the floor plan to the paint colors to use in different parts of the house, it can be a lot. However, you need to stay on top of things by being informed. This is especially important for aspects of the home that could cause major restructuring if they needed to be changed. Plumbing is one such aspect of homebuilding. You need to get it right from the very first steps of planning. A poorly working plumbing system can be a nightmare in the future. From blocked drainage to floods and everything in-between, you need to prevent all issues. How can you do this? By bearing the following considerations in mind as you build your home.

Current and Future Plumbing Needs

You may just be a small family now but what about in the future when the members increase? Do you plan on moving to another home? If not, bear in mind what your future plans are. Think of the number of bathrooms you need. How many rooms in the house will need a water supply? The pipes, drain lines, and sewers need to be installed in such a way that they ensure utmost functioning. Outdoor plumbing needs should also be considered and plans made appropriately.


It is good to discuss with your contractor about your plumbing needs at the early stages of planning. Determine how well the desired plumbing will work with the floor plan you choose and make changes if necessary. Good home builders in NC will allow you to alter the floor plan as necessary to suit your plumbing needs.

Required Permits

Plumbing work is governed by strict regulations that differ from one state to the other. In most states, plumbing work will require one to have a permit before commencing operations. Find out what the specific qualifications are in your state. Apply for permits early to allow time for processing.


Talk to your plumbing contractors about whether they can get the permits for you or not. Do not just assume that they will only be frustrated later.

Conveniently Place Plumbing in a Central Location

Placing plumbing fixtures in one place makes it easy to carry out repairs and maintenance. The water heater, sump pit, sewage ejector pit, water softener, and main water shut-off valve should be placed in one place. Remember that these are not the most beautiful sights in your house so it is best to keep them hidden. The basement is a perfect location because it has enough space and stays out of sight. If you do not have a basement, a hidden part of the home (such as a utility closet) will work just as fine.

Save Money with Wet Wall Sharing

A wet wall is a side of a room’s walls that houses the water pipes, vent stacks, and sewer lines. Having different rooms share the same wet wall will save you money and time. You will need to buy fewer supplies and put in less work. To achieve this, have kitchens, bathrooms, and laundry rooms share walls.


The materials for constructing a wet wall will differ from those used in making other walls. Having as few wet walls as possible will save you money on these special materials.

Use Quality and Water Saving Materials

Only high-quality materials should be used to install your home’s plumbing system. Find the best quality pipes that will serve you for a long time without requiring repairs.

A leaky tap can cause you to lose gallons of water even if that leakage is only a drop at a time. Invest in high-quality plumbing fixtures that ensure effective water usage and minimal wastage. Consider using low-flow showers, toilets, and sinks. These will reduce water consumption significantly which means lower utility bills. Plus, mother nature will be happy as well.

Keep the Shut Off Valve within Reach

The last thing you want to do is to swim across the basement to shut off the water supply in a flooded home. Hopefully, this will not happen but it is better safe than sorry. Place the shutoff valve near the basement’s entrance or at a location that can be easily accessed from outside. This is to allow easy shutoff if the need ever arises. Shutting the main water supply off quickly when a pipe bursts may save you from property damage worth hundreds of dollars.

Work with a Professional Plumber

You do not want to make the plumbing of your new home a DIY affair. You do not want to risk safety issues with your new home, right? Get a qualified plumber to do all the plumbing work for you. He or she understands the requirements and workmanship best. Offer the best support you can but let the contractor take charge of the entire process.


With these considerations in mind, you will be able to build a home that is not only functional but efficient as well. Your plumbing needs are very crucial and nothing should be left to chance.

Guest Contributor: Elizabeth Howard

Home Improvement Pallet Ideas

RH Business Marketing Solutions

Do you have extra pallets laying around that you don’t know what to do with? Lucky for you, we love DIY pallet projects. There are so many ways to recycle and reuse the pallets to make home decor!

A book shelf is the perfect thing to make with a pallet. Easy, affordable and customizable. You can choose whatever color you’d like to paint it to fit in with the aesthetic of your house!

Pallet bed frames are becoming a huge trend because of how easy it is to get ahold of the materials and how nice it looks. Lots of people love the idea of lighting up underneath their bed. Definitely a DIY money saver since bed frames can get expensive.

Need a spot to hold all of your household tools? A pallet is the perfect thing to use because it doesn’t take up much space, it’s big enough that the tools fit in perfectly and it keeps you more organized with everything in one spot. Not to mention, you can move it around your garage if you need to!

Looking for more decorations for your house? Pallets are perfect because you can accessorize it with almost anything you can think of and it still looks adoable. You can put this inside or outside, the possibilities are endless.

This is the perfect idea for a dog bed. A lot of dogs tear up their dog bed because of the material, but having a wooden base with a pad ontop of the base would probably deter them from ruining it. Plus, it’s a sturdy, reliable bed!

This pallet bar will take a little more effort in the DIY aspect but this would be perfect for an outdoor bar. Not too big, not too small and you can recycle your pallets into this.

Another bar set up, but this one would make a great permnanet bar in your backyard!

This cute pallet cabana can be your spring and summer get away outdoors. Perfect to sit in to read a book, or just enjoy the outdoors without sitting in the sun.

Want a fenced in garden but you don’t know what type of fence? This is perfect because it still allows light through the pallets, and the side of the garden can be endless!

Another fence type of design that allows for all those plant lovers to have a place to plant them!

Lawn furniture can get very expensive, but good thing pallets are very cost effective. This is a perfect way to get more bang for your buck!

Pallets are very durable and sturdy, so this would make the perfect porch swing.

Setting Up A Truck For Your Plumbing Business

RH Business Marketing Solutions

When setting up a truck for your plumbing business, there are a few key things to keep in mind. It's important to have everything you need on hand so that you can be efficient and effective while on the job. Here are some tips for setting up your truck

1. Truck tarps

A truck tarp is an essential piece of equipment for any plumbing business. It's important to have a quality tarp that will protect your truck and its contents from the elements.  Choose a tarp that is made of high-quality materials and is weatherproof. This will ensure that your truck and tools are protected from the elements. You can get custom mesh tarps that have a high level of water and wind resistance. Make sure the tarp is large enough to cover your entire truck. This will keep moisture and dirt from getting into your truck bed and causing damage. Look for a tarp with grommets along the edges. This will make it easier to attach the tarp to your truck. Choose a tarp that is flame resistant. This will help protect your truck in the event of a fire.

2. Ladder rack

A ladder rack is a must-have for any plumbing business. It's important to have a safe place to store your ladders while you're on the job. A ladder rack will keep your ladders safe and secure while you're driving. It's also a great way to organize your truck. You can store all of your tools and supplies in one place. This will make it easier for you to find what you need when you're on the job. Look for a ladder rack that is made of heavy-duty materials. This will ensure that it can withstand the wear and tear of everyday use. Its durable construction will help keep your ladders safe and secure.

3. Toolbox

A toolbox is another essential piece of equipment for any plumbing business. It's important to have a place to store your tools and supplies while you're on the job. A toolbox will keep your tools organized and safe. It's also a great way to keep your truck clean. You can store all of your tools and supplies in one place. This will make it easier for you to find what you need when you're on the job. Look for a toolbox that is made of heavy-duty materials. This will ensure that it can withstand the wear and tear of everyday use. It's also important to choose a toolbox that is waterproof. This will help protect your tools from the elements.

4. Shelving

Shelving is another essential piece of equipment for any plumbing business. It's important to have a place to store your tools and supplies while you're on the job. Shelving will keep your tools organized and safe. It's also a great way to keep your truck clean. You can store all of your tools and supplies in one place. This will make it easier for you to find what you need when you're on the job. Look for shelving that is made of heavy-duty materials. This will ensure that it can withstand the wear and tear of everyday use.

Setting up a truck for your plumbing business is essential for being efficient and effective while on the job. These were some of the most important and essential things to keep in mind when setting up your truck. Make sure you have a quality tarp, ladder rack, toolbox, and shelving to help you keep your truck organized and safe.

How to Become Cash Flow Positive

RH Business Marketing Solutions

Cash flow is the lifeblood of your business. Without a steady cash flow, you could be forced to shut down in a matter of months. You might have a product or service that customers love and are willing to buy from you. However, if you don't have the cash in place to fund your company's growth and development, this could spell disaster.

Assess Your Monthly Income

Assessing your monthly income will give you an idea of how much money you bring in each month. This is a good starting point for creating a budget since your budget will be based on your income.


Use Net Income instead of Gross Income. Net income is your gross income minus all taxes and other deductions. It's the actual amount of money that goes into your bank account each month, so it's what you should use when calculating your monthly expenses.

Improve Your Income Sources

The first thing you must do to become cash flow positive is to improve your income sources. The easiest way to do this is to get a second job or start your own business. If you don't have the time or know-how to start a business, then working part-time at night or on weekends may be your best bet. Either way, you need to find a way to make more money.

You Can Improve Your Income by Understanding the Rule of 72

As you start to earn more, your financial priority should be to become cash-flow positive. The first step to becoming cash flow positive is understanding the Rule of 72. This rule states that in order to find the number of years required to double your money at a given interest rate, you just divide the interest rate into 72. For example: If you are able to get an 8% return on your investment, then it will take 9 years for your money to double (72/8 = 9).


In order to become cash-flow positive, you need to find an investment vehicle that will give you a positive return and will do so consistently year after year. You also need to understand how compounding works and how it can dramatically increase your wealth over time.

Improve Your Income by Settling Debts

You can also improve your income sources by selling your house; you can sell your house to a company that buys houses in cash or states we buy houses San Antonio TX. If you are cash flow positive, then it may be possible for you to sell your house and use the proceeds from the sale as extra money to pay off debt. You can also choose to rent out your home and downsize into a smaller place while you begin to make an income from your rental property. This will help you build equity in your home and allow you to use that equity as collateral for loans that will help you pay off even more debt.

Track Your Expenses to Create a Budget

If you're like most people, it may be a while since you've looked at your bank statements and credit card bills. So, before we jump into making a budget, let's look at what you've been spending money on over the last few months. This will provide a good starting point for your budget.


Gather all the statements from the past three months—bank and credit card statements. You might be surprised by how much you spend in categories like dining out and groceries. This is especially important if you haven't made a budget before because you can see exactly how much money you're spending and where it's going.

Create an Emergency Fund

Creating an emergency fund is an important step toward becoming cash flow positive. The purpose of an emergency fund is to help you prepare for the unexpected.


The smallest possible starting amount for an emergency fund is $1,000. You can increase the number if you want to, but it is a good place to start. The idea is to keep building this fund so that you have 3-6 months' worth of expenses saved up in case you get laid off or suffer a financial setback.

Create A Retirement Account

You should start saving for retirement as soon as possible because the earlier you start, the more time your money can grow. If you're just starting out and don't have much to save, don't worry – even small contributions will add up if you start early enough.

Get A 401K Retirement Plan

Many employers offer their workers a 401(k) plan, which allows employees to contribute pre-tax money toward their retirement. These plans are often matched, meaning that the employer contributes to the employee's retirement fund as well.


The primary benefit of a 401(k) is the fact that it allows you to take advantage of tax-free growth, meaning you don't have to pay taxes on the money until you withdraw it from the account. In addition, many people like 401(k)s because they allow for automatic deposits into your retirement fund. However, 401(k)s have limited investment options and high administrative costs.

Conclusion

Becoming cash flow positive is an important milestone for any business, but it's not always easy to reach. The first and most important step you can take is to figure out where your business stands now so you have a reference point going forward. Once you know that, you can begin taking steps to get there.

Guest Contributor: Hannah Boothe

8 Essential Gadgets and Tools for Every Home DIY Needs

RH Business Marketing Solutions

Having the right tools and gadgets around your home makes DIY projects and repairs much easier and can even save you time and money. If you are a home DIY enthusiast, there are several tools and gadgets that are essential in your toolbox. Whether you are a beginner or an experienced builder, these eight essential gadgets will help make your home improvement projects easier and less time-consuming.


1. Hammer

A hammer is one of the most versatile tools around and can be used for a variety of tasks, from fixing things to pounding nails. It is a good tool to have around the house in case of a home repair emergency. In addition to being useful in DIY projects, a hammer can be used as a weapon for self-defense.

2. Drill

A Drill is an essential tool for any DIY enthusiast. A drill is useful when making repairs, installing new hardware, and more. A drill can be powered by a battery or an electric motor. Moreover, drill bits come in various shapes and sizes, and you can choose the one that fits your needs depending on the task at hand.

3. Screwdriver

A screwdriver is essential for tightening screws and installing door hinges and locks. You can also use it for removing screws from boards and panels. It can also be used as a stabbing tool when repairing furniture. Moreover, a screwdriver will come in handy when repairing electronics and automobiles. Some screwdrivers also have interchangeable heads that can be used for various tasks.

4. Tape Measure

A tape measure is essential for any DIY project because it allows you to measure distances and widths accurately. You can use it to check the size of furniture pieces before you start assembling them or to mark the location of holes on walls or ceilings for later installation of plumbing or wires.

5. Wrench

A wrench is used to tighten or loosen screws, bolts, and other objects. It is also used to pry open objects. A wrench can be made from many different materials, including metal, plastic, or wood. Wrenches are generally divided into three categories based on the shape of their handle: straight-handled wrenches, ratchet-handled wrenches, and socket wrenches. Their versatility makes them a must-have tool for any home DIY project.

6. Cordless Drill

If you’re a DIYer, then you definitely need a cordless drill. A good cordless drill can do everything from drilling holes in wood to screwing screws into boards. It comes in handy for smaller jobs, and it saves wear and tear on your hands and arms when doing projects that require repetitive use.


7. Lube Shuttle Electric Grease Gun

lube shuttle electric grease gun is a handheld tool that is used to apply lubrication to machinery, equipment, or other objects. It consists of a gun-shaped body that is fitted with a trigger and a nozzle. Lubricant is stored in the body of the gun and is released when the trigger is pulled. This type of grease gun is powered by electricity and is, therefore, suitable for use in areas where there is no access to a power supply. If you need to apply lubrication quickly and efficiently, this tool will come in handy.

8. Jigsaw

A jigsaw is useful when cutting wood into different shapes and sizes. It also has a blade that you can use to remove wood filler or other materials. This tool is helpful for creating a precise finish on projects. Additionally, you can also use a jigsaw to make cuts in metal or other hard materials. Moreover, the blade on a jigsaw can also be sharpened to create precision cuts. As such, a jigsaw can offer many benefits when it comes to crafting and repairing items to add value to your home.


Closing Thoughts

When it comes to DIY projects, having the right tools is essential. These eight items will help you get started on your project and make it easier and faster. If you have any questions about any of these tools, be sure to ask a professional before beginning a project. They can provide guidance and instruction that will help you complete your task successfully. Home improvement projects can be fun, but they're not easy—be sure to use the right tools to make the process easier.

Guest Contributor: Tracie Johnson

8 Reasons You Should Apply for a VA Loan

RH Business Marketing Solutions

Finding an affordable mortgage that you’re eligible for can be challenging, especially in the current home buying market. Despite so many different loan options available, it can be difficult to find the one that’s right for you.

If you’re a veteran or an active-duty military member, then you likely qualify for a VA loan! Even if you qualify for other loan types, if you can apply for and benefit from a VA cash-out refinance loan, then it’s definitely worth your time. In many situations, VA loans are the best option available and if you glance at the eight reasons below, you’ll quickly understand why.

8 Reasons You Should Apply for a VA Loan

#1. No Down Payment

While other mortgages will require a down payment of anywhere between 3.5% to 20%, a VA loan does not require a down payment. For many people, providing a down payment is one of the biggest obstacles in buying a house. You need to come up with a large sum of money before you can benefit from the loan and in many cases, this is very difficult.

With a VA loan, you won’t have to scrounge up every last penny you’ve saved in order to put down a down payment. Instead, you can benefit from the loan without this obstacle.

#2. No Minimum Credit Score

Another major challenge for potential homeowners is having a high enough credit score to be approved for a loan. While conventional mortgage loans have a minimum score of 620, FHA loans set their minimum to 580. Many lenders raise their minimum score requirement to avoid risky investments.

In many cases, you may be asked to show a credit score of 680 or higher which makes it difficult for buyers.

When it comes to VA loans there is no minimum score requirement. This being said, some lenders may still request a copy of your credit score in order to assess how much of a risk you are. Because of this, it’s recommended you have a score of 580 or more, though it is not an eligibility requirement.

The VA program will look at your credit history for the last year, so it’s important you haven’t filed for bankruptcy or had a collection marked on your credit score. As long as you have relatively good payback standings and haven’t had any problems, you’ll be good.

#3. Relaxed Debt to Income Ratio

Your debt to income (DTI) ratio often plays a huge role in the determining of your mortgage. For most conventional loans, this ratio is capped at 36%. For VA loans, however, it’s around 41%. Depending on the lender you contact, they may permit a higher ratio, though you shouldn’t always rely on this. 

#4. No Mortgage Insurance Requirement

Most mortgages will require you to get private mortgage insurance. The cost for this is added on top of your mortgage payment and is often raised if you’re unable to provide a 20% down payment. This makes paying for a mortgage much more expensive. 

While not all conventional loans require private mortgage insurance, all FHA mortgages require it. When it comes to VA loans, however, private mortgage insurance is never required!

As VA loans are backed by the government, lenders don’t require you to pay for private mortgage insurance in addition to your regular mortgage payments. All the money you would have otherwise spent on insurance can go directly into paying off your loan, saving you thousands of dollars.

#5. Lower Interest Rates

Mortgages typically have fairly high interest rates, especially if you don’t have an excellent credit score. While refinancing may help you switch to a loan with a lower interest rate, you won’t be able to do this right away and you’ll still lose quite a bit of money simply by having to pay so much in interest.

VA loans normally have lower interest rates than other mortgage types. This is again due to the loan being backed by the federal government.

While the average interest rate for conventional loans is anywhere between 3.5% to 4.5%, a high VA loan interest will hover around 3.5%. Of course, this will vary from lender to lender, but on average, you’ll have lower interest rates with a VA loan than you would with another type of loan.

#6. No Prepayment Penalty

In some cases, lenders will require you to pay an extra fee if you are able or willing to pay off your mortgage before the term ends. This can be discouraging for those who want to either refinance or pay in full for their loan.

If you are able or willing to pay off your mortgage in full, a VA loan will not penalize you.

#7. Easier Qualification

Qualifying for a mortgage can be a difficult and long process. You’ll be asked to provide multiple documents and even if you do, you may still be denied. Even pre approval may be revoked and you’ll find yourself back at square one.

VA loans are much easier to qualify for. Eligibility requirements can be found on the VA website along with more helpful information about applying for a certificate of eligibility and what to do if you don’t meet the requirements. There’s also a phone number provided at the bottom if you have any additional questions or need some extra assistance.

#8. Easy Refinance

If you’ve previously taken out another type of loan, VA loans can be used to refinance your current loans. When you refinance a previous loan into a VA loan, you’ll benefit from all the advantages mentioned above and won’t have to worry about managing multiple loan types.

Conclusion

VA loans are there to help former and active-duty military members. If you qualify, it’s certainly worthwhile to look into the option and take advantage of it. Even if you could easily qualify for a conventional loan, VA loans come with so many other benefits that it makes the most sense for you to take advantage of it anyway.

How to Properly Maintain Your Tankless Water Heater

RH Business Marketing Solutions

It’s always a good idea to learn how to maintain everyday appliances. Not only will you be able to get your appliance up and working quickly, but you’ll also save the money you would otherwise spend on hiring a professional. Of course, you will likely need help with major issues – but understanding your appliances means that when it comes to easy-to-fix problems, you’ll be able to handle them yourself.

This theory is also true for your tankless water heater. While water heaters may seem like a step too far when it comes to doing your own maintenance work, they’re not all that complicated to handle. 

If you’re wondering how you should go about maintaining your tankless water heater, you’re in the right place. Here are some tips you should keep in mind. 

Clean the Fan and Motor

The fan and motor of your tankless water heater should be clear of dust and dirt. You can clean these parts using pressurized or compressed air, which also allows you to get the dirt out of all the tiny crevices. This is one of the easiest parts of maintaining your water heater and should ideally be done every few months. 

However, depending on where you live and where your water heater is installed, you may have to clean it more often – it all depends on how much debris your water heater is exposed to. 

Flush Your Heater

You will need to flush your water heater at least once a year. Flushing the heater essentially means removing the mineral build-up from the inside of your appliance. If left unattended, this build-up can damage the walls of your heater and affect its lifespan and ability to function. 

Though flushing (also known as descaling) your water heater may seem complicated, it’s actually pretty straightforward. As explained by Sacramento-based plumbers, the tankless descaling procedure should be handled properly, so it’s best to have professionals inspect your heater before problems escalate. However, if you’re up for it, you can attempt to flush your heater yourself with the  steps below:

  • Turn off the power, whether that means turning off the gas or the circuit breaker.

  • Close all the water valves so that no water will enter or exit your heater during the procedure. There will usually be three valves for you to turn off. 

  • Remove the purge port valve caps. The purge valves help control the pressure in your heater, and their handles are T-shaped. When removing these valve caps, make sure to do so slowly and carefully so that the pressure can be relieved gradually without the hot water burning you. 

  • Attach hosing lines to each of the valves (as mentioned above, there are generally 3 valves to a tankless water heater)

  • Open the purge valves. 

  • Add descaling solution into your water heater. Alternatively, if you don’t want to use chemicals inside your water heater, you can use pure white vinegar as a natural alternative instead. You’ll need about 2.5 gallons of vinegar for a standard water heater, though this amount will change depending on the size of your appliance. 

  • Check the water heater manual for instructions on how to flush your appliance. Once you’re done flushing it, you will also need to drain it properly, and the procedure for this step will also be included in the manual. If you cannot find your manual, check to see if there’s a digital version you can reference instead. 

  • Once flushing and draining are complete, close the port valves, disconnect the hosing lines, and reseal the purge valves using the port caps you removed. 

  • Restart your water heater by turning the water valves back on and turning on the power. Don’t be alarmed if it takes a few moments before water starts flowing through your heater – the pipes will first expel the air within them before the water starts flowing properly once again. However, your water heater should be back to normal within a couple of minutes. 

Clean the Filters

Aside from the fan and motors, you will also need to regularly clean both your water heater’s air and water filters.

For the air filter, you will first need to detach it from the water heater. Once it’s removed, you can then use a soap and water cleaning solution and a soft brush to clean the filter. Clean it thoroughly to ensure there is no dirt or debris obstructing airflow, then rinse it well and let it dry before reattaching it to the water filter. 

The water filter in your water heater is essentially a screen that is meant to trap any sediment in the water so that the water you use is as clean as possible. However, this sediment will need to be cleaned from the filter regularly – a built-up will prevent the filter from doing its job and will prevent it from working correctly. 

To clean the filter in your tankless heater, you will first need to remove the filter. However, make sure the water is turned off before you remove it to reduce the risk of being singed by the hot water. Once it’s removed, clean the filter using the same water and soap solution you use for the air filter. 

Once clean, wipe down the water filter and let it dry before returning it to your water heater. 

Clean the Burners and Other Key Elements of Your Gas Heater

If you’ve got a gas tankless water heater, you’ll need to ensure that all the “control” components are working properly. This means ensuring there’s no dust or dirt around the burners and also making sure that the control compartments and air passages are completely clean. 

If these elements are not clean, you risk your water heater suffering from a major failure. Ideally, you should do this at least once a year. 

When maintaining your tankless water heater, you should also consider just giving the outside of your tank a quick wipe. This will make sure that the outside looks just as good as the inside does – and as an added advantage, you’ll have a visual confirmation that you’ve finished cleaning (and you can also use the external appearance of the tank to decide when it needs to be maintained again).

That said, keep in mind that not everyone should or is comfortable handling their tankless water heater maintenance themselves. If you’re worried about your handyman skills, a bit concerned about your safety, or simply have a major water heater issue to deal with, you should always be open to contacting a professional. After all, a professional will know exactly what they’re doing, and there’s a lower chance you’ll lose time and money over a mistake, which is always a positive!

Useful Boat Plumbing Maintenance Tips From the Pros

RH Business Marketing Solutions

Owning a boat is a wonderful luxury and not something to be taken for granted. There are many skills you’ll need to master to help take care of your precious investment, none more important than learning the basics of boat plumbing maintenance. Unless you leave your boat at a full-service marina, you will be unable to get away with owning a boat without learning how to take care of the plumbing. The following are some of the most important tips to keep in mind about your boat and will help you safeguard it for many years to come.

Water Tanks

It can be tricky to keep freshwater tanks on boats. Sure, the water is fine for boiling in a kettle to make tea or coffee, but they aren’t safe enough to drink as is. Also, large water tanks can be a liability when not cared for properly. It’s recommended that you don’t buy gigantic five-liter reusable water carriers and, instead, simply invest in smaller vessels. In terms of drinking water: just buy bottled water and bring it aboard for the crew and guests. If you must buy a water tank, then invest in something made of stainless steel, fiberglass, or even plastic since the flexibility is bound to help. 

Contaminated Water System

If you suspect that your water may have been contaminated, you will need to replace all the pipes, and maybe even the tank you have aboard. In this case, this is a fairly serious intervention that you shouldn’t attempt on your own. The local plumbers at a reliable boat repair shop in San Francisco recommend finding professionals in your area to consult regularly for maintenance. When pipes get contaminated with fungus or algae growth, it can be incredibly dangerous to your health, and the system would need to be sterilized completely by the pros moving forward.

Basic Troubleshooting

While water pumps are fairly resilient devices and can last for years with minimal trouble, things can go bad at the turn of a dime. For starters, you definitely have a filter installed in the system ahead of the pump, since that will ensure their longevity. In addition, you need to check on the wiring and problems in the electric supply that will end up affecting the lifespan of your plumbing. People don’t realize that the boat’s electricity can affect the capacity of the plumbing, which is a big mistake. 

Finally, if you see a leak from the tank, try to get it fixed straight away. These are fairly common and can strike at any moment. For this reason, stainless steel tanks could be your best bet in preventing holes from burrowing into your plumbing. For boats with more complex systems such as pressurized hot and cold water, or pressure valves, regular maintenance checks performed by professionals is a good way of protecting yourself from further trouble down the road.

While maintaining the plumbing on your boat is usually a lot easier than maintaining the plumbing at your home, it’s still useful to secure the assistance of a pro from time to time. If you are passionate about learning DIY techniques, then read up on a few tips available through your local boating association - just make sure not to skimp and save on the bigger expenses.

6 Things To Do If You Suffered Water Damage To Your Home

RH Business Marketing Solutions

If your home has been flooded or you’ve had a pipe burst, you may be dealing with water damage. While this can be a stressful and overwhelming experience, it’s important to take quick action to mitigate the damage and start the cleanup process.

Here are six things you should do if you’ve suffered water damage in your home:

1. Identify the cause of the water damage

The first step is to determine what caused the water damage. If it was due to a natural disaster like a flood or hurricane, you will need to take special precautions to ensure your home is safe and secure. If the damage was caused by a mechanical malfunction like a burst water pipe or plumbing leak, you will need to have the repairs made as soon as possible to prevent further damage. If the water damage was caused by an appliance, such as a washing machine or dishwasher, make sure to have it repaired or replaced before using it again. It is essential that you identify what caused the water damage so that you can be sure to avoid any future flooding or leaks and you can determine if the damage is covered by your insurance.

2. Remove all wet items

If you suffer water damage to your home, the first thing you should do is remove all wet items. This includes carpets, rugs, drapes, clothing, and anything else that has been soaked by the water. All of these items can harbor mold and mildew, which can cause serious health problems. Additionally, wet items can damage floors and walls if they are not removed quickly.


3. Start the cleanup process

The next step is to begin the cleanup process. This includes removing all of the wet items from your home and beginning the drying process. You will need to use fans and dehumidifiers to help remove the moisture from the air and prevent the growth of mold and mildew. Here are other important steps:

A. Turn Off the Power. If there is standing water in your home, it’s important to turn off the power to avoid the risk of electrocution. Locate your breaker box and flip the switch for any circuits that may be affected by the water. If you can’t access your breaker box or you suspect that the floodwater has reached it, you should call your utility company to have the power shut off at the street.

B. Remove Excess Water. Once the power is off, you can start removing excess water from your home. If there is only a small amount of water, you may be able to use a wet/dry vacuum to remove it. For larger amounts of water, you’ll need to use a sump pump or rent a commercial wet vac.

C. Clean and Disinfect. Any surfaces that have been affected by floodwater should be cleaned and disinfected as soon as possible. This will help prevent the growth of mold and bacteria. Use a mild soap and warm water for cleaning, then follow up with a disinfectant.

D. Dry Out the Affected Area. Once you’ve removed the water and cleaned the affected area, it’s important to dry it out as quickly as possible. This can be done with fans, dehumidifiers, or even opening up windows on a sunny day.

E. Inspect for Damage. After the area has been dried out, you can begin inspecting for damage. Look for signs of water damage on walls, ceilings, floors, and any other areas that may have been affected. If you find any damage, you should make note of it so you can repair it later.

4. Call Your Insurance Company

Once you know what has caused the water damage, you will need to contact your insurance company and let them know about the situation. If you have homeowners insurance, you should call your agent as soon as possible to start the claims process. They will be able to advise you on what steps to take next and how to document the damage for reimbursement. They will also be able to help you file a claim and get the reimbursement you deserve.

5. Throw away any damaged items

Once you have removed all of the wet items from your home, you will need to throw away anything that has been damaged by the water. This includes carpeting, furniture, clothing, electronics, and anything else that may have been damaged.

6. Prevent future water damage

The last step is to take steps to prevent future water damage from occurring. This includes fixing any leaks or burst pipes, installing a sump pump, and making sure your gutters are clear. By taking these precautions, you can help keep your home safe and dry in the future.

Taking quick action after water damage can help reduce the amount of damage and make the cleanup process easier. By following these six steps, you can start getting your home back in order after a flood or burst pipe.