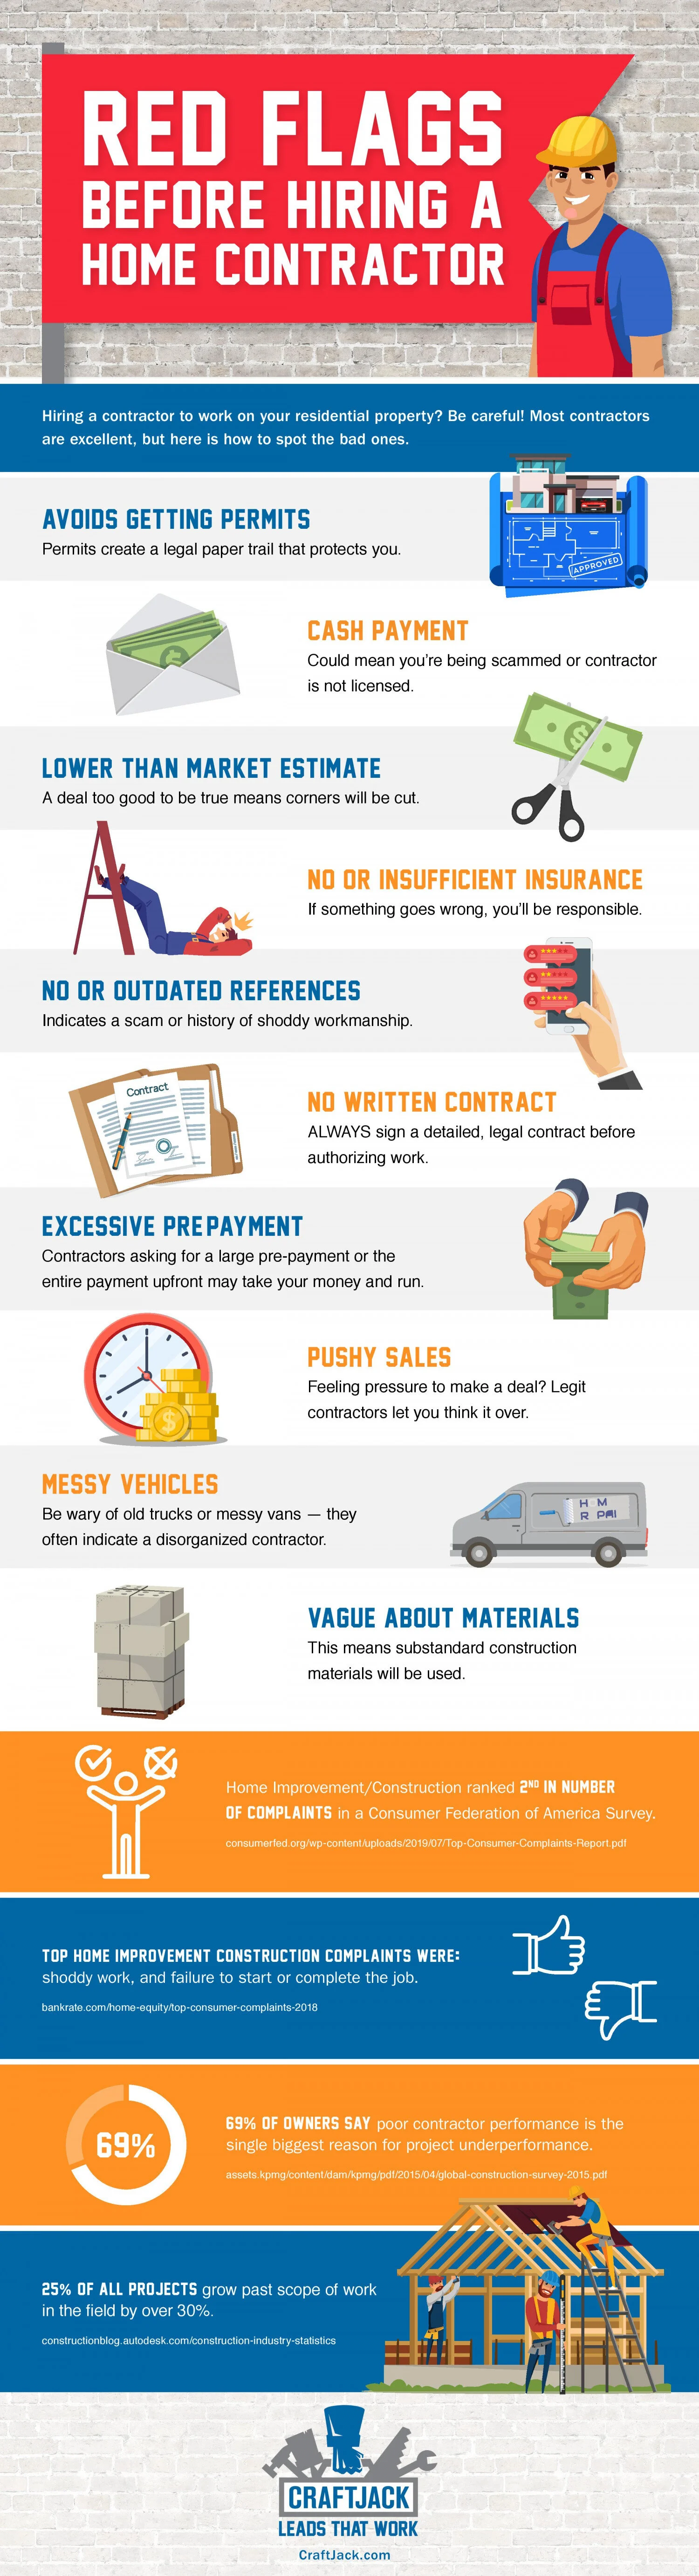
Red Flags Before Hiring A Home Contractor
RH Business Marketing Solutions
Guest Contributor: craftjack.com
Use the form on the right to contact us.
Day or Night, we are here to serve you. Leave your plumbing problem to us.
Tinley Park, IL
(708)845-7922
Kevinszabojrplumbing@yahoo.com
Residential and Commercial plumbers and plumbing contractors available in Orland Park, Tinley Park, Oak Lawn, Palos Heights, Midlothian, Oak Forest, Homer Glen, Mokena, Frankfort, and the surrounding Chicago South Suburbs. Emergency plumbers.
Kevin Szabo Jr Plumbing is Tinley Park, Orland Park, Oak Forest, Midlothian, Orland Hill, Homer Glen, Mokena, Frankfort, Crestwood, Palos Heights, Oak Lawn, local plumber. Read our blog for advice, tips, a good laugh, and basic home improvement.
**We are moving our old blog to our new and improved website. Too see all our posts visit kevinszabojrplumbing.blogspot.com
Guest Contributor: craftjack.com
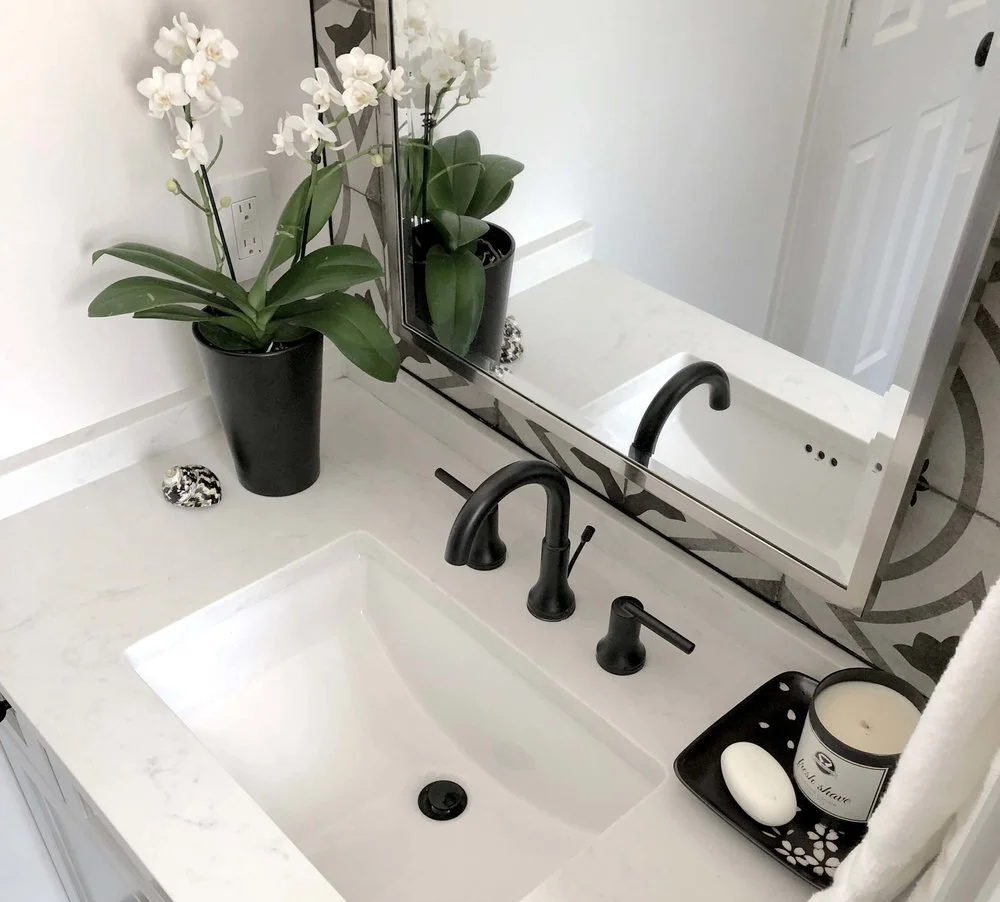
How To Select The Perfect Bathroom Fixtures For Your Style
Bathroom fixtures do far more than accessorize. Used well, they make the bathroom design feel cohesive and finished; used poorly, they make it look mismatched and off. This is exactly why many homeowners get overwhelmed in the design process of a new bath: the potential for making or breaking a room’s whole vibe can feel like a lot of pressure. How do you pick pieces you’ll love for the long haul? What’s the key to avoiding choices you’ll regret later? Whether you’re building a new home, renovating your bathroom or for any other reason to wander through the maze of bathroom fixture possibilities, here’s a guide for how to select the right products for you.
Start with your budget. Knowing what you can afford to spend sets clear limits for your fixture shopping. For this reason, take time upfront, before purchasing anything, to set a budget for your bathroom project. If nothing else, a budget narrows your world of options, simplifying your search.
Pick a finish. Once you know your price range for fixtures, it’s time to start exploring. Right away, you’ll notice there are a lot of finishes available, such as brass, nickel, chrome, bronze, black, copper, stainless steel, polished, satin and antiqued. To know which direction you want to go, you can browse magazines, the Internet, model homes or the bathrooms of friends. You can also take into account what finishes are in the rest of your home. If all your other household fixtures are chrome, for example, you may wish to stay with that theme. That said, feel free to mix metals for a look that’s all your own, too. If you’re totally unsure which direction to go, timeless choices include bronze and brass or brushed nickel.
Select a style. Even once you’ve selected a finish, your decision-making isn’t done. Search through only matte black fixtures, for example, and you’ll still have to decide among modern, traditional, industrial and more. To know which style to go with, consider the rest of your home and what aesthetic you lean towards: classic and traditional, modern and minimal, items with ornate detail, or something else? Identifying what you like can help guide you to the fixtures that fit your taste.
Consider sustainability. If possible, opt for environmentally friendly, non-toxic materials. While any fixtures sold at a normal U.S. retailer need to be certified free of lead, for example, that’s not to say all faucets and fixtures are safe. Always look for the National Sanitation Foundation (NSF) certification of safety, and, if you’re interested in conserving water, look for products with WaterSense® labels.
Compare favorites. At this point, you should have whittled down your options to a manageable number, making your decisions a bit simpler. Order samples if possible, so you can touch materials, hold them up in your space and get a good sense of how they’ll work. You could also make mood boards or mockups to help you visualize potential the project and any tweaks to make it just right. From here, you should be able to gain confidence in what fixtures will fit your bathroom.
Make your selections. Last but not least, order your products. Be sure not to overlook anything important, such as the sink drain, plumbing valves or the toilet lever. Likewise, don’t forget a toilet paper holder, if you need one, and a towel bar and/or robe hooks; important accessories that serve a purpose and tie the space together Other possibilities worth exploring are mirrors, light sconces or an exhaust fan, as well as pendant and recessed lights.
Outfitting a bathroom with beautiful fixtures doesn’t have to be daunting. By following the six steps above, you can save yourself time and headaches in making the best selections for you. Invest a little thought and planning now, so you can choose fixtures you’ll love both now and well into the future.
AUTHOR BIO: Carmen Fiordirosa is Vice President of Marketing for Gerber, a manufacturer of high-quality kitchen and bathroom plumbing products. Fiordirosa, who has more than 18 years of experience in the marketing industry, focuses on earning the trust of trade professionals and homeowners alike who find value in products that have both style and substance.
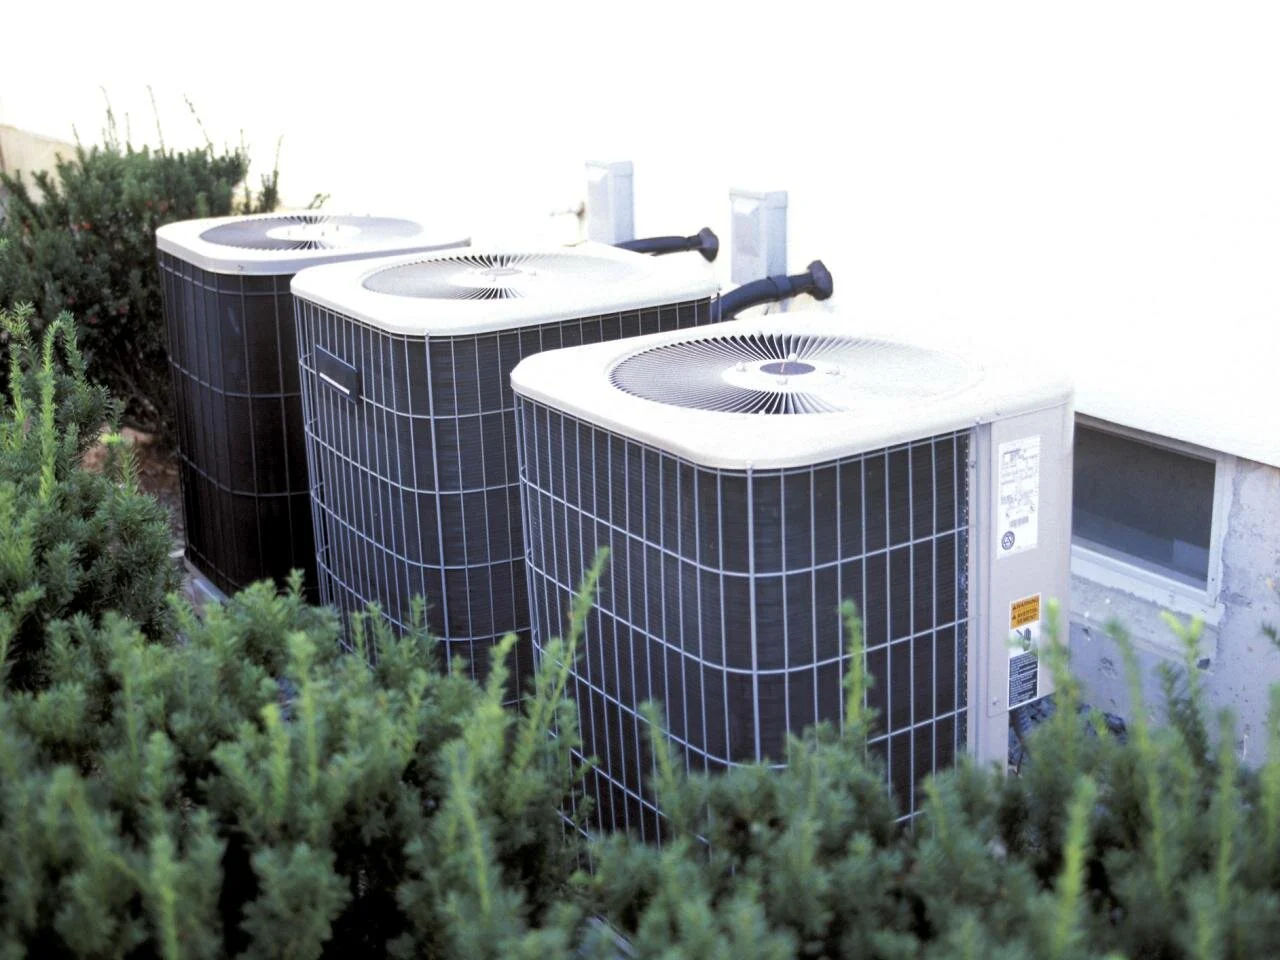
If you’re still relying on an aging HVAC system to keep everyone comfortable in the summer and winter, you deserve a pat on the back for keeping it functioning after all these years.
However, you might want to consider shopping for a new one, especially if your HVAC system has been in use for a decade or longer.
Ask home and commercial HVAC experts, and they will likely recommend upgrading to a new HVAC system because of the many benefits that come with it.
Here are the benefits of upgrading to a new HVAC system.
1. More Energy Savings
HVAC systems tend to become less efficient as they age, even with regular maintenance.
There’s also the fact that the SEER (Seasonal Energy Efficiency Ratio) of an older HVAC model is typically lower than that of a new one.
Older systems have a SEER of 8 to 10, while the SEER of newer units could be as high as 25.
Since a higher SEER translates to better efficiency, you can have much more significant energy savings if you switch to a new HVAC system.
As for the heating part of the equation, newer HVAC systems operate on 90% annual fuel utilization efficiency (AFUE), which is 25% higher than the 65% of older HVAC systems. As with the SEER for cooling, a higher AFUE for heating systems indicates much better efficiency.
2. Improved Indoor Comfort
Newer, high-efficiency HVAC systems are typically equipped with variable speed motors, which are instrumental in keeping indoor temperatures constant, and therefore, comfortable.
Unlike the traditional single speed motors of older HVAC systems, variable speed motors don’t run at full blast then shut down upon reaching the desired temperature.
Instead, HVAC systems with variable speed motors run longer but at lower speeds, which results in better humidity control and improved indoor comfort.
3. Complete Climate Control
Programmable thermostats are great, and it would be great if you could buy one that’s compatible with your aging HVAC system.
But that’s just the thing: there is a distinct possibility that a smart thermostat won’t have compatibility with old HVAC systems.
On the other hand, most new systems already come with a programmable thermostat. For those that don’t, their chances of being compatible with a separate smart thermostat are still much better.
With a smart thermostat working in conjunction with a new HVAC system, you will have complete climate control, even when you’re away.
Newer HVAC systems typically come equipped with programmable thermostats, which allow you to completely control the temperature in your home even when you’re away.
4. More Peace and Quiet
No matter how well-maintained, an HVAC system with plenty of years behind it will always tend to make a lot of noise.
With a newer, high-efficiency system, you’re guaranteed a much quieter operation. That’s because newer systems are equipped with more advanced noise-reduction technologies.
Newer models have sound-absorbing material, better fan design, well-insulated compressors, and variable-speed blower fans that help keep the noise down.
5. Lower Repair Costs
Your older HVAC system may still be operating, but how many times have you had it repaired in the last few years?
Aging HVAC systems require more frequent attention, which translates to higher maintenance and repair costs.
With a new HVAC system, you won’t have to spend much money on repairs because it isn't likely to break down during its first few years in operation.
And if it does break down in its first couple of years, remember that all parts and the entire unit are still under warranty. You won’t have to spend anything at all.
6. More Environment-Friendly
The higher energy efficiency of new HVAC systems makes them so much friendlier to the environment.
Newer systems also no longer use R-22, better known as Freon, a common refrigerant in older units that has already been phased out for compounding the depletion of the Earth's ozone layer.
When you upgrade your HVAC system, trust only professional HVAC technicians to install it to make sure that it will perform optimally and allow you to enjoy all its benefits for years to come.
Guest Contributor: Sara Olsen
What are the types of Home Drainage Systems?
Understanding the drainage system of your house can make all the difference when it comes to waterproofing or protecting your house foundation from water damages. There are many different types of home drainage systems and their installation depends on the geology and the topography of the landscape.
Whether you are building a new house or are dealing with repair work of the previously installed drainage system, it is imperative to understand the basics of it. Any damages to this system can seriously affect the structural integrity of your house.
The real estate value of a property is also very much associated with the quality and current state of the drainage system. Water damages are expensive to deal with so, logically, no potential buyer would pay you the price for a house that is at risk.
Here is a brief guide about some of the different types of home drainage systems. Learn more to become a proactive homeowner and protect your property and loved ones from water woes.
Surface Drainage System
The surface drainage system is one of the simplest systems. It basically contains a few ground-level drains that are connected. Trenches are dug in parallel patterns. The ditches are shallow and they act as canals so that water can run through them. The run-off water is directed away from the house into a larger drain which is generally made up of PVC.
If the water keeps flowing in a directed manner, a surface drainage system effectively prevents water pooling or flooding in unwanted areas. If you are living in flat areas, this system is a necessity. The areas with high precipitation rates need adequate channels on the ground that can take away excess water.
It is also used around buildings, driveways, or walkways to prevent water pooling. Most of the residential properties built at ground level have a surface drainage system.
Sub-Surface Drainage System
As the name suggests, the pipes for the sub-surface drainage system are built beneath the top layer of soil. This system is very effective in removing excess water from the root level that has become waterlogged.
Also known as French drains, this system consists of perforated PVC piping which is installed in deep trenches. The trenches are properly covered with gravel. These deep ground ditches and pipes are connected with a large collector drain that aggregated the water coming from these channels.
In most cases, a sump pump is also installed with this system to ensure adequate water flow. It becomes a necessity when there is the fear of waterlogging damage to the plants. For most homeowners, this is an expensive proposition but is indispensable when they want to maintain healthy front and backyards.
Slope Drainage System
A slope drainage system harnesses the power of gravity and the incline of slop to carry away the excess water. This system works well for the properties that are situated at higher altitudes as compared to the main drainage lines. The greater the altitude difference is, the better this system works.
A pipe is installed that will gradually lead to a decline and the force of gravity will keep the water flowing towards the lower pipes. Plastic and metal are the two of the most common materials used for drainage pipes. All such pipes must be covered with durable grates to prevent harming anyone.
Downspout and Gutter Drainage System
The gutter drainage system is synonymous with the drainage system for most Americans. Downspouts make a channel of pipes that collects water from roof gutters and take it away from the property. It directs water away from the house to prevent water pooling in the foundation.
A downspout generally ends on a sloped structure to ensure the steady flow of water by the pull of gravity. The shapes and materials of downspout vary greatly. They could be rectangular or round and made up of steel, aluminum, or PVC.
Downspouts are designed in such a way that they are not visible from the front and thus do not affect the curb appeal of the property. Some modern house designers utilize these systems in such a manner that they become a part of the house exterior design.
A residential property can have more than one drainage system installed. Some of them work to carry away water from roofs while others are designed to take water from bathrooms and kitchens.
Components of a Drainage System
A typical homeowner knows the plumbing and drainage system of their house as far as the kitchen sink goes. Understanding the parts of the drainage system can help you identify the issues sooner rather than later. When you notice any problem in the drainage system, check all of the following components.
Internal Pipe System
It’s the network of pipes that are running throughout your home. These could be made up of cement, metal, clay, or steel. The pipelines are supposed to last as long as your home.
Vents
Vents are a very important part of the drainage system as they allow the air to enter the drains. They are generally open up on the roof. As the air passes through the vents in the drainage system, the unclean water is pulled through it without the constant need of siphoning.
Traps
As the name suggests, traps are designed and installed to capture any large-sized madrterials before they enter the drainage system. The most commonly known trap is installed in the sink. Although most of them are not so obvious, almost all of the plumbing fixtures have some kind of trap to keep the water flowing without obstructions. Keep the traps clean to prevent buildup and clogging.
Interceptors
Interceptors are installed in the drainage system to prevent the mixing of normal and hazardous wastes. Any damages to the interceptors can seriously affect the water drainage system of your area. If you observe any fishy smells which don’t seem to go away, get the interceptors checked.
Shut Off Valves
This is one of the most important things you should know about the drainage system of your house. If something goes wrong with the system, shut off these valves to prevent water damages.
How to Maintain the Drainage System of Your House?
The best approach to keep a healthy drainage system in your home is through prevention. Keep the drains clean and see what’s going down them. Keep your roof clean to prevent gutter clogs and subsequent downspout damages. If possible, use drain guards on every single drain.
For water flooding emergencies, keep the contact details of a reliable plumbing company on your sped dial.
Guest Contributor: Adele Smith
At one point or another, nearly every homeowner has the urge to remodel their kitchen. After so many years of the same old wooden cabinets and dull drawer pulls, they feel it’s time to give the space a facelift. If you’ve found yourself swooning over marble countertops and farmhouse sinks, you may be itching to start renovating.
But is now the best time for a kitchen remodel? Well, the answer will depend on a few different factors.
Study Your Schedule
For many homeowners, planning a kitchen remodel is especially difficult during the family’s busy season. Whether it be high school sports, band camp, or a new commitment at work, your schedule will determine whether you have time to take on another responsibility — especially one as big as remodeling your kitchen.
Therefore, it may be best to wait until you have a few weeks or months with fewer activities on your schedule.
Estimate Project Length
Full kitchen renovations that include changes in plumbing, electrical wiring, and other complex components may take anywhere from three to five months to complete.
On the other hand, if you’re only planning to switch out the sink, paint the cabinets, or add a backsplash, the project might only last a few days or weeks.
Before committing to a remodel, estimate your project length and timeline so you can prepare and plan accordingly.
Consider Special Events
You may also want to consider holidays and special events when planning your kitchen remodel. Is there a birthday, graduation, or anniversary coming up soon? If so, postponing the remodel may be wise, especially if you want to prepare dinner for these occasions.
In most cases, it will be easier to delay the renovation than to reschedule a party or reunion.
Before You Move
If you’re planning on selling your home and moving soon, now may be a good time to remodel. Most projects pay back 90% of the initial investment because kitchens are such a selling point for buyers.
In fact, a remodel may even help you sell your home faster, especially if you update appliances and choose an eye-catching, modern design.
Remodeling With the Seasons
While you can certainly do kitchen remodeling any time of the year, some seasons are more conducive to this home improvement project.
Depending on where you live, it may be easier on the family to begin a remodel in the summer while you’re away on vacation. However, the job can cost more during spring and early summer. Weigh your priorities and options wisely to make the best choice for you and your family.
Planning Ahead
When it comes to remodeling your home, there is no such thing as planning too far in advance. If you determine that now is not the best time to remodel, start saving up and preparing for your future project. Collect materials, buy supplies, and make a Pinterest board to inspire your reno ideas.
The earlier you begin, the smoother the project will go. Plus, you’ll be overjoyed when you finally get to cook in the kitchen you dreamed about for the past 10 months.
Guest Contributor: Rose Morrison
Osteria Ottimo is one of the BEST places to sit down and get an Italian meal! They offer dining indoor and outdoors, due to covid, but reservations must be made and kept at a 2 hour limit. They serve pasta, pizza, and handcrafted drinks. “You’ve never tasted Italian food like this before: pasta made by hand every morning, fruits and veggies sourced from a local farmer just for us, fresh fish flown in daily and our meats aged to mouth-watering perfection. We have taken old school Italian and added a modern twist..” (http://ottimoorland.com/home-2/). Located at 16111 S LaGrange Rd Orland Park, IL 60467, you won’t go wrong with eating here!
Noteworthy Foods:
Grilled Calamari
Beef Tenderloin
Tiramisu
“This place is the shiznit. This was one of my Mom's favorite restaurants when she was alive... and we've kept on eating here because it's so sublime.
They're open during COVID and do a fantastic job of spacing out the tables. If you're lucky you will get Ephraim (or maybe Efraim?) as your waiter. We've been lucky enough to get him the last few times we've been in and he's just the nicest guy. He is personable, available, but doesn't hover and get annoying.
Food is sublime. Everything is good. Seriously... try the pork chop, any of the pasta, the risotto is incredible, the salads, and try to not eat like 3 loaves of that bread. Drinks are stiff and reasonably priced. Great wine list-
Just a great place in Orland. We will be back again and again.” - Matt G. via Yelp.com
“We eat here every now and then , never had a problem. My wife loves seafood and she taves about the "Frutti de mer". Its loaded with mussels and clams, jumbo shrimp , calamri in a spicy cherry tomato sauce . My wife opined this is the best seafood ever!!” - Victor N. via Yelp.com
“Wow....can you say great Italian food in the South Suburbs!!! Cozy place to enjoy some amazing drinks and food! Calamari was fresh and plentiful, bread was fresh and kept coming, glass was never empty .... oh then there's the butter!! I asked for an off menu item, and NO problem, they made it for me!! Portions were great and oh that Martini
Waiter was attentive and service was great!!
I'll definitely be back!!! My favorite new cozy spot for a hearty Italian meal!!” - Priscilia R. via Yelp.com
Photo Source: Yelp.com
Are you looking for a new local taco and tequila bar? Look no further than Mama Maria’s in Orland Park! Located at 16117 S Lagrange Rd Orland Park, IL 60467, they have the best food, margaritas and a wonderful atmosphere. There's a variety of food to choose from, and even have vegetarian options as well. The staff is friendly and prompt, and the service is great!
Noteworthy Food:
Chicken Taquitos
Belly Taco
Guacamole
Shrimp Tacos
“Very cute and cozy restaurant with great food and great service. The guacamole here is awesome and the belly taco is delicious. I really enjoyed the chicken enchiladas as well! Great vibe and atmosphere charming date spot and great drink and margarita selection! Will definitely come back!” - Nick R. via Yelp.com
“This is my favorite place to come to for margaritas and tacos! Hands down the best margaritas I've ever had! Please do yourself a favor and try! Fyi.. Try your taco in a lettuce wrap!! Best one is the Korean BBQ” - Michelle G. via Yelp.com
“The food here ohhh the FOOD, everything is so delicious. my top favorites are always any of the special menu tacos, the Steak is AMAZING and its my top favorite dish. The super steak burrito is also great and filling!
We love the margarita here, my absolutely favorite would be the blueberry basil margarita! they are on the pricy side of things, but i believe its worth it for how good they are!” - Tuan D. via Yelp.com
Photo source: Yelp.com
If allowed by your lease, painting your apartment is a great way for your new apartment to really express your true personality. Not all rooms have to be white, and a little color can liven up any room, be it the bedroom, living room, or kitchen. Outside of making sure your apartment stays clean and uncluttered, a fresh coat of paint serves as one of the most effective ways to truly brighten up any living space. In some cases, changing your room’s color can make the room even look bigger than before!
Now you could always pay some painters to come over and take care of anything, but why not roll up your sleeves and do it yourself (while saving some money)? Painting can be a breeze, so long as you follow these helpful hints.
Choose the Right Color (h2)
Obviously you’ll want to make sure to choose a color that feels warm and comforting, but you’ll probably want to make sure to check with the landlord once you’ve settled on a color. Keep in mind, some colors can actually lower the value of a property, and while you don’t have to worry about such matters as a renter, you’ll probably want to choose a color that won’t make your place harder to rent out when you move on to your next place.
Consider carefully how the color will affect your environment. Some colors can help brighten a room, while others might not quite live up to your expectations. If you’re able to get samples, or just color swatches, put them up to the wall and try to envision it covering the whole space. You might find brown to be a nice, comforting color, for example, but then realize that an entirely brown room might give off a subconscious feel of being “dirty.” You’ll be looking at these walls for your entire time in the apartment, so make sure that it’s a shade you’ll truly enjoy.
Of course, the most important thing is to pick out a paint color that you feel represents your personality. So by all means, paint your walls your favorite color. Just maybe let your landlord know first if your favorite color happens to be neon pink.
Get Your Gear
Now that you have your color picked up, you’ve probably gone and bought at least a few gallons of your preferred shade. Now it’s time to get your gear. You’ll need drop cloths, brushes, rollers, pans for the rollers, and painters tape.
The pans will hold onto small amounts of paint at a time, which you’ll use with your rollers. The brushes will be used to cut in your edges. And of course the paint and drop cloths ensure you don’t get any paint somewhere it doesn’t belong (namely, anywhere that’s not on the walls).
Now it’s time to paint.
Tape, Tape, and Tape Some More
Well not exactly. First, you will want to take your painter’s tape and place it on the wall everywhere there is an edge. Wherever the space you plan to paint meets an area you do not plan to paint, you’ll want to have tape there. That way, if you’re less than exact with your painting, you won’t have to worry about removing excess paint.
It might take a bit of time, but you’ll be glad you did the first time your brushwork slips a little bit. So remember, tape, tape, and tape.
Place More Drop Cloths Than You Think You Need
Once you’ve taped up the whole room, you’ll want to place your drop cloths. Drop cloths are nothing more than cloth tarps that you can place over flooring and furniture that’s near the walls (you should move furniture away from the walls before you start painting, but cover them to be safe).
Drop cloths are essential to the painting process. Or rather, they’re essential to making sure you don’t paint your walls as well as your floors. While painting, you’ll be using a roller for the vast majority of the surface area. Rollers, while great for painting large portions of your wall, also tend to spray out little droplets of paint when you use them. So make sure that you have drop cloths covering, if not the entire floor, at least all the area that is three to four feet away from the wall. After all, you put a lot of thought into how your room was decorated, but you probably didn’t envision flecks of paint all over your furniture when you first moved in.
If you don’t have enough drop cloths to cover the whole floor during the entire paint job, you may move the tarp along the wall as you finish each section. Just remember to always keep the same side on the ground. The surface of your cloth will collect wet paint drops, so flipping it over should be avoided.
Prime, and Then Paint
If you’re painting a white room, you probably can ignore this step. But if not, you’ll want to first paint the room with a primer before getting the full job underway. Primer is usually white, and essentially creates a layer on the wall that will make it easier (once dried, of course) for paint to adhere. It also serves the benefit of making your paint show up better on the wall—if your room is, say, dark blue, that blue can absolutely show through your final paint job if you don’t prime first.
If you decide against primer, you can still get the job done. It’ll just take longer—instead of primer and one or two coats of paint, you’ll find yourself trying to paint four or even five coats just to make sure your color truly shines through.
Cut in Before You Roll
“Cutting in” is what painters refer to as using a standard brush to paint in, by hand, all the spaces along the edges, where you’ve previously placed your tape. Now this process is going to be the most time-consuming part of the whole job. You thankfully don’t need to be too careful here, thanks to your tape, but you’ll be going along the floor, around outlets and window sills and, even more painstakingly, along the area where your wall meets your ceiling.
When cutting in, it’s good to aim to get at least an inch of paint brushed onto the wall, though to be safe you’re better off getting about the width of a standard brush there. When you’re done you’ll have essentially a bunch of “lines” that you can “color in” when you get to rolling.
After you’ve cut in the room, it’s time for the easy part. Taking a roller (with an extension handle), pour paint into your pan, and just roll in the parts you haven’t cut in. You’ll want to roll as close to the edges as possible, but don’t get overzealous—after all, the reason you cut in was to make sure you wouldn’t risk the rollers getting on your molding or ceiling.
Keep a Rag Handy
Throughout this process, make sure to keep a (if possible) slightly damp rag with you at all times. If you ever slip up and paint either molding or flooring that you don’t want painted, you’ll use that rag immediately clean up the paint before it has a chance to set. You hopefully won’t need to use this, but it’s better to be safe than sorry. After all, no one wants paint on their hardwood floors or carpets.
Wait Before Removing Tape
You’ve done it! Your room has been painted! If you feel like you can still see some of the previous color seeping through, you’ll maybe want to go ahead and paint one more coat, but once that’s done you can take in the new look you’ve given your room.
Well, almost. There’s still one more thing left to do. Time to take off that pesky painter’s tape. Peeling it off while the paint remains wet could lead to smudges, smears, or paint getting where it’s not wanted. That’s why it’s best to wait until shortly after the paint has dried to take off the tape.
Peeling the tape off is actually a pretty gratifying feeling—it should come off smoothly, leaving a perfect line between the painted wall and the area the tape was covering. But it’s gratifying for another reason too. Once that’s been done, your new room is officially ready to show off! And nothing beats the satisfaction of transforming your living space in just a handful of short hours.
Guest Contributor: Jeff Good
Things to ask your plumber before a big home renovation
You don't have to be an expert constructor to plan your home renovation. However, you should have basic knowledge and familiarity with systems and installations in your house. The plumbing system in your home is something you need to take with more seriousness. Unless you are a plumber yourself, chances are you are going to need professional advice. And, the only way to properly prepare is to know what things to ask your plumber before a big home renovation. Many questions would require expert answers, from how to move your appliances to estimated costs.
Big home renovation - what to ask your plumber
You are probably already aware that renovation is a challenging project. That's why you need to take time to gather enough helpful information. It's not like building your home from the start, where you have the freedom to do whatever you want. Renovations bring a lot of complexity because you make adjustments to an already established place. A lot of things can go off the plans, and unforeseen situations may occur. The key to success here is to find a professional plumber to answer all your questions and help you prepare.
For nonprofessionals, the home water system might look confusing.
Here you will find a list of questions you should ask your plumber before a big home renovation and a few situations you can face. Whether you are planning to renovate your current home or purchase a new one and make some adjustments, these are some of the essentials you must consider.
The planning phase.
Ask your plumber about permits.
Question about replacing pipes.
Ask about appliances.
Check the required water pressure with your plumber.
Ask what else you should fix.
The planning phase
Whatever you do, it's always better to include a plumber in your planning phase. That way, you will spare yourself from the trouble of having to react on the go.
A professional plumber will be able to point out potential issues that may occur during the renovation.
They will tell you what materials to get and what fixtures you need to resolve.
And this will enable you to calculate your renovation costs more precisely.
And, if there is something that requires a plumber's attention or advice right away, you already have the right man for the job. For example, if you plan to renovate a part of your home to move your old parents in, you will need to check about the adjustments for elderly people. There might be some additional features you will have to plan to install to prevent accidents.
Ask your plumber about permits.
Not everywhere, and not for every renovation, but for some changes, you might need permits. Depending on the range of tasks you are planning to do, a significant modification to your home plumbing will require you to get permits, especially if your water system is connected to the city water supply. And the best person to help you with this is your plumber.
Question about replacing pipes
Not only can a plumber help you inspect your existing pipes, but he can also tell you if you will have to replace them. From experience, they know exactly what is required and what to expect in the future. If there are any repairs or updates that you need to complete before renovation starts, now would be the right time to discuss them. In general, this is a fundamental question to answer for older homes. There are many situations where people don't even realize how old their house or apartment is. More importantly, how old the plumbing systems in their residence are.
Ask about appliances
There are two situations where the advice from your plumber can be quite useful.
Firstly, if you are moving to a new place and want to bring your appliances with you because leaving your brand new expensive dishwasher in an old apartment is out of the question. But, what if it can't fit into a new place. The plumber will help you with this and show what adjustments to make to fit everything in.
Secondly, if you are planning a renovation of your kitchen, for example. This task often includes inspection and remodeling or replacing everything inside your kitchen, including appliances. Especially if you plan to change their position, it's always good to ask your plumber for an opinion. Due to the position of pipes inside walls or the materials you plan to install, expert opinion can save you from unnecessary costs.
During these significant renovation, it’s advisable to keep your belongings safe in a storage unit, away from all the debri and other damage hazards. Once you find the storage provider you like, make sure you implement additional safety measures so you can be sure your appliances and other items are safe and protected until the renovation is complete.
Avoid renovation of your kitchen without a plumber because you can easily make a miscalculation with concealed pipes inside your walls.
Check the required water pressure with your plumber.
Let's say you are planning an expansion of your bathroom. A large bathtub is always a good addition and convenient to have. But, before you start the renovation and installation of such large water consumers, you will have to inspect your water heater and regular water supply.
Everything that requires water depends mostly on your plumbing system's water pressure. This is something plumbers are quite familiar with. So, they can point you in the right direction about what necessary steps you have to take. In some cases, you might need to upgrade your entire system so that everything functions properly. And that can be a considerable investment risk to take without a professional by your side.
You will need a proper solution for the distribution of hot water in your home.
Ask what else you should fix.
A preliminary inspection prior to your upcoming renovation is the right moment to deal with all the repairs. In this situation, your plumber can help you find out if any other issues require your attention. You should check potential leaking problems, old and worn out pipes, water insulation, flood prevention, swimming pool leaks, and other similar things on time. If you don't do it before the renovation is complete, you will end up paying subsequent costs. To avoid this, you want to be sure everything is taken care of before the entire renovation process is complete.
Knowing the things to ask your plumber before a big home renovation is a key to successful completion. Not only will you reduce the potential costs, but it will give you peace of mind, too. With an expert by your side, you will ensure that everything goes smoothly and without stress. Once everything is over, you will have a home ready to last and function for a long time.
Guest Contributor: Sophia Perry
Many people hate moving because it means investing a lot of time and effort into the process. You need to pack all your belongings and unpack them when you reach your new home. This process will take a lot of time, which is why some people prefer to hire movers to help them with the move. This is the best approach because you will have someone experienced helping you with the move. You will have peace of mind knowing your move is going to be stress-free.
Moving tends to be expensive, but the good thing is there are tips you can do to make it a little bit cheaper. Below are some great tips for moving on a budget.
Getting a moving cost estimate
Before you can start preparing for your move and start packing, you should have a rough idea of how much the move will cost you. It is hard to know the exact cost upfront, but you need to have a rough idea of how much the move costs. The costs are calculated by looking at the moving expenses you are going to incur.
Some of the costs are not that obvious, which is why you will do a little research on your part. Make sure you factor in these hidden costs because they can add up pretty quickly.
Comparing moving estimates
It is a good idea to hire a moving company when moving because they have the experience and you don’t have that much time to do all the work involved when moving. Make sure you get a couple of moving estimates, then choose one that works best for you, this will help you to save on moving costs. This doesn’t mean choosing the one offering the lowest price. See the services offered and reviews too. Some movers usually offer additional services like disassembly, packing, unpacking, and re-assembly. Some will even offer temporary storage. You also need to find out whether there are any extra charges involved.
Be careful when you get an offer that is too good to be true. Find out why the company is offering its services at such a price. There are many scams out there, don’t fall for them.
Consider DIY
When you have an estimated cost, you can decide to move yourself if you think it is too much. When you have a limited budget, you are forced to look for ways of cutting down costs. You do things in a way that fits your budget. If it is a local move, you can ask your family and friends to help you move. You can hire a moving truck and do it on your own.
There are expenses you are going to incur even if you are making a move. The good thing is you are going to spend less. If you choose this option, then it is very important to start early. There is a lot of work to be done, and if it is all up to you, start early. You will have enough time to do the work. You can start packing a month or two before the move. Careful planning will make the process stress free.
Choose your moving date wisely
If you are moving on a budget, then you need to know the right date to move. There are times when it costs more to move than other times. Most people move from May-September, and this is when there is a high demand for relocation services. This means most of the moving companies will be booked, and it is hard to get their services at a discounted price.
You should choose the off-peak season because it is going to save you on moving costs. Weekend moves tend to be more expensive compare to weekdays move. Choose the middle of the month because most people move at the end or start of the month. Being flexible will save you a lot of money because you can choose a date that works for you while not spending a lot.
Taking only what you need
The more stuff you move, the more you can expect to spend. There are three main factors used when calculating the costs of your move. The three are the overall weight, the total distance, and extra services. You cannot change the move distance because it is a constant value. A good way of reducing your moving cost is by reducing the weight of your stuff.
Decluttering will save you a lot because you will move with less stuff. There are many things in your home that you have not used in the past year, and there is a good chance you are not going to use them in the future. Get rid of such items because they are going to cost you when moving.
Guest Contributor: Komal Shah