Google+

contact us

Use the form on the right to contact us.

Day or Night, we are here to serve you. Leave your plumbing problem to us.


Tinley Park, IL

(708)845-7922

Residential and Commercial plumbers and plumbing contractors available in Orland Park, Tinley Park, Oak Lawn, Palos Heights, Midlothian, Oak Forest, Homer Glen, Mokena, Frankfort, and the surrounding Chicago South Suburbs. Emergency plumbers.

copper water lines.jpg

Kevin Szabo Jr Plumbing Blog

Kevin Szabo Jr Plumbing is Tinley Park, Orland Park, Oak Forest, Midlothian, Orland Hill, Homer Glen, Mokena, Frankfort, Crestwood, Palos Heights, Oak Lawn, local plumber. Read our blog for advice, tips, a good laugh, and basic home improvement.

**We are moving our old blog to our new and improved website. Too see all our posts visit kevinszabojrplumbing.blogspot.com

Filtering by Category: December

COMMON DO-IT-YOURSELF MOLD REMOVAL TECHNIQUES IS IT POSSIBLE?

RH Business Marketing Solutions

In the home, mold is unwelcome. It darkens the bathroom corners, stains the walls, and develops between the tiles. It's an obnoxious sight that feeds on and rots moist wood. Mold can grow and become difficult to eradicate over time. Mold causes respiratory ailments and is generally harmful to human health, in addition to being a horrible sight.

Infestation with mold is a big issue in any home. You might be tempted to clean it up on your own once you've found the presence of this health-threatening fungus. Mold clean-up is a job that should be left to the pros. However, if the infestation is minor, you may be able to handle it on your own. But in case of major issues, find a mold inspection specialist.

But first, read on to learn about the fundamentals of mold remediation, as well as the right methods and procedures for properly removing it without jeopardising your health and safety.

 Determine the type of mold

Mold infestation can be found in almost every home. The best solution is to collect them before they gather and become large chunks. These molds are hazardous to your family's health, and as they grow larger, they become more difficult to remove. The elimination of black mold can be done with common cleaning supplies found in the supermarket. Molds are easily distinguished by their little black patches that quickly grow into enormous colonies.

The secret to identifying mold is to use bleach to test it. Mildew can be easily identified by a few drops of home bleach applied to the mold. This is generally seen in moist places. Mildew-mold and dirt mold are the two types of black molds. Mildew mold is easily removed with bleach, however dirt mold does not. Other types of mold are hazardous, so if you have respiratory issues or are prone to allergies, it's best to find a mold inspection San Diego specialist.

Once you've determined what kind of mold you're dealing with, it's time to prepare for safety.

 Protect yourself and follow safety procedures

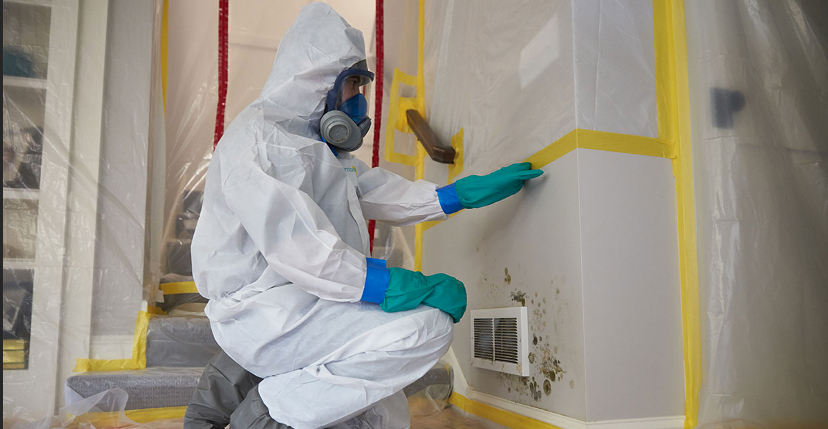
When dealing with mold, it's more crucial than anything else to protect oneself from its damaging consequences. A thin mask isn't going to help. You'll need to wear clothes that you can wash right away or, better yet, throw away after each use. Remember that mold has a distinct stench, especially if it is thick and crowded.

If you wash your clothes alongside other garments in the washing machine, mold can attach to them and spread to other clothes. Wear clothes that you can throw away after you soil them instead of washing them. Goggles and gloves will be required. These particles must be protected from your eyes. They can get into your eyes, and if you don't wear protective gloves when cleaning, mold can go into other regions of your body. If you haven't showered after general black mold removal, we recommend that you don't eat.

Because spores can rapidly move through the air, it's essential to keep the space well ventilated when cleaning. These spores can also stick to the blade, so to save time cleaning the fans you've used, get the cheap ones that you can just throw away afterward.

When it comes to the mask you're wearing, if you have a thin mask, you can layer it to avoid having to buy the N-95, which can be quite expensive. Wearing the mask in multiple layers should suffice.

This should not be removed during the cleaning process. When you're dealing with mold, turn off your furnace and air conditioner. We don't want those spores to spread throughout the room, if not the entire house, creating breathing and respiratory issues. To prevent particles from moving to the adjacent room, you can also block the door gaps.

 Mold remediation process

Now that you're prepared for mold removal or black mold removal, we may begin the cleaning process. To begin, look for symptoms of mold. Examine the moldy walls and pry them open with a screwdriver. Don't be afraid to cut through the drywall because you'll be replacing it anyhow, or you can get someone to do it for you. Make sure you discover the source of the molds and open up the walls to do so.

Scrub the surfaces with a mold cleaner, making sure to get all of them. Allow the solution to soak in for a few minutes after scrubbing to allow it to penetrate the wood or wall. You can now clear up the wall debris while the mold cleaner is working. To remove the moldy wall, use a vacuum cleaner.

Place the larger components in a strong rubbish bag. You can now wipe the mold cleaners after a few minutes. They should not be washed. You can wipe them off and then use a wood primer to seal the wood surfaces. This will improve the condition of the wood or the surface. After that, you can install negative air machines to get rid of any leftover mold cleaning and mold odours.

 Get the right cleaning product

First and foremost, gather your supplies. In order to clean mold, you'll need a dependable product. Many homeowners believe that bleach is a good mold treatment. However, bleach is a powerful chemical that can be harmful to your health. It also does not remove the mold. Its colour simply shifts from black to white or grey. There's still a chance that the mold will return after a few weeks of bleaching.

Borax, a white powder that can be found in the grocery, detergent, or laundry area, is a common DIY mold treatment tool recommended by mold professionals. To clean mold using borax, mix one gallon of hot water with the powder. Apply the solution to the moldy surface and scrub it away with a rug or brush until the mold is gone. It's not necessary to rinse it because the borax will prevent the mold from returning. This cleaning should not be used on porous surfaces like drywall. These materials readily absorb water. This could exacerbate the problem because mold thrives in wet settings. You can also  call a professional  to remove mold  in San Diego.

 Dress appropriately

 Before you begin your DIY mold removal, make sure you are adequately equipped. If you're utilising a chemical, wear gloves, goggles, and loose clothing. Dispose of or thoroughly wash your clothing and gear after cleaning the mold. Mold spores fly through the air and can readily spread throughout your home.

When it comes to black mold eradication, it's best to leave it to the specialists. Black mold is a toxic type of mold that can be harmful to your health.

 The surface should be completely dry

The final and most crucial step in removing mold is to dry the affected area. Keep in mind that moisture is the primary source of mold growth. These fungus thrive in a moist, humid environment. The surface will be damp for a while because you will be cleaning mold with water. By ventilating the area, you can hasten the drying process. If feasible, open doors and windows and use a dehumidifier. Air movers can also be used to swiftly dry the surface.

 Conclusion

You, like the majority of homeowners, want to learn how to remove mold on your own. It's a good thing, and knowing the must-dos and must-haves for cleaning mold is essential to your project's success.

However, it is recommended that you engage with the best mold specialist San Diego if you are unsure about the entire mold mitigation process or if the mold infestation in your home is too large to handle. They are the best people to work on it since they have not only the necessary expertise and training, but also the necessary tools and equipment to properly remove mold.

Author Bio:- Aimee Grace

Aimee is a marketing manager at EZ Plumbing & Restoration. She is very passionate in writing about discrete plumbing services and leakage detection as well as repair solutions.  Her vision is to educate people about the consequences of water and slab leaks at home or office and what they should do to repair them to avoid further water damage as well as property damage. 

Innovations have paved a way for smart devices to lead a convenient life. Plumbing industry is no different but only few people know about various tools used to fix the leakages. Stay tuned with the recent articles to know all about how to find water damage, slab leak, clogging, and ways to repair them, installation of new HVAC appliances in San Diego.


Swimming Pool Leaks: Finding Cracks on Pipes and Fixing Them

RH Business Marketing Solutions

Different variables might cause a leak in a swimming pool. The pipelines could be harmed and have breaks or cracks on them, which causes a leak as water is siphoned into the pool. A leak in your pool presents the main pressing issues to your property and waste of water volume utilization. Pool leaks and spills are not easy to find, but they are conceivable with specific accommodating techniques and a little tolerance. This article will explain those techniques to find cracks on pipes and fix them to avoid swimming pool leaks.


Locating The Leak Or Crack On Pipes

Make sure that the pump system of your swimming pool is switched off and it is empty before you begin finding the cracks on pipes in your swimming pool. Locating the leak or crack on lines might seem apparent and an easy step. However, determining the exact location of your leak or which pipe is damaged is crucial to know where to apply the resin or the epoxy

Also, it's important to have the necessary pool supplies by the time you've discovered the crack. By wrapping the pipes with a paper towel and pushing hard afterward, searching for wet spots can be one of the methods to employ if you are having difficulty identifying the leak. The damaged pipes responsible for leakage are those with wet areas on the paper towel.


Damaged Pipe Preparation

The next step after locating the leak or identifying which pipes have cracks is to prepare them. The epoxy might not stick properly if the tube is too wet, so cleaning the line fully is included in the preparation of the damaged pipe. Get rid of all the debris and dirt that can mess up the mending operation by using sandpaper around the region of the leak.


Epoxy Preparation

After preparing the damaged pipe is to prepare the epoxy that will be used for fixing the pipe. The epoxy is classified as an adhesive and used as a resin to firmly fill a crack on pipes. In preparing the epoxy for fixing the tube, you are blending the epoxy with the adhesive. For this step, snip off the right amount of your epoxy stick, and using your fingers, knead that piece of epoxy until it shows one consistent color. 


Applying The Epoxy Over The Crack

After preparing the epoxy, it is time to apply it over the crack responsible for leakage in your swimming pool. This step involves and spreads the right epoxy over the crack until the region is entirely covered. It is recommended that you apply the right amount of epoxy over the crack because it won’t work if the epoxy is too thin. Take note that you are calm and do not take too much time applying the epoxy as it hardens as time passes.


Checking and Finishing Touches

After applying the epoxy over the crack, it is recommended to make sure that the epoxy is fully hardened, and you check if the pipe is completely fine before running water through it. It is also advised that you perform covering the damaged pipe again using the paper towel to identify if there are still wet spots on the region of crack on the pipes.

 Guest Contributor: Coltin Trost

Common Kitchen Layout Mistakes and How to Avoid Them

RH Business Marketing Solutions

Common kitchen layout mistakes and how to avoid them (2).jpg

Having a kitchen with a good layout is an essential part of the overall impression of your home. Furthermore, a nice, convenient, and well-designed kitchen will inspire you to spend time there and enjoy cooking. Sometimes you can’t even pinpoint what the issue with your kitchen may be. For this reason, we will go over some common kitchen layout mistakes and how to avoid them.

When remodeling their house, most people focus on the kitchen's appearance. While choosing the color of your tiles and appliances is important, sometimes people disregard the question of functionality. Although your kitchen's visual appearance influences its appeal (and your desire to spend time in it), it is essential to take into consideration the layout, too.

Therefore, let's look at a few common mistakes that will help you plan out your kitchen remodeling quickly and easily.

Poor Ventilation

Not paying attention to your kitchen ventilation system is perhaps one of the worst mistakes you can make while planning your home renovation. Just think about it - no matter how tasteful your tiling and design are, inadequate ventilation will significantly worsen the entire feel when the heat and smells from your cooking linger.

Also, over time, poor ventilation can make the kitchen feel as if it was an eternally pungent furnace. It can even be unhealthy as the smells, dirt, and piled up dust mixed together make for a potential cradle of bacteria. 

So, be sure to place the kitchen in a room that has access to fresh air. Having a big window in your kitchen will not also make the space more fresh, light, and enjoyable, but it will also save you money that you would otherwise have to invest into an expensive ventilation system. If this is not an option, you should consider buying a quality range hood that will suck in your cooking smells. Also, a well-designed ventilation system will minimize the potential risks of fire. 

Inadequate lighting

Lighting is also a crucial element that you need to take into consideration. The sources of light in your kitchen can be easily overlooked since people sometimes have the impression that anything will do the trick. A poorly lit kitchen can significantly ruin the overall functionality, especially since people bring in additional light sources such as lamps. 

The most common approach to designing a kitchen lighting system consists of having three principal sources of light. They are professionally referred to as: 

  • accent,

  • ambient,

  • task.

Accent lighting is an umbrella term for additional supplementary light sources that enhance visibility alongside the lighting on your ceiling. 

Ambient lighting serves a similar purpose, but it is more oriented towards creating clean, aesthetically pleasing lighting in your kitchen. 

Last but not least, task lighting is most often overhead, neon lamps that allow you to clearly see what you are doing. For instance, range hoods usually have task light bulbs incorporated into the appliance. If you do not have a range hood, then try to make up for not having task lighting by paying attention to accent or ambient lighting

Common kitchen layout mistakes and how to avoid them.jpg

Of course, if you are moving house and you already have kitchen appliances, there is no need to invest in new, better appliances to solve this problem. So, if you are more inclined toward transporting the kitchen appliances and countertops that you had purchased for your previous home, make sure that you hire a dependable moving company that will have your kitchen inventory ready to go in no time. 

Not organizing your kitchen as a ‘Workflow Triangle’ 

A good layout is vital for establishing a good workflow in your kitchen. Interior designers refer to this aspect of kitchen design and remodeling as a workflow triangle. This means that the cooktop, sink, and fridge are placed to form a triangle that will make movement and placement of other elements logical and convenient. 

Make sure you avoid one of the biggest kitchen layout mistakes and follow the workflow triangle principle. Even a small kitchen can accommodate it.

Make sure you avoid one of the biggest kitchen layout mistakes and follow the workflow triangle principle. Even a small kitchen can accommodate it.

You may notice that you find it hard to enjoy cooking when you are running back and forth to reach the food, grab the pots and pans, throw away things, regulate the temperature on your stove, etc. Instead of having everything placed in a line, it is more convenient to have one of the mentioned workflow elements standing outside the line. In this way, you will be able to simply turn and get what you need instead of making unnecessary steps that will confuse you and make the entire experience somewhat chaotic and tedious. 

Wasted Space on countertop surfaces 

If the amount of space available in your kitchen allows you to incorporate a kitchen island, it might be worth investing in this additional kitchen element. The main reason for this is that you will have more storage space alongside a clean, big surface where you can prepare your meals.

A kitchen island will make your kitchen more efficient.

A kitchen island will make your kitchen more efficient.

Of course, although additional storage space will improve the functionality of your kitchen, you have got to be mindful of the workflow triangle we have mentioned above. If the island makes your kitchen tighter, then organizing and placing your groceries into a pantry might be a better solution.

Hopefully, this short article has helped you recognize the common kitchen layout mistakes and how to avoid them. With these mistakes in mind, you should be able to visualize and organize your kitchen effectively, so you and your family can enjoy the time you spend there together

Guest Contributor: Sophia Perry

Common Heating Problems You Can Avoid with Professional Maintenance

RH Business Marketing Solutions

Blueair_GP11-26-2020_v1.jpg

No matter how hard you try to cuddle up in a warm blanket during the winter, nothing still compares to the comfort you get from a well-functioning HVAC system. Unfortunately, heating problems are inevitable, and they can make your home completely unbearable and uncomfortable. That’s why we are here to save the day.  

Here are the common heating problems that you can avoid with the help of an expert.

Sudden Heat Loss

If you notice that your indoor space is not getting warmer no matter how you turn up the heat, chances are there’s something wrong with the heat pump. If there are hot and cold spots, the culprit could be poor insulation.  

Check for leaks and cracks around the doors and windows and use weather stripping to seal them. Call a professional HVAC technician in Clark, NJ to diagnose your system and make the necessary repairs. Doing so could help prevent expensive problems. 

Restricted Airflow

Due to extended use of your furnace, more dust and debris accumulate in your system over time. As a result, the airflow in the vents and air ducts is restricted. We strongly advise that you keep your filter clean and replace it regularly to prevent poor airflow. 

As a rule of thumb, replace your air filter every two to three months, or as specified in the manual. You may also need to bring in a professional for an air filter replacement or air duct cleaning.  

Short Cycling

If you notice that your furnace cycles on and off frequently, then you can put the blame on a malfunctioning thermostat. In this case, replacing your thermostat is the best thing to do. However, another possible reason is a faulty part. When the components quickly heat up due to restricted airflow, the emergency stop system gets activated. If you are using a battery-operated thermostat, it’s best to check if it’s low on battery and replace if necessary. 

If you can’t correct the problem by replacing the battery, then it’s best to call an HVAC heating maintenance in Clark, NJ professional for a thorough inspection of your heating unit.  It will help ensure that your issue will be resolved with the right tools and trusted experts.

Carbon Monoxide 

Carbon Monoxide is a deadly gas that is hard to detect, hence its name “the silent killer”. Gas furnaces that are already more than 10 years old are advised for annual inspection to ensure that there’s no carbon monoxide leak. When there’s a smell of rotten eggs, it is a sign of a gas leak. 

You can safeguard your health by investing in a carbon monoxide detector for your home. The health of your loved ones and pets is something that you should not take for granted. Call an expert immediately to prevent carbon monoxide poisoning and other health and safety-related issues. 

Why You Need Regular Maintenance?

Your heating equipment is essential, especially during the cold weather. That’s why it is just right to invest in proper care and maintenance. Any HVAC problems imaginable can be avoided with regular maintenance checks and tune-ups. Plus, don’t you know that you can save at least 30% of your utility bills if your HVAC is well-maintained?

If you need help staying warm and cozy this winter season, talk to an expert HVAC contractor in Clark, NJ. Whether you need heating installation, tune-up, repairs, or simple maintenance, Blue Air One Heating & Air Conditioning can provide you the best service you need.

Guest Contributor: Dennis Grizzle, Blue Air One Heating & Air Conditioning

How to Test the Oil Pump

RH Business Marketing Solutions

unnamed.jpg

Meta Description

Isn’t your vehicle engine running smoothly? Are you trying to test if the engine is pumping oil properly? We have outlined some procedures in our article. Check out below to know how to test the oil pump. 

Introduction

The function of oil pumping in the engine is lubricating. The engine of a vehicle is generally running smoothly because of oil. The oil absorbs the excess heat of the engine.

If not oil pumps are distributed to the whole engine, it causes friction. As a result, it causes damage to the engine or may burn. A malfunction of the oil pump may damage the engine of a vehicle.

If your engine is causing an oil pump malfunction, then you should take some steps. Read more to know how to test the oil pump.    

For more information, you can also visit the LS oil pump.

Signs That Specifies of Oil Failure in Engine

When the engine of your vehicle is not having sufficient oil for lubricating its parts, it shows some signals. If you can understand the signal, you won't face any problems on the middle road. Some symptoms of oil failure of the engine are giving below- 

1.   Light on Your Dashboard

The dashboard of your vehicle always notifies you about the occurrence of the engine. When the oil level is low, the dashboard will light up.

If the light turns up, then it could be a sign of oil pump failure in your engine. If the dashboard is not working, check with a dipstick if the oil is low or not.

2.   Overheating Engine

As the function of an oil pump in the engine is lubricating to prevent friction by regulating temperature. If the lubricating function stops, the parts will rub with each other and will produce heat.

3.   Noise from the Engine

The hydraulic lifters of engines work silently when oil pumping is proper. But when the parts of the engine are not well lubricated, it starts fractioning.

Due to over friction, it produces sound from the engine. If such sound occurs from your engine, you should check if the oil is pumping or not.

How to Test Oil Pump in Engine?

Oil of the engine generally excesses the heat. If the upper symptoms of oil pump failure occur, you should test the oil level of your engine. The procedure is giving below-

Step 1

Stop your vehicle if the oil pressure light turns on. Then check your oil pressure gauge. If the reading is low, then it causes oil pump failure.

If the engine produces sound, it also is a signal of oil pump failure.

Step 2

Another step to test the oil pump is checking with a dipstick. Stop your vehicle for a few minutes, take a dipstick, and check the oil level. Add oil if necessary until it turns full.

Step 3

Start the engine again if any indicator shows problems. If so, check the oil pressure unit, if there is any problem with bad wiring or in the plug.

Step 4

Lastly, you can mount the oil pressure gauge, running the engine to read the pressure. If it is normal, then the problem is in your sending unit, not in the oil pump.

Then go to a mechanic to replace your oil pump if your oil pump is persisting the indicators.

What Should We Do If Oil Pump Failure Happen?

If your engine stopped oil pumping, you should follow these steps given below-

1.   Stop Your Vehicle

If your dashboard is showing a low oil indicator, then stop your vehicle. Refill oil and after a few times again restart it.

If again light-up of the dashboard, then follow the second and third steps.

2.   Go and Check the Oil Pressure Unit

After refilling oil, if the light on the dashboard still turns on, it indicates there must be a mechanical problem. This occurs due to a loose plug or bad wiring.

3.   Increasing the Oil Pressure Scale

Check your oil pressure gauge by running the engine, if it is mounting or not. There might be some issue if the light remains turned on.

At this point, you should call a mechanic to replace the oil pump.

Conclusion

Before starting your vehicle, checking your engine is important. If the engine doesn't pump oil properly, then it causes damage.

Do not drive when the engine is showing low oil pressure. The user should check the engine oil refueling every time. The oil failure of an engine is a significant problem.

Users should be alert when they get to know about oil pump failure. Immediately stop your vehicle and should fix this.

I hope this article helped you to test your oil pumping problem in the engine. 

Guest Contributor: Nancy


Best Christmas Decor Ideas

RH Business Marketing Solutions

Family-Room-Christmas-Decoration-Ideas.jpg

If you want to make Martha Stewart jealous this holiday season, you need to bring your A-game when it comes to decorating. It isn’t sufficient for you to plug in the artificial tree and hang a single wreath. How can you transform your castle into an unmatchable and unique holiday showplace? Draw inspiration from these eight best Christmas decor ideas. 

1. Bring the Outdoors In

Why stop with the tree? If you seek inexpensive (read: free!) decorating supplies, look no further than Mother Nature. From making a wreath out of pinecones to adorning your centerpiece with fir branches, there’s no limit to what you can do. 

Keep in mind that living things do get messy. Protect your hardwood floors by investing in a tree mat and watering your tree once a day to prevent excess sap and needle loss. Always shake out any craft materials you select from the outdoors. You’ll get rid of excess needles, dirt, insects — and maybe a wayward squirrel, ala “Christmas Vacation.”  Turning away from purely indoor holiday decorations and creating ornamentation from outdoor materials is a creative approach, but we should ponder over decorating outdoors as well. It doesn't take much to create a view that will bring the spirit of the holidays to any outdoor area. It can be realized through simple additions such as string lights and large inflatables; these modest changes can be fundamental in creating your perfect winter wonderland. For example, a large inflatable Santa, an inflatable snow globe, a large inflatable snowman, or any other character or scene placed in strategic locations around the yard, create a “feel” that cannot be replicated. Thanks to their customization they can be designed to your specifications and will not only draw attention to themselves and make an immediate impact on visitors but also add a large amount of joy to the atmosphere. In addition, string lights can effortlessly wrap trees or large structures while remaining visually pleasing and attractively lighting up the area.

2. Make a Book Tree 

People in Iceland know how to celebrate the cold season in cozy style. Their publishing schedule intentionally releases new reading around the holidays so that natives can celebrate “Jolabokaflod.” Nearly everyone gets new books for Christmas eve, and they spend the night digging into juicy novels — no doubt while warming themselves by the fire with a cup of cocoa. 

Celebrate in your own way with a creative book tree that showcases your favorite tomes — or a stack of new ones. You could throw a twist on the “white elephant” party full of trinkets no one will use. Instead, have guests each bring a book to swap. 

3. Reuse and Repurpose

It’s 2020 — meaning you might be a bit more mindful about spending money. Why not make the most of the materials you already have on hand? 

You can run streamers of wrapping ribbon in traditional fashion down your tree, or fold multiple layers to make miniature red and green spruces to bookend your mantle. Tie some to pinecones to make chair hangers and attach photos of Christmas past to wide swatches to decorate your pantry door. 

4. Set a Festive Table 

Why not let your holiday table serve as your decor? You have a world of options from which to choose. Choose a flannel tablecloth and wrap pine branches with jute for a centerpiece to create a rustic farmhouse look. 

Are you planning a more formal dinner party? You can’t go wrong with classic winter whites, highlighted with accents of blue, red or green. 

5. Select a Unified Color Theme

Are you a multicolor bulb person or more in favor of all white? One of the best Christmas decor ideas is to create a unified color theme. If you’re more subdued, soft neutral tones can create a cabin-like feel. 

However, don’t be afraid to go bold — especially if your pad features a more modern decor. Bright teal tones make an interesting bold hybrid twist between traditional green or blue. If you like it glitzy, think silver and gold with splashes of purple or fuschia for an intriguing accent. 

6. Use Pillows and Throws to Create Hygge

If you look for decorative throws and pillows at the store, you might cringe at prices. $30 for a single place to rest your head? However, don’t despair if your budget is tight this year — you can make new festive covers for your current models out of old T-shirts. 

Do you have a knitting “knut” in your family? Pull out those homemade afghans you got as gifts during Christmases past and drape them over your furniture to invite folks to curl up with some cocoa. Try to cultivate the spirit of hygge, a Danish word that represents an atmosphere of cozy comfort. 

7. Trip the Lights Fantastic

Do you fall into the more lights, the better category? Save yourself a small fortune by switching to LEDs. While a string of 100 incandescent minis will cost you approximately $3.53 to run for the season, a similar string of LEDs only sets you back $.41. 

Look beyond illuminating your exterior. A single strand can highlight a mantle garland. If you have a canopy bed, strings of clear icicles dangling from the top create a magical retreat. 

8. Leave No Halls Undecked

Why stop decorating with your living room? Folks will spend plenty of time in the kitchen baking cookies and gobbling snacks. Go beyond the holiday-themed dish towels and potholders. Make mini-wreaths to decorate your cabinet hardware and drape some garland around your overhead pot rack. 

Headboards all look more festive with a touch of greenery. You can crochet festive covers for your toilet seat. And while you don’t want to kiss any strangers this year due to COVID, you can still hang sprigs of mistletoe in your hallway. 

Get Holiday Ready With These Best Christmas Decor Ideas

If the holidays make you feel like Clark W. Griswold, go ahead and indulge your passion with the tips above. Your home will be the most festive on the block with these best Christmas decor ideas.

Guest Contributor: Rose Morrison


When The Need For Hot Water Repair And Maintenance Does Arises

RH Business Marketing Solutions

thumbnail.png

You do not want your water heater to get broken untimely, especially when it’s whopping snowing all day and night. Your water heaters have done more than enough for you, by providing you got baths and removing your all day tiredness. A water heater is a necessity these days. Still, if you need hot water repairs and maintenance, but you are ignoring it is going to cost approximately ten times more than regular maintenance. You can even yourself do a regular by yourself and could increase the life span of your water heater. 

Generally, a water heater needs 6-month regular maintenance; if you are capable of doing maintenance yourself only, then you should do it on your own. Otherwise, you should have a professional plumber do the work. 

image1.jpeg

Usually, every water heater has the same bunch of problems which you can even call as warning signs. To tackle these problems, you should have a little knowledge of how to prevent them. 

Some of the problems that need hot water repair are: 

  • Sudden drop in temperature of hot water

  • This is the most common problem that demands hot water repairs, and it usually occurs if you are living in a joint family or your building has only one water heating unit. When the load increases on the machine, it struggles to heat the water. Another reason could be if you have an electrical water heater, then a power surge due to excess use of water heater could trip on the circuits.

  • Water Tank corrosion and smelly water

  • If there is an uncommon smell in your hot water, then there might be some rust caused due to mismatch of the sediments at the bottom of the water tank. Due to this problem, your water might also get discolored into reddish-orange. Corrosion in water tank also leads to smelly water, more particularly like the smell of rotten eggs. Sometimes the problem could be from the water source also, for that run cold water for 10 minutes and if there is no color, neither smell then the problem is in the hot water tank.

  • A leak in water heater

  • A water heater leak occurs like in 5-7 years of the period but could be dangerous of the people using that water heater. Water leaks from the water heater and could damage the floor and other devices near it. Sometimes in an electric water heater, the water leaking has an amount of current in it; therefore, a problem this should not be ignored. You should immediately call for professional help.

  • Rumbling sounds

  • If your water heater is making reverberating sounds, that could be a significant concern. These sounds could be due to the burning of sediments or malfunction of heating components. If you hear these sounds, you should immediately turn off the water heater. These are the signs of pressure building up inside the water heater, which may even burst. In this case, you should drain your water heater and do not use it. If still, the problem resists, call a professional for hot water repairs.

Why should faulty water heaters be repaired? 


image2.jpeg

If you ignore these warning signs of breaking down, this is probably the worst thing to do. It will make the problem more serious, hard to resolve and more expensive. A faulty water heater is always a risk for your family or anyone using. If your water heater has leaks, it might be using more power which means an increase in power bill and gas bill. If your problem has gone severe, it will cost you more even you will need to have a new water heater installed.  

These are a few of the common signs of requiring hot water repairs services. Make sure that you choose the best professional help for this.

Guest Contributor: Emma Smith

Why You Must Focus on the Correct Size When Choosing Covers for Your Garden Furniture 

RH Business Marketing Solutions

It is easy to transform your backyard into a hub of entertainment and relaxation with family and friends with the addition of some carefully selected garden furniture. Considering how expensive good-quality furniture is, you will naturally want to protect them when they are not in use so that they have extended lives, and you don’t want to keep on spending on their maintenance or replacement now and then. While it is best if you can stow away the furniture inside the house, most people do not have that luxury are forced to leave it outside. It makes investing in good-quality garden furniture covers essential. Buying covers of the right size is important to give your furniture the protection you want. Some tips on what to look out for:

Cheap Furniture Covers Tend Not to Fit Well

While cheap furniture covers can be very enticing, you can be sure that they will not only be low-quality but also fit very poorly. It is because they will generally be available in a limited number of size options. On the other hand, manufacturers of high-quality furniture understand that buyers are discerning about the quality, and they are interested in protecting their valuable furniture. It is the reason why they fabricate the products from premium fabrics that are not only tough and last for several years but also offer good protection against the harsh elements while being lightweight and easy to clean. Manufacturers of premium garden furniture covers make them available in a large range of sizes, and some will even make them to your custom size if you so desire.

Proper Cover Size Ensures Better Protection of the Furniture

The reason why you need to buy furniture covers of the right size is that you will either end up buying covers that are too small or too large. The smaller covers will not fit properly and offer adequate protection because some parts of the furniture will tend to remain exposed, while the oversized covers will allow the air inside to balloon them on windy days and either tear or blow away leaving the furniture exposed to the elements. Another concern with covers that are too large is that the excess material sags and allows the rainwater, snow, and ice to collect. It can not only lead to the development of mold and mildew that are health hazards but also encourage mosquitoes to breed. When the weather turns cold, the accumulated water turns into ice and can damage the cover and let in water that can harm the furniture inside. According to https://www.huffpost.com, you should buy covers that have drawstrings or Velcro bands to hold them in place.

Conclusion 

Since there is a large variety of shapes and sizes of outdoor furniture, buying the right size of furniture cover can be somewhat difficult. The trick is to measure the dimensions of the furniture accurately. You should then try to locate covers that are just one size bigger. It will ensure that they fit properly while allowing you to put on and remove them without difficulty or run the risk of ripping them if they get snagged on the sharp edges or corners.

Guest Contributor: Silvia Watson

Tasteful Ways to Decorate for the Holidays

RH Business Marketing Solutions

pavilion-321036_1280.jpg

The holidays are upon us, and there are plenty of ways to celebrate. Some homeowners love to go all out when it comes to their decorations. From exterior to interior, there are many ways to show your holiday spirit. 

Exterior

Preparing your lawn for your holiday decorations is critical. Before you set up any blow-up snowmen or place plastic reindeer down, lawn care is the first step in any exterior decoration plans. You can keep things simple with classic lights hung on the house, or you can go big and decorate everything from your front porch to the mailbox. Always ensure you're being safe while hanging outdoor lights, use waterproof lighting, and turn them off before bed each night. Depending on how much work you want to put in, you can add simple decorations like wreaths, garland, and window bows. There are many DIY decorations you could make to add as well. 

Interior 

Typically, your living room is the center of all the action during the holidays, so focusing on this space is standard. Keeping the family to your living room or bonus areas in your home means that it's the perfect time to remodel your kitchen and bathroom. Give yourself the gift of home upgrades for the holidays. As for your Christmas decor, you can choose a few different avenues, depending on your personal style. 

Fun

If you're home with the kids, going all out for the holidays creates some of the best lasting memories for them. Suppose you choose to go a more lighthearted and fun route. In that case, you can incorporate traditional and straightforward decor while focusing on a fun and colorful tree or bright stockings. 

Traditional

If traditional is your style, there's value in sticking with tradition. The cozy and inviting nature of the Christmas season is something we all want in our homes. Snuggling up to the fireplace with hot cocoa and loved ones with the stockings hung, snow falling, and warm lights is what the season is all about. Choosing traditional decor is perfect for those who want the quintessential Christmas experience. 

Minimalistic

If you're a minimalistic person, scaling back on your decor can still look beautiful and cozy. Adding a few impactful decor choices can allow you to celebrate the season without crowding your space or making it feel overwhelming. 

Simple

Sometimes, we don't want to spend a lot of energy and time to decorate every inch of our homes. Choosing a few accents and a tree while keeping the overall feeling of a traditional Christmas can be a simple yet inviting approach. Including functional decor like throw pillows, a festive rug, candles, or centerpieces, can add a lot of holiday cheer without being too overwhelming. 

Leverage your Current Decor

If you have a distinct decor style in your home, you can leverage that style in your Christmas decor. Suppose you have a monochromatic color pallet. You can incorporate holiday decor that matches that color scheme. It keeps your style front and center while giving your space a fluid feel without the Christmas decorations standing out against your current decor. 

Decorating for the holidays is fun for the whole family, and there's no wrong way to do it. Choosing your favorite style and making your home a cozy space to spend the holidays with your family is what Christmas is all about!

Author Bio:

Alex Platt is a real estate agent for The Platt Group in South Florida and owner of livesellfl.com. He brings a wealth of knowledge and expertise about buying and selling real estate.


Sources:

https://www.thespruce.com/festive-living-room-roundup-4117910

https://www.housebeautiful.com/entertaining/holidays-celebrations/tips/g2804/outdoor-christmas-decor…

https://www.countryliving.com/home-design/decorating-ideas/tips/g1541/outdoor-christmas-decorations/


How Would You Choose The Best Bathroom Design?

RH Business Marketing Solutions

You must choose a bathroom design that can blend with the rest of your house. For example, if you have your master bedroom walls painted with yellow color then you can paint the bathroom walls with the burgundy wine color. Instead of changing the color of your bathroom or living rooms, you can just change the bathroom design to renovate your home.

Bathroom Design (2).jpg

Make sure, you must choose the best bathroom design to give a makeover to your home. Decide whether you need a bathtub or not, because a bathroom can occupy a lot of space and you can replace your old bathtub with a shower cubicle. You can add soothing body sprays in your shower room for more relaxation. Make sure, you must choose the best bathroom design to give a makeover to your home. Decide whether you need a bathtub or not, because a bathroom can occupy a lot of space and you can replace your old bathtub with a shower cubicle. You can add soothing body sprays in your shower room for more relaxation. 

Things to consider while you choose the bathroom design:

When you choose bathroom designs, you need to divide your bathroom into separate zones. Here, you can find some tips for a bathroom renovation:

  • Functional zone: This is the central space of your bathroom. You must leave some open space in your bathroom, even if you have a small bathroom space. If you have a small bathroom then you can install a few wall-mounted cabinets, and you can remove soggy trowels, steamy showers, and withstand splashes to save your space.

    Depending on your lifestyle, you can choose the floor, fixture, and countertops of your bathroom. Sometimes, you cannot get the space for redoing the existing fixtures because you need to change the old plumbing and drainage lines in this regard. It is better to seal such outlets and change your bathroom layouts with new plumbing lines.

Vanity: You need to install a countertop, storage, and mirror, and sink in your vanity area. It is better to avoid mirror walls or large mirror slabs for your small bathroom because these bathroom designs are traditional and outdated. You can install a sink for two or a double-bowl sink in your master bathroom, especially when you have only one bathroom for your entire family.

  • Shower: If you want to renovate your bathroom within a small budget then you can install a standby shower and a bathtub in your bathroom. Tubs are outdated, but if you want to reduce your water consumption bill then you can install a bathtub to save water. You can store hot water in this pool-sized vessel and use it for getting complete relaxation in winter.

    But if you have a small space in your master bathroom then you must choose a bathroom design with an advanced shower system. You can install tiles on the wall and floor in a spate zone and turn cover that area with a glass door. If you have a small budget, then you can use shower curtains.

  • Toilet: it is the most important part of your bathroom. You cannot change the position of your toilet because you need to change the drainage and sewage lines for the same. In this case, you can hide your toilet by your bathroom door and place your toiler beside a vanity. You need to maintain proper ventilation of your bathroom, and you must install exhaust fans, windows, and skylights for the same.


To choose the best bathroom design, you need to consider a few things, such as how many people will use this bathroom? Do you want to change the toilet? Do you want to store your towels and linens inside the bathroom? Depending on these factors, you need to choose the storage.  It is better to hire a professional designer to design your bathroom layout. You can search for such designers online and choose the best one after checking their reviews and templates.

Guest Contributor: Emma Smith