Google+

contact us

Use the form on the right to contact us.

Day or Night, we are here to serve you. Leave your plumbing problem to us.


Tinley Park, IL

(708)845-7922

Residential and Commercial plumbers and plumbing contractors available in Orland Park, Tinley Park, Oak Lawn, Palos Heights, Midlothian, Oak Forest, Homer Glen, Mokena, Frankfort, and the surrounding Chicago South Suburbs. Emergency plumbers.

copper water lines.jpg

Kevin Szabo Jr Plumbing Blog

Kevin Szabo Jr Plumbing is Tinley Park, Orland Park, Oak Forest, Midlothian, Orland Hill, Homer Glen, Mokena, Frankfort, Crestwood, Palos Heights, Oak Lawn, local plumber. Read our blog for advice, tips, a good laugh, and basic home improvement.

**We are moving our old blog to our new and improved website. Too see all our posts visit kevinszabojrplumbing.blogspot.com

Filtering by Category: September 2020

Farmhouse Fall Decorations

RH Business Marketing Solutions

Need some inspiration for fall decorations this year? Farmhouse decorations are a huge trend in 2021, it’s very easy to decorate to fit the vibe. Here are a couple of our favorite fall farmhouse themed decorations.

cfd016f800c0ae6c332b58356cc469cc.jpg
771defdfdab49823555ec36bc4425c81.jpg
0f1c04971be381c43168768f933b4aa4.jpg

How to Prepare a Room for Painting

RH Business Marketing Solutions

Proper_Paint_Prep_and_Cleanup_Tips_step_01_1.jpg

Most people have been spending more time at home lately - you might be sick of those bright blue walls that were so trendy five years ago. Does a room in your home need a refreshment? A good place to start is with a fresh layer of paint. If you plan to sell your home, painting is a great remodeling strategy that provides a handsome ROI. But before you break out a bucket and roller, you’ll need to take some steps to get everything in order. Properly preparing a room before painting it will ensure the best results:

Move or cover all the furniture. Ideally, you should move all your furniture out of your room, but that’s not always possible if you’re short on space. In that case, use drop cloths to cover all your furniture from accidental paint splatters. Protect your floors by covering them with drop cloths, as well.

Clean the walls. Dust will interfere with a smooth paint application. Use a vacuum on baseboards and crown molding to clean those hard-to-reach places. Then, wash your walls with a cloth and warm soapy water. This will remove any stains and dirt. If you’re painting a room that’s been exposed to oil (like a kitchen), you may need to use a grease-removing product. Humid areas like the bathroom may have mildew growing in the corners, in which case you’ll need an abrasive sponge and a solution with bleach. Allow the walls to dry completely before applying any paint. 

Assemble your tools. Unfortunately, paint doesn’t apply itself. You’ll need to arm yourself with the right supplies to do a good job. Make a list of the items that you have and what you’ll need to pick up from the hardware store. To name a few here, you’ll need paint, brushes, a roller, a tray, painter’s tape, cleaning rags, drop cloths, and clothes that you won’t mind getting covered in paint. 

Wear protective equipment. Before you open up a paint bucket, wear a respirator mask! It’s important to wear one that can filter out harsh chemicals. Beware of harmful chemicals that can irritate your lungs and cause headaches. If you can’t wear a mask, be sure to open all doors and windows to allow a cross breeze through the room.

Repair any holes or damages in the walls. For this step, you’ll need putty, a knife, and sandpaper. Fill in any holes or imperfections on your wall using the putty and smooth the raised edges with the knife. Once it’s dry, file it down with sandpaper so that it’s level with the rest of the wall. If the existing paint is flaking in any areas, smooth it away using sandpaper to ensure a smooth application of paint.

Protect electrical elements and light switches. Remove the covers from electrical outlets and switches, and cover them with painter’s tape. You don’t want the paint to get inside of your electrical outlets, so don’t neglect this step.

Use painter’s tape around baseboards and windows. You are painting your room, but you don’t want to paint everything in it. Seal the edges surrounding your doors, windows, baseboards, and crown molding. If you have painted before, then you’ll know the satisfaction of removing the painter’s tape once you’ve finished the job. Something to keep in mind is that you should never remove the tape before the paint has dried completely, or else you’ll wind up with jagged edges. Rather than ripping it off all at once, try to do it slowly. 

Choose your wall color. The final step is choosing which color will work best for your space. If your room is small, select paint colors to make a room look bigger. But if size isn’t a concern, then you have free reign. Those who want to sell their homes in the future should keep in mind that most buyers like neutral colors. There’s also the option of going bright and bold - it is your home, after all. Once you’ve chosen your color, determine how many gallons of paint you’ll need by measuring the square feet. When covering a darker color with a lighter one (like black to white), you will need a few extra coats. Factor in that you might want a little extra to use for touch-ups in the future. 

Apply a primer. A base coat will help your paint job last for years to come. It can also help you transition from a darker color to a lighter one. The primer you need will depend on the type of paint you’re using. Oil and water don’t mix, so if you’re using an oil-based paint, you’ll need an oil-based primer (and vice versa for latex-based paint). 

The painting process will go much more smoothly if you take the above steps first. After all this preparation, rolling layers of paint on your walls will seem like a breeze. It’s amazing what a coat of paint can do to transform a familiar space and make it feel brand new.

Guest Contributor: Christie Simon

10 Tips on How to Stay Warm This Winter Without Spending a Fortune

RH Business Marketing Solutions

scarf-around-house.jpg

Cooler temperatures are rapidly approaching and if you, like me, have huddled down next to the heater in the evenings, simultaneously bemoaning and dreading the impending heat bills, you’re not alone. Here are 10 simple tips on how you can stay warm this winter, without spending a fortune. 

  1. Insulate your house. Perhaps your house is older and in the middle of the winter, you notice lots of icicles hanging off your gutters. Your house is leaking heat and therefore, you’re wasting money. Spend the time before the winter really starts by properly insulating your house and especially around your windows. This may be as simple as caulking around the windows, but it can make a lot of difference, and save you money in the long run. 

  2. Buy a heat pump. Not only will it work during the summer to keep you cool, but it will reverse during the winter to help you stay warm. They’re efficient and economizing, and use less energy than regular heaters. 

  3. Reverse fan direction. During the summer you want your fan to be pushing air down so the circulation is increased. But in the winter, you want the cold air pulled up and the warmer air pushed down. Consult your owners manual to make sure you have the fan settings right. 

  4. Hot water bottle. This is a favorite trick of mine. Hot water bottles are cheap, long lasting, and retain heat for hours. You could cozy up with one on the couch while another one is heating the foot of your bed. Buy good quality bottles and accessorize them with padded exteriors that help retain the warmth and prevent you from burning yourself if the water is extra hot. 

  5. Embrace the sunshine. Don’t keep your blinds pulled during the winter. Let the sun shine in and use the natural warmth to help heat your house. It can make such a difference and that combined with better insulation allows your house to warm up and stay warm through the day. 

  6. Drink hot beverages. During the warm summer months, you probably swap your coffee for an iced one, but as the temperatures cool, you probably will want to swap back to a hot cup. Coffee, tea, and cocoa all are warming drinks that aren’t very expensive, especially if you make them yourself, and can help you stay warm during the cool winter months. 

  7. Bundle up. Break out those woolen sweaters and socks because bundling up is one of the best ways to stay warm during the winter months. If you’re looking to invest in a warmer wardrobe, buy natural fabrics, such as wool or cotton, that last longer than man-made ones and will naturally biodegrade once they’re no longer wearable. Wool especially is fantastic in the winter because it helps regulate the body temperature. Furthermore, wool fibers last longer than cotton and can be bent hundreds of times more before they wear out. There is a reason our ancestors wore wool, and we should too. 

  8. Invest in a wood stove. Using a woodstove can be an investment, or it can be a much cheaper and more efficient way to heat your house, depending on your circumstances. If you live in an area where wood is cheap and you don’t mind the extra work, using a wood stove as supplemental heating can be a great way to save money on conventional modes of heating. 

  9. Open your oven. Are you a baker or do you use your oven often? If so, once you’re done cooking, crack it open so the excess heat leaks out and helps warm up your house. It will help keep your kitchen toasty warm and comfortable and help save money. With this in mind, bake away!

  10. Turn up your heat in the morning. Keeping your house between 60*-67 at night is recommended anyhow for optimal sleep. If you keep your house cool but not chilly, you’ll be cool in the morning, so turn the heat on then and warm up your house during the day. At night, the temperature will cool down again but since your house will be set at a cooler temperature, it will cost you less overall. Essentially, you’re only using your heaters when you’re up and around there house needing it. 

In conclusion, there are lots of ways you can save money this winter by preparing ahead of time to save money on your heating. Of course, this list does not take into account a heater that is maybe broken or not working properly. If that describes your heater, definitely have it fixed before the chill of winter sets in so you stay warm and comfortable all winter long.

Guest Contributor: Allie Shivers

5 Simple Ways to Upgrade your Home Gym

RH Business Marketing Solutions

home-gym.jpg

As you spend more time exercising at home, you would notice some things to improve in terms of space, equipment, and the overall feel. With these five simple ways to upgrade your home gym, you can create your dream workout space and get inspired to fulfill fitness goals. 

5 Simple Ways to Upgrade your Home Gym

Designing a functional setup, changing equipment, constructing efficient storage, investing in lights and audio systems, and saving workout routines are simple ways to upgrade your home gym and achieve a healthier lifestyle through exercise. Use this guide to start renovating your home gym. 

Invest in the Right Equipment

Get rid of any machine or tools you don't use, as these can only add clutter and take up much-needed space. Some of them may be showing signs of wear, or they simply don't fit your fitness regimen anymore. 

Instead, upgrade into better equipment that can last long and bring new life to your home gym. You can use resources from Simple Fitness Hub to pick workout equipment appropriate for your goals.

  • Cardio: Smith Machine such as a treadmill, spin bike, and rowing machine utilize body weight to enhance your strength and cardio. A 30-minute jump rope session is a more affordable option, especially if you don't have space for huge equipment. 

  • Strength: Strength training involves routines that improve endurance. You can do this by using battle ropes, weights, barbells, kettlebells, and dumbbells. Wearing resistance bands also supports your mobility. 

  • Flexibility: It's essential to retain flexibility as you age. Things like foam and rumble rollers can assist your body when exercising to avoid overstretching.

Design A Functional Setup

If you've ever gone to an overcrowded gym, you appreciate the importance of having space to exercise safely and comfortably. You can achieve that in your home by using rubber, foam, carpet, or vinyl flooring to protect the body from sweat drips and uneven surfaces. 

Since there may not be somebody else to coach you, placing mirrors on walls can help check your form and be your own coach. Besides, putting up mirrors can make space appear larger.

Moreover, set up a hydration station with clean towels and plenty of bottled water to keep your body clean and hydrated. 

Build an Efficient Storage

Sustainable storage is key if you want to pack a ton of equipment in your home gym. You can keep small items like medicine balls or yoga mats in storage cubes. You can designate one side of the wall to install panels or pegboards to hang resistance bands or jump rope. 

If you have sets of kettlebells and dumbbells, opt for a compact yet heavy-duty weight rack to keep all items neatly tucked in a corner. 

Install Proper Lights and Audio System

Why listen to music on headphones when you can blast your favorite pump-up tunes through the speaker? Whether it's a Bluetooth speaker or a boom box, make sure that the volume is on safe levels or just enough to energize you through intense workout routines. 

Meanwhile, the right lighting makes it easier to see your form, ensuring you get to do routines properly. When you see what you're doing, you can adjust your movements and avoid making workout mistakes

Save Workout Routines

Regardless of how spacious your home gym is, or no matter how much equipment you buy, you won't be able to optimize them without commitment to exercise. 

You can save fitness routines from the internet or various instructors to guide you. Likewise, you may download apps that can suggest exercises suitable for your body's needs and goals.

Conclusion

Go over renovating ideas until you find what works best for your needs and liking. Use this list to start upgrading your workout space, and you can make it feel and look like a real gym with a personal touch. 

Guest Contributor: Allen Michael

How to Unclog a Drain

RH Business Marketing Solutions

The warning signs of a clogged drain are clear — water pooling or refusing to go down the drain. Sometimes, removing that clog can be quite a hassle, and that’s why people often go straight to a plumber for help.

Depending on availability, it might take a few days for a plumber to clear your drain. When it comes to minor issues, why not try a few DIY hacks before resorting to the professionals? Read below to learn some suggested methods to unclog a stubborn drain.

Start With a Plunger

Plungers are the tried-and-true method. Unless there is a serious problem (e.g., a root growing through a buried drain line), this is probably the method with which a professional plumber will start. Depending on the type of drain you’re unclogging, there are various kinds of plungers that will work:

  • Sink plungers are the conventional type that usually come to mind when we imagine plungers — with a rubber cup that is designed to seal to the bottom of the sink.

  • Toilet plungers have more of a bell shape with a flange around the bottom that helps it seal in a toilet bowl.

Choose the right plunger, and give it a try to clear debris from your drain.

Try Homemade Drain Cleaners

Commercial drain cleaners are marketed as a quick and easy solution to clogged drains, but plumbers generally don’t recommend them. That’s because these solutions contain chemicals that can damage your plumbing — and harm your septic system, if you have one. What’s more, the harsh chemicals could damage porcelain toilet bowls, sinks, and other fixtures. Thus, while a commercial drain cleaner may have cleared your drain, it can also leave you with bigger problems to fix.

That said, there are homemade options that can clear small clogs without causing damage to plumbing and fixtures. Start with soda to clear a small clog. It’s bubbly and a little acidic, which will help clear debris. If you have a 2-liter bottle handy, pour the liquid down the drain and wait a few minutes before rinsing with warm water.

Baking soda and vinegar is an all-natural method that you probably have in your kitchen. First, bring a pot of water to a boil and pour that down the drain. Once you’ve done that, measure a ½ cup of baking soda and pour down the drain. When the baking soda and water had roughly a minute to reach the clog and start working, mix 1 cup of hot water with 1 cup of vinegar. Pour this down the drain, and wait for about five minutes before rinsing the drain with clear water.

Baking soda and salt can help break up a clog, too. Mix 1 cup of baking soda with a ½ cup of salt. Then, pour it down the drain. It can take a while to work, so let it sit for a few hours or overnight, then flush the drain with boiling water.

Take Apart the P-Trap

This is among the most common areas for a clog to occur because curving pipes are more likely to catch debris than straight spans. If you can access the drain’s P-trap, then you should be able to take it apart with channel-lock pliers or a wrench. Make sure to place a bucket beneath the trap before taking it out, since wastewater is likely to spill from it. Once you’ve removed the trap, clear any debris you find. Then you’re free to reassemble. Remember to run water through it once you’ve replaced it to check fittings for leaks.

Use a Drain Snake

This is the next tool that a professional is likely to try after a plunger. Snakes are long cables — often with an attachment on the end — that are designed to be run down a drain to break up a clog so that it flushes. You can find snakes at most hardware and home improvement stores — in different lengths, too — if you have a longer drain to clear.

Try a Coat Hanger If You Don’t Have a Snake

Maybe the hardware store is closed, but if you have a metal coat hanger on hand, you can turn it into a drain snake. Simply straighten it so that you have a long, sturdy piece of wire. Then run it down the drain until it reaches the clog. This will help you break up the clog so that you can pull it out or flush it with running water.

Chances are, at least one of these options will get your drain flowing once more. If none of these methods work, however, it might be time to contact a professional.


Author bio: Excited to share her love of home design and décor with readers, Jaclyn Crawford started with ImproveNet in 2016. As a staff writer, she enjoys chronicling the latest trends and ways you can make your home the loveliest it can be. You may also find her in ImproveNet videos, sharing tips and trends for your home.

How Do Misting Systems Work?

RH Business Marketing Solutions

high-pressure-misting-system-1500-psi-flexible-1_copy_2.jpg

In essence, a misting system refers to a range of outdoor cooling methods that uses a fine spray of water to cool you, your family, guests, workers, customers, and yes, even your pets! Other terms for misting systems include spray cooling and fogging systems. 

Misting Systems: How Exactly Do They Work?

All misters work with the natural cooling effect that occurs when water evaporates in warm air. This is also called evaporative cooling. Most misters work beautifully in dry weather. Some also work superbly with humid weather, although not all. It is recommended that you do your homework before purchasing one for a damp area. 

Misting systems offer several excellent benefits. They can minimize dust and odors in a specific area. They are also great at regulating the humidity, so they are fantastic for atriums, courtyards, greenhouses, and the like. What’s really amazing is misting systems can cool you down without getting you wet.

Water is forced through very minute nozzles to create a very fine fog or mist. As the droplets of water evaporate, it cools the air instantaneously—the finer the mist, the more thorough the evaporation.

The terms fogger and mister are used interchangeably, and many people often confuse one for the other. Some misters produce a spray made of large droplets that can get you wet. These systems often use larger spray nozzles and low or medium water pressures.

On the other hand, foggers use tiny spray nozzles (to create a fog-like mist) and high water pressure. The fog-like mist evaporates before it can get anything wet.  

Your Key to Categorizing Misting Systems: Think Water Pressure

Let's get something straight: all foggers are a kind of misting system. However, not all misting systems are foggers. To avoid confusion, it is crucial to think in terms of water pressure—low, medium, and high.

Since water pressure is the primary indicator of any misting system's performance, it is used as an accurate way to categorize the systems. Water pressure is measured in PSI (pounds per square inch) or BAR. One BAR is equivalent to 14.7 PSI, while one PSI is equivalent to .0689 BAR.

Low Pressure

Low-pressure systems can be likened to being near a sprinkler. It can cool you down and might also get you a bit wet. This kind is also the simplest and the least expensive of the three options. 

Low-pressure systems also won't require electricity. They typically work with gravity-fed water pressures. While their spray can cool a small area, you need to be near the nozzles to cool. However, the closer you are to the nozzles, the wetter you will also get.

Medium Pressure

Medium pressure systems use motorized pumps to raise the water's pressure to 100 - 250 psi / 7 - 17 bar. The spray water this system produces is fine enough to cool you in hot weather and is less likely to get you wet. 

High Pressure

This is the system that will provide the maximum among the three options. High pressure misting systems are considered ideal for areas with very high humidity. It can cool you down effectively without getting anything wet. 

High pressure and medium systems typically use pumps to boost the water pressure from any water source. The higher the resulting pressure, the cooler (and drier!) you'll feel.

What Makes a Misting System Great?

A misting team has to be one thing to be considered great: it has to meet your needs. Even if you invest in the highest-powered and the best system but only have a small patio in a quiet neighborhood, the system might be too expensive, too noisy, and too much. In short, it's not the right fit for you.

What about your kids' sports team? In most cases, a lighter, smaller, and less expensive system that will not get them wet is ideal. However, it might not be the best option for an elegant wedding reception with 200 guests.

Conclusion

Finding the right mister that will best suit your needs is no walk in the park. However, once you gain a better understanding of how they work, you can easily make knowledgeable and educated comparisons. From there, you can effortlessly decide which system works best for you. Check out this Arizona mist systems for more details.

Guest Contributor: Anna Fox

Small Studio Apartments: Are They the Next Big Thing?

RH Business Marketing Solutions

1.jpg

If you already have a studio or if you rent one, we have some good news for you: these little units are the next big thing in real estate. Since people are downsizing globally and looking for ways to live more efficiently, studios are a perfect solution for all their needs. But why are these small studio apartments so attractive to investors and buyers? Here’s all you need to know. 

Their location is usually top-notch

Location is one of the most important driving factors when it comes to investing in real estate, and what small studios lack in space, they make up for in location. Major city centers are often the best places to buy a property, but prices are usually astronomical. Finding an affordable property with a bold design can be hard in these areas, but studios have smaller square footage which lowers the price tag and allows even beginner investors to grab a property on a prime location. 

2.jpg

They are affordable

If your budget doesn’t allow you to get a traditional investment property like a multi-family or single-family home, consider getting a studio apartment. This is the best way to invest as little money as possible and gain exposure to the real estate market. Also, they are easy to rent out or sell with some minor staging efforts, so if that’s your goal, you’re all set. 

4.jpg

They are practical

Today, people are rapidly leaving the countryside and moving to cities, so urban areas need a practical and functional solution that will accommodate a large number of residents. According to some predictions, 68% of the global population will live in cities, so major urban environments are opting for the concept of compact living when it comes to residential architecture. 

Many of the world’s metropolises like Hong Kong especially love this downsizing trend, and the concept of small studio apartments is blooming there. Everyone from digital nomads to young professionals and students is choosing apartments for rent in Hong Kong thanks to their convenience, price and low-maintenance costs. With all the necessary amenities at your disposal, it’s easy to see why studios are so practical. 

They are green

More and more people today are choosing a more eco-friendly and sustainable lifestyle that rangers from dietary changes and adopting better shopping habits to saving energy and water and downsizing to more eco-conscious housing solutions. Small, compact living spaces are always greener than big houses, no matter how well designed. Smaller square footage equals less energy consumption, less maintenance and less furniture, all of which can contribute to your smaller carbon footprint. 

They are easy to maintain

Like stated above, studios are small and they naturally require less cleaning and decluttering. Small studios are also easy to organize and keep clean since there’s less room for decoration and other trinkets that do nothing but collect dust. This makes them perfect for minimalists or people who hate or simply don’t have time for cleaning. In general, one can clean and declutter an entire studio apartment in an hour while ensuring maximum living and sleeping comfort

5.jpg

They bring a good return on investment

If you intend to break into the real estate market and make money on your first try, go with small studios. According to research, small studio apartments increase your ability to make money and yield an excellent return on investment. Even though the rent in studios is more than affordable to tenants, the price is still high when taking into consideration the square footage. Usually, small units outperform big apartments and family homes, they have high occupancy rates and sport pretty high rental-rate premiums. Since they are more or less a safe bet, small studios are perfect for beginner real estate investors, especially those who don’t like to gamble too much. 

Studio apartment cons

Don’t think small studio apartments don’t come without a flaw. No matter if you’re investing or renting these small units, you need to know about the risks. In general, certain countries and states have minimum apartment size requirements, so super-small micro-apartments might create a problem. There are also various housing codes, zoning regulations, municipal ordinances, minimum parking standards, unit-mix rules, outdoor open-space and indoor common-space provisions to look into. 

Additionally, even though small studios always have their place in the rental market, they are not suitable for everyone. Usually, they are reserved for single working professionals or students. This means your tenant group will get smaller and you will need to forget about families. 

In real estate, bigger is not always better. While small studio apartments have their cons, they have a huge pile of benefits to offer to both investors and residents, so if you want something practical and cost-effective, go small with a studio. 

About the author: Mike Johnston is an avid blogging enthusiast and experienced freelance writer with a focus in real estate, home improvement, interior design, and sustainable living.

Steps You Need To Take To Recover From Fire Damage in Your Home

RH Business Marketing Solutions

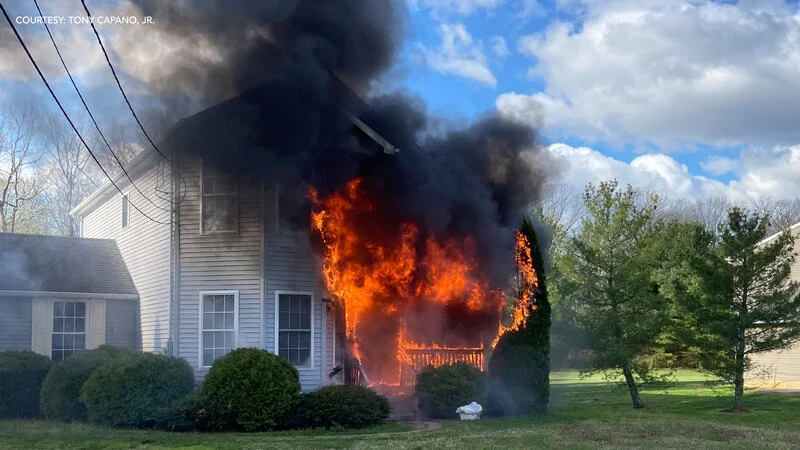
Seeing your home on fire can’t be easy.

Even if only a portion of it burns down, it’s still painful to witness something you worked so hard to acquire or build go up in flames.

Then again, there isn’t much you can do while the fire is still ongoing. By the time firefighters declare the fire under control, your home will have already sustained fire damage.

What’s critical is what you do once the fire is out.

You will need to take steps toward fire damage restoration, among other things, and ensure that you and your family will recover from the disaster just fine.

Secure Your Family and Find A Place To Stay

Whether it’s a fire or some other disaster that strikes your home, your top priority is to ensure your loved ones' safety. Make sure that everyone is safe, then find a place to stay not only for the night but for some time, depending on the degree of fire damage to your home.

Whether you decide to stay at a hotel or with relatives or friends, you will need to check your home insurance policy if you have one. A standard homeowners insurance policy has an ALE or additional living expenses provision, which will pay for your meals, hotel bills, and other expenses you incur while your home is under repair.

Call Your Insurance Provider

Another important thing you must do after—or even during—a fire in your home is to place a call to your insurer. Since fire is a covered peril in a standard home insurance policy, it’s best to give your provider a heads up that you will be filing a claim so the entire process can start as soon as possible.

With your home insurance coverage, you will have the money not only to pay for the cost of repairing the damaged parts of your home but also to replace the personal belongings you lost in the fire. Furniture, appliances, clothing, computers, and other possessions are usually covered by home insurance.  

Wait Until It’s Safe To Enter Your Home

Naturally, you would want to enter your home as soon as possible, but you can’t do that right away, given that it’s still dangerous to do so. Aside from the heat, soot, and fumes, your home's structural integrity may have been compromised by the blaze.

Wait until the proper authorities declare the area safe before entering your home to try to salvage some of your belongings or assess the extent of the fire damage.

Ask For Police Assistance In Securing Your Home

If your house was only partially burned, that means some of your belongings could still be intact.

With you staying elsewhere for the next few days at the very least, your home could become a very attractive target for burglars or looters.

You also run the risk of coming home to the sight of squatters in your living room, drawn by your conspicuous absence from the premises.

Contact the police, who can lend some assistance in securing your home for the days that you’re not there.

Document All Fire Damage

When it’s safe to enter your home, document all the fire damage. Proper documentation is extremely important for insurance purposes, so take photos and videos of charred walls, collapsed ceilings, and any other evidence of the fire.

Call Your Utility Providers

In all likelihood, you never had the time or opportunity to switch your gas or electrical mains off at the onset of the fire that hit your home.

In any case, firefighters will be doing that as they put out the fire, you still need to call your utility providers and inform them of what happened.

Wait for word from the fire department if it’s safe to turn on the gas and electricity. Under no circumstances should you switch them on without their say-so.

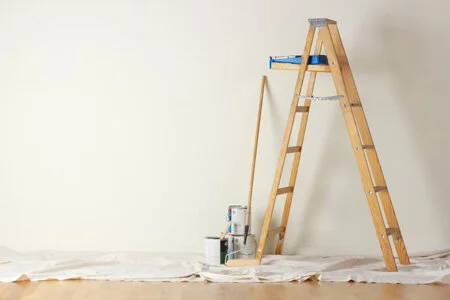
Contact A Fire Damage Restoration Company

While you can always personally take on the gargantuan tasks of cleaning up the fire damage to your home and restoring it to the way it was before the fire hit, it would still be best to leave them all in the hands of professional fire damage restoration specialists.

A fire damage restoration company is staffed by well-trained, extensively-experienced, and well-equipped technicians who know every technique necessary to perform excellent fire damage cleanup and restoration. By the time they’re done, you can be sure that your home will look like a fire that never hit it at all.

Guest Contributor: Rachel Anderson

Water-wise Gardening Advice: How to Save Water in Your Yard and Garden

RH Business Marketing Solutions

image1.jpg

Countries around the world have seen persistent drought-spells and dam reservoirs hitting their lowest points in decades, and in some cases, water-restrictions have become a common occurrence. In times like these, it’s crucial for everyone to re-evaluate their water priorities and reconsider ways of protecting their gardens as they are the ones taking the hardest hit. 

Reducing water usage in gardens doesn’t necessarily mean letting your plants wither and die. It simply means being water-wise and resourceful which may require more work and preparation, but such an investment will pay off by helping both the environment and your pocket. 

Here are several water-saving tips to help your garden and yard stay healthy.

Prepare your soil

The key to maintaining a water-efficient garden lies in understanding the soil, good planning and its preparation. Each type of soil is different and can be improved in many ways. Compost helps water retention by adding nutrients needed for plants to grow better and stronger. 

Good-quality organic matter will improve the structure of your soil and with mulching, the flowerbeds and the area around your trees and shrubs will also prevent water evaporation during dry spells. You can also use water crystals for the same purpose and with the addition of water-retentive granules to your compost, even more moisture will stay locked in the soil. 

When it comes to your lawn, there’s no reason to panic if you notice brown or yellow spots during dry periods. When the rain returns, it will quickly recover. However, it helps to be water-savvy with your irrigation, by mowing the lawn a bit higher and giving it deep watering just once a week to boost the root system.

Pick the right plants

For a wonderful green garden that requires no excess amount of watering, after proper soil treatment, your next step is selecting the right plants that are low on water needs. Choose native varieties that can withstand dry spells and lots of sun, and add trees and tall plants for cooling shade. There are lots of plants that have evolved in dryer climates and need very little water to survive, such as lavender, verbena, mimosa and palm trees. 

Water your garden at the right time

Many homeowners over-water their gardens which is not only wasteful but it also demands more work. You can easily prevent this by checking your soil at spade depth – if it’s moist, leave it be. It also depends on your soil type. If it’s clay, it may seem damp whether it’s been irrigated or not, and sandy soil can seem dry even if it has been watered. In these situations, inspect your plants for signs of water stress. If you notice leaves changing color or position, it may signify water shortage. 

Use the right amount of water

Using the right amount of water depends on your soil type. Heavy soils need less watering than light sandy ones whereas clay-based soils need lots of water but can be watered less often. The common rule for plants to stay healthy and keep growing is giving it up to 24 liters per square meter once a week.

Choose the best watering techniques

The right watering technique will also help you maintain your garden well. You can opt for sprinklers for your lawn and unplanted areas as they have great coverage. To target specific sections of your garden, it’s best to use watering cans and hoses. They might be more labor-intensive, but they’re also very precise.

Seep hoses allow water to slowly seep through holes in the hose and being buried under soil and mulch, less water will evaporate. An automated irrigation system is the most expensive option, but it's also one of the most effective and water-saving options as it limits the amount of water used by letting it drip slowly and only when you program it to do so.

Collect rainwater and reuse old water

Even in the dryer parts of the country, it's possible to collect large amounts of rainwater from your house roof. It's not easy to store large amounts, but if every home in the country managed to collect around 160 liters that would give 4 billion liters of free water that can be used for garden watering.

Another way to be water-savvy is to use greywater (from showers, washing up and washing machines). By way of diverters, this greywater can be used efficiently in your garden. Household soaps aren't harmful to plants, but do avoid using water that contains bleach, dishwasher salt or any strong chemicals.

Maintaining a lush and healthy garden in hot climates can be challenging, but with these tips, it's possible to grow a beautiful garden you can truly be proud of and enjoy year-round!

Guest Contributor: Kurtis Wilcox

Bathroom Upgrades That Save Water

RH Business Marketing Solutions

Image-68.jpg

Bathrooms use a lot of water. In fact, this is the room that uses most of the water in your home. The toilet accounts for 26.7% of all water usage, on average. The shower adds 16.8% to that figure. The interesting part of this is, while you can’t avoid using water, there are ways to upgrade almost every fixture you have to reduce water usage.

Below, we’ll cover the bathroom upgrades that will go easy on your water bills and the environment — while turning your bathroom into a more beautiful, contemporary space.

Choose a Low-Flow Toilet

Modern toilets use a lot less water than older ones while providing plenty of flushing power. In 1992, a U.S. law was passed that mandated all new toilets sold within the U.S. to use 1.6 gallons of water per flush or less. Contrast that with older toilets, which can require twice or even four times as much water — 3.5 to 7 gallons of water per flush. You can see where replacing those older toilets can save a lot of money while upgrading the look of your bathroom.

Replace Your Showerhead With a Low-Flow Showerhead

This is an inexpensive upgrade that you can install — and it could save you many times over on your water bill. On average, if you took seven-minute showers 25 times per month, a regular showerhead flowing at 2.5 gallons per minute would use 440 gallons of water. Replace it with a low-flow model that uses about 1.5 gallons per minute? That number drops to 262 gallons per month, which saves you roughly 2,000 gallons each year.

Opt for a Low-Flow Faucet, Too

Similarly to showerheads, you can install low-flow faucets to help rein in water usage. Though the bathroom faucet isn’t among the largest water users in the bathroom, this still chalks up to big savings. Standard faucets use about 2.2 gallons per minute, but if you get a water-saving faucet, it could consume between 0.8 and 1.5 gallons per minute.

Rethink the Bathtub

Hot baths are undeniably a relaxing luxury — but they also use a lot of water. The average bathtub will need between 25 and 50 gallons for a fill — whereas a 10-minute shower with a water-saving showerhead will use roughly 25 gallons of water. The first thing that you can do where the bathtub is concerned is to treat baths as a luxury. It’s perfectly fine to indulge once in a while, but daily baths can drive up your water usage.

Another great way to reduce water usage during baths is to replace your tub with a water-saving bathtub. These are quite unique in that they’re designed to hold less water than a traditional bath while giving you the same comfort. Essentially, they’re designed to fit the contours of the human body, which allows you to soak while using far less water.

Combine New Fixtures With Good Habits

The upgrades mentioned above will save a lot of water yearly, making them well worth the investment. They’ll enhance the look of your bathroom, too, replacing old and worn fixtures with new, stylish ones. 

Past that, you can save even more water by combining your updated fixtures with good habits:

  • Make sure to shut the bathroom faucet off when you’re not actively using the water. In other words, don’t let the water just run while brushing your teeth.

  • Minimize shower time and treat baths as a luxury to ease water usage.

  • Regularly check your plumbing. Leaks account for up to 13.7% of water usage within the home. If your toilet keeps running, faucets drip or pipes seep, that is water being wasted. It may not seem like much, but it adds up over the course of a year. Worse, plumbing leaks could cost you even more if they go unnoticed long enough to cause rot or some other kind of damage to your home.

Saving water means investing wisely in fixtures. Nowhere is this more important than in the bathroom, which is the biggest water consumer in any home. Consider upgrades to bring your water bills down and to give your bathroom a much-needed update.

Author bio: Erica Garland is Content Marketing Manager at Modern Bathroom and has 15-plus years of experience in the bathroom renovation industry. Modern Bathroom sells a variety of products you would need for any bathroom renovation project. With such a large selection of vanities, faucets, sinks, toilets and showers, Modern Bathroom is sure to have the perfect piece to give your bathroom an updated look.