Google+

contact us

Use the form on the right to contact us.

Day or Night, we are here to serve you. Leave your plumbing problem to us.


Tinley Park, IL

(708)845-7922

Residential and Commercial plumbers and plumbing contractors available in Orland Park, Tinley Park, Oak Lawn, Palos Heights, Midlothian, Oak Forest, Homer Glen, Mokena, Frankfort, and the surrounding Chicago South Suburbs. Emergency plumbers.

copper water lines.jpg

Kevin Szabo Jr Plumbing Blog

Kevin Szabo Jr Plumbing is Tinley Park, Orland Park, Oak Forest, Midlothian, Orland Hill, Homer Glen, Mokena, Frankfort, Crestwood, Palos Heights, Oak Lawn, local plumber. Read our blog for advice, tips, a good laugh, and basic home improvement.

**We are moving our old blog to our new and improved website. Too see all our posts visit kevinszabojrplumbing.blogspot.com

Electrical Safety Tips For Holiday Lights

RH Business Marketing Solutions

71cLKGzpWFL._AC_SY450_.jpg

Tis’ the season to start decorating your house for the Holidays. Oh what a wonderful time it is, the best time of the year! Before you start to decorate your house, you’re going to want to inspect everything to make sure it’s still in good shape and doesn’t create a hazard to you or your house.

Holiday Lights

Whether your lights are colorful, white, yellow, etc. you’re going to want to inspect them before hanging them anywhere. You want to look for frayed wires, broken sockets, or other signs of wear and tear. Before you set them up where you want them you should always plug them in first to see if they work. You should always hang them on non-flammable surfaces. If you plan on connecting more then one light strand together to get a longer strand, a good rule of thumb is to not connect more than 3 just to be safe. You should also never place the lights or any extension cords used under rugs, blankets, or near walkways as it is a serious hazard. When hanging up lights outdoors, make sure you keep the electrical connection off the ground. Only use exterior lights outside, the interior ones are not made the same and are not as durable. You should always unplug the lights whenever nobody is there to accompany them. You should always be close and nearby incase something happens. You can also purchase a timer for the lights to help remember when they’re on and off. Lastly, you’re going to want to hang them on a tree that is labeled fire resistant. Most people hang lights on their tree not knowing if the tree is fire resistant and it’s a serious safety hazard. The lights will start to warm up the longer you leave them on, so it’s best to be safe than sorry when purchasing a tree that is fire resistant.

Guest Contributor: Tiffany Powell

How To Unclog A Shower Drain

RH Business Marketing Solutions

shower_drain_clog_600x400.jpg

Have you taken a shower or bath lately and noticed the water isn’t draining how it use to? It’s slow, or the water doesn’t drain at all? If the water does go down the drain smoothly and it fills up and slow drains (or doesn't drain at all) you have a clogged shower drain. If you start to notice your water is draining slowly it’s best to clean the drain now rather than later. If you want to try to unclog the drain before calling a plumber, here are a few things to try.

Boiling Water

Grab a pot and fill it with water and place it on the stove. Let the water get to a boil, and remove. You want to pour the boiling water down the drain, carefully, in increments. Doing so should help the blockage loosen up and hopefully get rid of the blockage. This is only recommended if you have metal pipes as PVC pipes can potentially loosen at the joints.

Snake The Drain

Snaking the drain is easier than you think, however as nasty as it sounds. You’ll want to roll your sleeves up for this one. You can buy a snake drain cleaner at the store but if you’re in a pinch a metal coat hanger will do the trick. You can undo the wire hanger into a straight line, leaving the hook at the end. You want to stick the hanger down the drain and attempt to feel for any blockages. Once you reach a blockage try to bring the blockage up, do not push it further into the pipes. Once you got everything out and can feel no more blockages, run the water and test it out. You can also put boiling water down the drain afterwards just as a little extra to ensure there are no blockages remaining.

Baking Soda And Vinegar

You’re going to want 1/3 cup of baking soda and 1/3 cup of vinegar for this. Mix them together in a cup and when it starts to fizz, which will happen immediately upon mixing them, put it down your drain. The chemicals should help break up the blockage and grime stuck in your pipes. Let it sit for as long as you can, but 1 hour is recommended. Then you can run hot water down the drain to see if it worked, and help loosen up anything else that could’ve been missed.

If you don’t feel comfortable doing those things, or you tried and it didn’t work, it’s best to consult a plumber to come take care of your problem. Kevin Szabo Jr Plumbing would always be more than happy to help with any kind of draining issues.

Guest Contributor: Tiffany Powell

How to Properly Store Your A/C During the Cold Months

RH Business Marketing Solutions

It’s fall season, and time to put your A/C back in the basement! But it’s easier said than done! An A/C unit that isn’t stored properly might suffer from irreversible damage. That’s why Bill’s Heating & A/C wants to share these top tips on how to store and care for your air conditioning system over the fall and winter. 

Inspect for Damage

Air conditioning issues can come in any form, and you wouldn’t want to deal with them at the height of summer. So before storing your A/C this winter, you’ll need to inspect it for damages. Are there dings or dents on the coil? Is the fan working properly? If it’s damaged somewhere, the next thing to do is consult an A/C repair pro in Grand Junction for effective solutions. 

Clean the A/C Unit

You don’t put back your dirty clothes in the closet, right? The same thing goes for your air conditioner! It’s never advisable to store it with dirt, dust, and debris all over. Make sure to clean it thoroughly in and out before storing it. Remove the A/C filter and wash it with soapy and warm water to remove the dirt. 

Cleaning your unit can be tedious and challenging with its many components. However, you can always seek professional help to get the job done. Consulting an expert HVAC contractor is the perfect way to ensure that your air conditioning unit is checked and cleaned thoroughly.

Replace the Filters

We’ve said it a thousand times and we’re going to say it again—replace your filters! The air filter should be free of dust or dirt that gets trapped between the fibers. With a new filter, your cooling system will be able to work at its best in the summer. Plus, it helps you avoid emergency A/C repair in Grand Junction

Run the Air Conditioning  

There's no other way to check if it's working than turning it on. Run your A/C for hours and see if it’s operating properly. Turning your air conditioning system on can help you determine if there are problems. You have to check for strange sounds, smell, or airflow issues. If in doubt, seek help from a specialist.  

Look for the Right Storage Room

Storing your A/C unit in a clean and dry place such as the basement, utility room, or an attic is necessary. As much as possible, don’t keep it in the garage as insects or pests can damage it. Make sure that rodents, mice, and other pests can't go near your unit while it is stored.

Cover It—Cause Why Not? 

Some say that covering your A/C during the winter isn’t necessary, but we say—why not? It doesn’t hurt to cover the unit as long as the cover or fabric that you’re going to use is breathable. Just make sure that the cover should not lock in moisture because it could be detrimental to your air conditioner. 

Get Expert Help

Not everyone has the time and expertise to maintain and store air conditioning units during the cold months. Luckily, Bills Heating & A/C is here to help. They offer a wide array of HVAC services, such as installation, maintenance, repair, and tune-up. With the company's passion for helping residential and commercial property owners, you can make sure that your heating and A/C system will get the best care it needs.

Your air conditioning system is your dependable ally during the brutal summer months, so it is just right to give it the best care it needs. 

You can count on Bill’s Heating & A/C for trusted professional HVAC services in the Coeur d' Alene and Spokane areas. You may visit them at https://callbillsheating.com or call them at 208-777-5528.

About Bill’s Heating & A/C

Bill’s Heating & A/C is a locally owned and operated company that provides a comprehensive range of heating and cooling services for home and business owners in the greater Spokane and Coeur d’ Alene areas. They also offer a wide selection of comfort products, including air conditioners, heaters, fireplaces, and water heaters.

Guest Contributor: Paul Stetzelberger

How to Have Clean Water in Your Home and Clean Your Pipes

RH Business Marketing Solutions

636487814295449708-water-rebates.jpg

From cleaning to hygiene to cooking and even just for drinking, the importance of access to clean water can’t be overstated. There are a variety of reasons that water is so important but it’s more than just your basic health needs when we talk about clean water in the home. It will also help you to keep your home clean and help pipes and appliances last longer. 

There are a few things that you can do to help improve the water quality in your home.


Assessing Your Water Quality

While there are plenty of places around the world that definitely don’t get the water they need, some households are lucky enough to have the water they need. That’s why it’s a good idea, when possible, to get a water quality report to give you a better idea of what your water is like and what you need to use to maintain better water quality. 

According to Food and Water Watch, people in the United States can look at their water quality report just by default. This report will tell you the source of your drinking water, the state’s source water assessment, the detected contaminants, the number of contaminants, and the potential health effects of those contaminants.

The water report should also include the regulations and goals for drinking water contaminants as outlined by the United States Environmental Protection Agency. 

Using Water Filters

One of the most common ways to help improve the water quality in your home is to turn to the help of a water filter. Water filters work to remove particles from the water. This can include everything from suspended particles to more nefarious components like parasites and viruses. 

That being said, not all water filters work the same. There are different types of water filters you can depend on ranging from whole-home systems to more targeted options like a filtered pitcher in your fridge. 

The only downside to water filters is that most types filter the water once it’s no longer in the tap. As a result, these options aren’t going to help very much when it comes to protecting your pipes and plumbing.

Using Water Softeners

Water softeners are different from water filters but not in a complicated way that makes them harder to use. This type of device is used to remove certain minerals from your water like calcium, magnesium, and other potentially harmful minerals. 

This is good for more than just your personal health, though. Water that has been through a water softener is better for the items around your home as well. For example, it can help with any cloudiness and in your glassware and it will be gentler on your pipes in the long run. 

Like water softeners, there are plenty of different types of water softener systems out there and you can explore some of the best options to fit your home. 

Boiling Water

If you don’t have access to clean water and you aren’t looking for a whole-home system, one tried and true way to purify your water is to boil it. This will help to kill bacteria with heat, much the same way as cooking your food can help it in this way. 

However, the solid particles in your water won’t simply vanish if you boil the water. You’ll want to take the extra step of straining the water to get any larger pieces out before using it. This way, you’ll be able to thoroughly clean your water before use or consumption. 

The downside, of course, is that it takes time to boil water and it takes more time for it to cool if you’re planning on using it as drinking water or need cold water for something. Of course, this isn’t going to help your water before it comes out of the tap which means that it isn’t the best choice when you’re trying to protect your pipes from harm. 

Iodine to Purify Water

Another common option to purify water is to use an iodine solution which is also available in the form of a tablet or as crystals. This is a readily available option that is easy to use but it does have some downsides. This includes the fact that you won’t want to use this if you or someone in your household is pregnant and it only addresses your water once it has left the tap, not protecting your pipes. 

Conclusion

In the end, there are a number of different ways that you can purify the water in your home. However, if you want to protect your pipes as well as your home, your best bet is probably to opt for a water softener that targets problems in your house’s plumbing system. This will help protect your pipes and your usable water.

Guest Contributor: Buddy Murphy

Passive Storage Investment: Tips for Beginners

RH Business Marketing Solutions

pasted image 0.png

Americans love storing their stuff. In fact, the self-storage industry is primarily a US-based industry, where out of the 58,000 self-storage facilities that you can find around the world, 46,000 can be found in the US. 

Although the average size of the American home has tripled over the past 50 years (according to the independent, non-profit media organization NPR), many homeowners still rent self-storage units for their extra belongings. The industry has become one of the fastest-growing sectors in the commercial real estate industry. Thus, investing in a self-storage business is a promising way to earn passive income.

If you’re thinking about making a passive storage investment, read this article to learn more about it.

Self-Storage Investing: What Is It?

Short for “self-service storage,” self-storage is an industry where people can rent out units to store their belongings. These units may be lockers, rooms, container vans, or open spaces. Many people store a variety of items in self-storage units, such as furniture, appliances, art, vehicles, decorations, or documents.

Some businesses also rely on these storage solutions to hold their stocks, pieces of equipment, and supplies. Several creative customers even converted their self-storage units into sheds and man caves.

Self-storage units can be rented on a short-term (monthly payments) or a long-term basis.

What is passive storage investing?

Investing in passive self-storage businesses means that you will put your money into real estate syndications (also known as group investments).

This means that, instead of buying a property or building storage units from scratch, you will pool your money with the company together with other investors. As a result, you’ll be able to acquire larger commercial properties. This also means more income for all of you.

As a self-storage investor, you don’t have to do any kind of work. You can simply invest your money and start getting cash flow checks.

What makes self-storage a profitable investment?

Real estate can be an overwhelming and challenging industry for entry-level investors. However, self-storage investment is one of the easiest, safest, and most lucrative businesses if you’re a beginner. 

Before you familiarize yourself with how to invest in storage businesses, you should first know the advantages.

Lower starting capital. Unlike most commercial real estate businesses that require a hefty amount of dollars as a starting capital, passive storage investment needs far less than that. Also, if you’re applying for a loan from the Small Business Administration (SBA) to build your capital, they will only require as little as 10% downpayment.

Fewer risks during economic downturns. No business comes free of risk, especially during economic downturns. However, the self-storage industry was the only sector to report positive returns during the Great Recession of 2008. 

High consumer demand. As the residential market continues to rise and more people earn higher disposable incomes, the demand for self-storage will also continue to grow.

How to Invest in Storage Business

Eager to earn passive income through self-storage? Fortunately, you don’t have to open up your own warehouse from scratch. You can invest in an established self-storage facility by purchasing shares and receive return-on-investment (ROI) through dividend returns.

Self-storage companies usually have different methods of receiving applications from investors, but here’s a general overview of the process:

1. Send in an application form. The first step to starting a passive storage investment is by filling out an application form or writing a letter that expresses your interest. This form can usually be found on the website of the self-storage company.

2. Discuss your goals with the company. After sending your application, one of the company’s representatives will contact you once you are accepted. From here, you can discuss your goals, and then they will provide you with the best investments that will help you meet those goals.

3. Start your passive investment. The company’s representatives will guide you through the process of making a passive investment.

4. Wait for your income. Once you are done with the application and have completed the initial investment process, you do not have to do anything. Just sit back and wait for your quarterly cash flow payments from your passive self-storage investment.


pasted image 0-2.png

Managing and Maintaining Your Self-Storage Facility

In general, passive self-storage investors don’t have to do any work at all. The company will be responsible for the operations and maintenance of the facility. But if you’re interested in learning more about managing and maintaining a self-storage facility, here are several tips:

Check the roofs.

One of the most important parts of the facility is the roof. You’ll need to ensure that it is reliable and strong enough to protect the tenants’ items inside the units. Clear out debris and residue on a regular basis, especially after storms. Clean out the gutters and downspouts regularly as well. Remove any debris that could clog the downspouts and prevent rainwater from flowing down. This measure will prevent leaks and roof deterioration.

Clean the exterior walls.

Since cleaning the interiors of the occupied units aren’t possible, make sure that the exterior walls are spic and span. Wash out the dirt, grime, and dust that have accumulated over time. Giving it a paint job whenever necessary will keep it looking new and attractive as well.

Perform regular general inspections.

With the help of professional building inspectors, you should schedule general inspections regularly to ensure the building’s structural integrity. Inspect the doors, the interiors, and the plumbing system. Ideally, this should be done when most of the units are empty.

How Much Self-Storage Passive Income Can You Make?

According to a study, self-storage investment only has an 8% failure rate compared to other real estate investments. Meanwhile, multifamily residential units have a  58% failure rate, office spaces have a 63% failure rate, and retail spaces have a 53% failure rate.

What do these numbers mean? The low failure rate of the self-storage industry means that it has the extra edge to survive tough economic times. According to Inside Self Storage’s financial model, an investment of $397,615 can generate a positive cash flow of $117,761 or a 29.6% cash-on-cash return on investment (ROI). 

Additionally, the self-storage industry in the US has a profit margin of 11%. That’s a stark contrast to the profit margin of restaurants, which is just 3-5%. Therefore, it’s no wonder that plenty of business beginners are enticed to earn self-storage passive income.

Can you imagine how much passive income you can make with self-storage businesses? And to think that you don’t have to do anything at all!

Final Thoughts

Commercial real estate is a promising industry for budding entrepreneurs. However, if you’re looking for an easy, safe, and profitable business opportunity, you should consider investing in self-storage units. Self-storage investing for beginners is pretty easy. Among other real estate sectors, self-storage requires the least starting capital. Plus, it’s the most resistant to economic downturns.


Need help with maintaining your self-storage units and other commercial spaces? Kevin Szabo Jr. Plumbing can help you with installing and updating your plumbing fixtures and systems. For more information, you may read more of our blog articles.

Guest Contributor: Edwin Sutton

Tips to Help Create Your Ideal Outdoor Living Area

RH Business Marketing Solutions

Outdoor-Living-Spaces-TV.jpg

Those who have enough space in their homes are investing in creating outdoor spaces, and it’s easy to see why.

An outdoor living space represents our best chance of feeling connected with nature and breathing fresh air anytime we want. 

After a hard day at the office, we can always plop ourselves onto the comfortable outdoor furniture, turn on the patio misting systems when the weather is warmer than usual, and relax while sipping on a glass of wine.

If you love having friends over for parties or get-togethers, then your outdoor living area will be the perfect venue for them as well.

If you don’t have an outdoor living area yet, but you’re considering creating one, you will find the following tips useful.

Determine Its Function

How do you intend to use your outdoor living space?

Many homeowners think of their outdoor living space as a place to unwind. If that’s what you have in mind, then make sure you provide the area with the most comfortable furniture you can find.

If you visualize it as more of a place to enjoy meals and entertain guests, then add an outdoor dining table with the appropriate seating.

Don’t Forget The Shade

Your outdoor living area won’t be so comfortable without plenty of shade, especially with summers getting hotter by the year.

Consider installing patio drop shades, which are perfect for keeping the sun away at certain times of the day.

If your backyard has enough space, consider planting trees, your most environmentally-friendly shade option.

Patio umbrellas will also get the job done.

Add More Plant Life

Complement the trees on your property by adding flowers and plants. Besides contributing to your home’s oxygen supply, more plant life will also add beauty to your outdoor space, particularly when the colors of the blooms you pick work well with the overall color palette of your home.

Put Up Relaxing Water Features

Do you ever get that feeling of relaxation whenever you hear the sound of flowing water? If so, then it would be right for you to install water features in your outdoor living area.

As far as water features go, you have a wealth of choices, although everything would depend on your budget.

A small reflecting pool would be great.

You can also opt for water gardens that host aquatic plant life.

If you want a fountain, you’ll have a variety of shapes, designs, and sizes to choose from that will make this water feature even more stunning.

The beauty and the soothing sound of cascading water that waterfalls can provide is also something to seriously consider when choosing a water feature for your outdoor area.

Install Heating & Cooling Options

We all wish for the weather to be perfect all the time, but we know that’s not going to happen.

Some summer days will be too warm, and the cold of winter can prevent you from spending time in your outdoor living area.

Things don’t have to be that way, as you can easily address heating and cooling issues in your outdoor space.

Electric fans would be a good way to cool off, although a patio misting system is better.

Installing gas-fired or electric heaters, or a fire pit to keep you warm out there would also be an excellent idea.

Create Good Lighting Conditions

You would want your outdoor living area to be a well-lighted place. After all, you spend most of your nights there and entertain guests in the evenings every so often.

Overhead light bulbs ought to do the job, but there are plenty of lighting options out there that you might want to check out.

String lights wrapped around trees, for example, is a creative way of illuminating the space.

Walking around your backyard will also be easier with garden path lights.

You can also try Tiki torches for a fun and tropical touch.

On top of the comfort and party opportunities it provides, an outdoor living area can also help raise your home’s value, with many homebuyers looking to buy homes with one.

Indeed, there are plenty of good things and virtually no downsides about having an outdoor living space at home. Build one now and enjoy its benefits for years to come.

Guest Contributor: Anna Fox

Home Remedies For Clogged Sink Drains That Actually Work

RH Business Marketing Solutions

pasted image 0.png

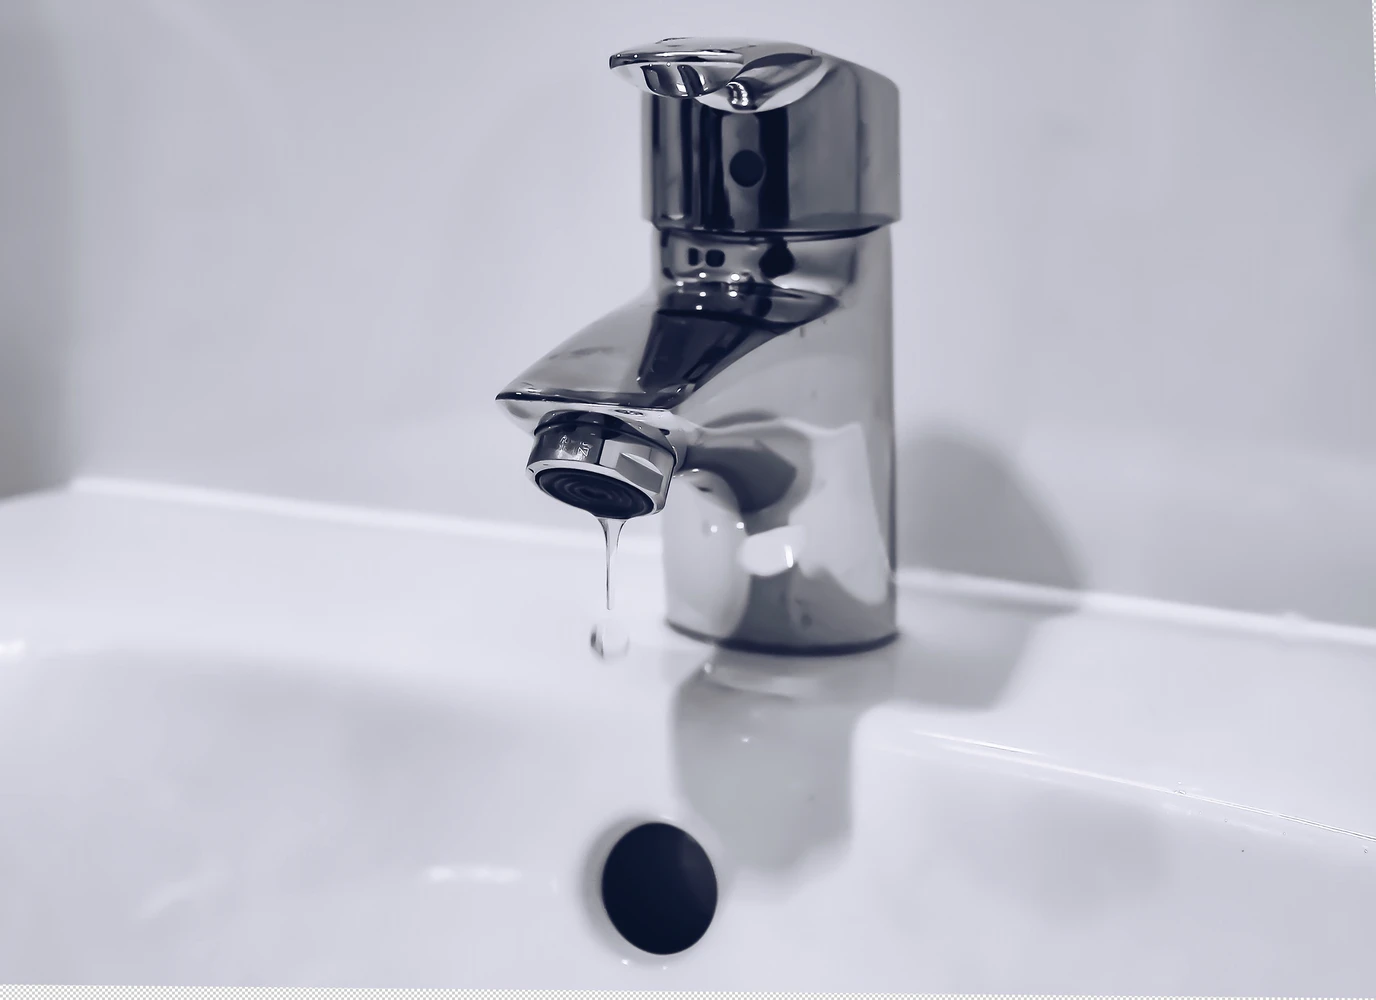
Nothing throws your daily routine off worse than discovering a blocked sink drain in your home. From water slowly trickling down the drain, to a full and complete stoppage, a clogged drain can lead to stagnant water, unpleasant odors, and a general frustration anytime you use your sink. 

It’s important to note that the best way to get rid of clogs is to avoid draining them. Think of your sink like your home in general. If you take the effort to, say, wash your windows regularly, you’ll probably save yourself the effort and cost of replacing those windows when that accumulated grime causes damage. 

The same goes for your sink. If you don’t take basic precautions, like using a drain-grate or making sure not to pour grease or coffee grounds down your drain, you’ll prevent clogs and the risk of more serious damage to your plumbing that can cost you more in the long-run. Also if you are interested, here you may check jobs for plumber helper.

One way this damage can present itself is the use of harmful chemicals to unclog drains. Most households, when facing the challenge of a clogged sink tend to reach for the nearest chemical drain cleaner. While this might resolve your issue, these cleaners can also produce toxic fumes and can actually cause physical damage to your water pipes. 

Thankfully, if you do encounter a clogged sink, there are several home remedies that can help take care of your problem, and get your sink running smoothly once again, without causing permanent damage. 

Boiling Water

When you find yourself with a slow drain, the first thing you should do is the simplest and easiest— flush the drain with boiling water. If that seems too easy, you’d be pleasantly surprised! Many minor clogs can easily, and cleanly, be taken care of with a quick flush of superheated water, which can clear out many minor blockages with ease. 

Before pouring water down the drain, make sure to check what material your pipes are made of. If you have metal pipes, you have nothing to worry about, but PVC can start to soften or melt at the joints when exposed to temperatures over 175 degrees. If you have PVC, or aren’t sure, just use water as hot as the tap can make it. Today'scave.com goes through kitchen sinks in detail, as well as all you need to know about maintaining a clean sink for a long time without spending a lot of money.

If boiling water doesn’t work, it’s time to move on to more intensive efforts. Your next step should involve...

Vinegar, Baking Soda, and Salt

Vinegar is a secret weapon in every kitchen that’s useful for more than adding a kick of acidity to a recipe. It’s also a very effective (and environmentally friendly) cleaner. Vinegar can be used to make a cheap window cleaner, as a weed killer, and it can even cut through mildew.

Vinegar’s unique properties (usually 5-8% of vinegar, by volume, is acetic acid) that make it so useful as a cleaner and disinfectant also help it attack stubbornly blocked sink drains, with a little help from some friends, of course. Those friends would be baking soda, salt, and boiling water.

The “recipe” is simple. First, mix ½ of a cup of baking soda, along with ¼ of a cup of basic table salt, and toss that down your affected drain. Then, pour one cup of vinegar (you’ll get better results if you heat up the vinegar first, but it’s not essential). Almost immediately you’ll hear fizzing and bubbling from the chemical reactions occurring.

Leave everything alone for the next fifteen minutes, and run hot water from the tap. This should clear out the vinegar/salt/baking soda mixture, and hopefully will result in a freely running sink. 

If the clog persists, however, it’s time to try some more intensive approaches. 

Using a Plunger

It might not occur to you that a plunger can be used on a sink as well as, um, other areas, but many a clogged sink can find relief through this simple tool. You’ll want to make sure you have a cup-shaped plunger, and not a flanged one, as the latter won’t form a proper seal over your clogged drain.

The approach here is very straightforward. Make sure to remove any strainers or objects in or around the drain, and ensure that you have a clean, airtight fit that is completely covering the drain. Then simply use “pump” the plunger using fast, sharp movements. Occasionally test to see if the clog has been resolved, and if not, keep plunging. 

If, however, plunging doesn’t seem to cause any improvement in the flow of your sink, you’ll need to move on to the next step.

Snaking Your Drain

Snaking a drain can be pretty daunting for the average homeowner. It involves purchasing tools, such as a drum auger, that you might not encounter normally. These can range in price from ten dollars for a very basic model to hundreds of dollars for more advanced, sophisticated augers. 

A 25-foot drum auger will likely suit your needs—it contains 25 feet of coils that you can unravel, with a tip designed to snag debris or other items that might be responsible for a clog in your drains. 

If your sink doesn’t have a stopper or plug, or if your stopper can be pulled out, snaking the drain is fairly simple. You just send the coil into the drain about as far as you can get it, then reel it back in, hopefully taking any obstructions with it. 

If your stopper can’t be removed, things get a little tricky. You’ll need to go under and take out the P-trap (the bending section of pipe) so you can snake from the bottom up. This might be a bit heavy-duty for some of you, and for truly severe clogs, you might still find an issue.

Use a Wet-Dry Vac

One additional step to try, if snaking doesn’t work, would be the use of a wet-dry vac. Of course, not everyone has a wet-dry vac. It’s not exactly a common household item for most people. If you do have one, however, and none of the previous methods have worked, you can give using yours a try. 

To tackle clogs with a wet-dry vac, first set the machine to the “wet” setting. Then make a tight seal over the drain, and turn it on at its highest setting. This should hopefully, finally, unclog your sink.

Drain-Clearing Chemicals

Now, most households would rather avoid the “hassle” of some of these approaches by just dumping drain-clearing chemicals, waiting half an hour, and flushing with hot water. If you’re determined to do this, do research first. Make sure the product is eco-friendly, and that it doesn’t utilize harsh and harmful chemicals.

As we mentioned earlier, many of these drain cleaning products harm both the environment as well as your pipes, and can release toxic or harmful gasses inside your home.

When All Else Fails, Call a Plumber

If, at the end of the day, you’ve tried everything and still are nowhere closer to having a functional sink drain, call a local professional. No one likes having to spend money for a plumber to come and fix a clogged drain, but when you’ve exhausted all your options, that means it’s time for extra help. 

A dependable plumber should be able to take care of everything, and they’ll likely find the overarching issue that caused your severe clog in the first place. 

No matter how you do it, once you’ve defeated the dreaded clogged sink, you’ll be thankful every time you go to wash your hands without leaving behind a pool of soapy, still water. And nobody wants that.


Guest Contributor: Jeff Good

When Is It A Good Time To Stain Your Deck?

RH Business Marketing Solutions

STRIP_A_DECK__018.jpg

It is important you keep a close eye on the maintenance of your deck, and not only is staining your deck visually appealing but it also helps take care of the wood and keep it in good condition. There are a lot of things that cause wear and tear on the wood: rain, snow, sun, wind, etc.

When Is It A Good Time To Stain Your Deck?

When you know for certain you have the time to do it and the weather is cooperative, that’s the best time. However, there are some things that play a factor in staining.

You should plan at least 2-3 days for this to get done. Before you lay down the stain, you’re going to want to power wash the wood and make sure it’s clean and even for an easy, consistent application. You should wait until the deck is fully dried after power washing it, and that could take hours. Depending on how big your area is to stain will ultimately decide on how long it takes.

You want to pick a day where you can avoid direct sunlight, and look at the weather forecast and make sure there’s no rain for the next 2-3 days following.

What About Temperature?

Most people don’t take temperature into play when they decide they want to stain their deck. If it’s nice outside, they go for it. Although it’s nice, it doesn't mean it’s an ideal time to stain and it should be pushed off longer if it could wait. Spring and Summer are not ideal times to stain deck, even though the weather is perfect for you to feel comfortable to do it. But, wood absorbs humidity and when the wood is dry is when you would see the best results. Staining in the Spring can lead to cracking and peeling stain because the pores are still very much saturated, making it harder to take the staining treatment. Summer is too hot, the paint can evaporate too quickly before it even penetrates the wood correctly.

Mild temperatures will help the stain work with you instead of you racing against the stain. Harsh temperatures and a very sunny day will possibly end up with the stain drying too fast than you can work, and ultimately not looking the way you envisioned.

Guest Contributor: Tiffany Powell

Ways To Clean Your Gutters Of Debris

RH Business Marketing Solutions

bigstock-Leaves-in-a-rain-gutter-16441973.jpg

Leaves are beautiful when it comes to Autumn, the way they change colors, look on the trees, the way they coat the ground and you can not forget the satisfying crunching sound when you step on them. However, their beauty comes with a price, and that price is them falling into your gutters.

Cleaning your gutters of leaves and debris is a dreadful task because of how hard it is for some people.

Luckily, there are numerous ways to successfully clean your gutters with minimal effort with the use of power tools.

Before we get into the power tools and how to use them, let’s discuss the safety precautions.

Be Careful!

On behalf of Kevin Szabo Jr Plumbing, we advise you to make sure you are cautious of your surroundings at all times, and you are cleaning them in a safe manner.

Things we recommend before cleaning:

  • Make sure you wear proper gloves and eye protectant. Thick suede gloves are what we recommend using due to the durability of them.

  • Do not try to clean your gutters after it rains. We suggest waiting a few days, and doing it midday when the roof is completely dry.

  • We advise against cleaning your gutters from on top of your roof. Reaching down to clear the debris is unsafe and can lead to an increased risk of falling. We recommend using a ladder, and if your roof is higher than normal, we suggest an extension ladder.

  • Before cleaning the gutters, you should always clear the roof of debris and leaves before the gutters. You do not want debris falling back into the gutters after it rains. This can be done by a leaf blower or broom.

  • If possible, have a helper with you. Have somebody alongside of you to hold the ladder and assist if needed.

A1vAgQ8HY1L._SS350_AC_.jpg

Leaf Blower

Using a leaf blower eliminates the need to use your hands to clear the clutter. While we do not recommend going on your roof at all, the most common ways people use a leaf blower to clear the leaves is to climb on the roof and stand straight above the gutters and blow the debris out.

Another alternative to using a leaf blower on top of the roof is to get an extension kit. This is the safest method to using a leaf blower. Although it is safer, it is messy. Eye googles are recommended, as the debris is going to end up falling down towards you since you are standing on the ground below where it is all getting blown out.

Vacuum

If you happen to have a wet/dry shop vacuum this is a great choice to help clear your gutters. You can do this by standing on a ladder, or by purchasing an extension and standing on the ground. This method has the least amount of effort, there is no cleanup afterwards.

Power Washer

This is mainly recommended after a storm when the leaves are sticky and stuck in the gutters. If you have a clog and everything is backing up, we recommend taking a power washer and blowing the leaves out. Be careful of the pressure the power washer has, you do not want to fall off the ladder or end up breaking the gutter from the amount of pressure they release.

This is the messiest way to clean your gutters. It would be a great idea to remove any nearby patio furnishings and be prepared to clean your house afterwards. The debris will more than likely get stuck on the siding and windows due to them being wet.

Professionals

Even with numerous ways to clear your gutters, most people dread doing this and let the debris build up. If you do not feel comfortable, have the time, or are physically able to clean your gutters, it is best to call a professional for help. Many landscaping businesses offer gutter cleaning and can be readily available to help. Make sure whoever you hire is insured, you do not want to risk any injuries or problems falling onto you.

Guest Contributor: Tiffany Powell

7 Tips to Modernize Your Home

RH Business Marketing Solutions

Whether you are building fresh or renovating, creating a home with a modern design will raise your property value. New buyers love home updates, especially when they form a cohesive design. It’s possible to modernize an older home to give it a more clean and sleek aesthetic.

Keep reading to learn seven tips to modernize your home.

1. Adjust the Layout

Modern homes utilize open floor plans. There is an emphasis on wide-open space with minimal decorations and furnishings. To update your home, consider adjusting the floor plan by opening up the walls. You’ll create a space that feels spacious, airy and modern.

Most modern properties have an open living, dining, and kitchen space, with separate bedrooms and offices. This allows movement between areas and creates a natural flow within the home.

2. Update the Exterior

Modern homes are known for having interesting rooflines with clear angular architecture. When building a new home, the exterior should offer clean lines and neutral tones. This will improve the resale value as buyers favor homes with updated paint in neutral coloring.

Most modern homes prioritize balance between the indoors and outdoors.  Adding large windows will help to give the impression of a larger and more open house.

3. Include Smart Devices

Smart homes are the rage in modern design. Automated systems control the home’s attributes, which provides a futuristic feel. By automating routine tasks, smart devices simplify living. If you are building a home, you may choose to implement these systems within the structure itself.

However, you can also renovate your home by adding smart features to give it a modern feel. Linking products such as speakers, lighting and security systems to your home network can provide you complete control using only your phone.

4. Consider Environmental Upgrades

Purchasing solar panels can be the first step you take in reducing your home’s environmental impact. Solar power offers a reduction in energy costs and low maintenance for regular use. Many modern homes utilize green design, by using sustainable materials and features.

When renovating your home, consider using reclaimed materials. Many modern houses utilize stone, metal, wood and concrete in their design. Sustainability is a crucial element in designing a new home because consumers want a strategy that will adapt with time.

5. Purchase New Flooring

New flooring can dramatically change the look and feel of a space. Concentrate on choosing a style that is minimalist and sleek to emphasize modern design. Wood and stone are featured more frequently in modern homes than carpet, so consider upgrading if your interior is fully carpeted.

While you are updating your flooring, you may choose to install heating. Thanks to modern technology, heated flooring has become increasingly popular because of its convenience and luxury experience.

6. Prioritize Minimalism

To create a more modern-looking space, you should prioritize minimalism. Modern design emphasizes open areas with minimal decorations and furniture. The lack of clutter allows viewers to focus on the design and style of the home.

To create a minimalist look, focus on practical storage solutions. While a farmhouse might have floating shelves filled with dishes, a modern style home would use sleek cabinets with significant internal storage.

7. Concentrate on Lighting

The lighting should remain unobtrusive to create a sleek design. Consider installing canned lights that won’t draw the eye. Think of decorative lighting as a dedicated feature rather than for functional use. The decorative lighting should match the general aesthetic for the updated space.

Remember to match the finishes inside the house to create a cohesive and thoughtful design.

Design a Home You Love

Use these seven tips to modernize your home. The key is to choose finishes that suit your style and taste. You should design a home that you love. To provide the most significant impact, update the spaces viewed most frequently or used most often.


Guest Contributor: Rose Morrison

Rose Morrison is the managing editor of Renovated, where she provides home maintenance and renovation advice. To see more of her work, check out the site.