Google+

contact us

Use the form on the right to contact us.

Day or Night, we are here to serve you. Leave your plumbing problem to us.


Tinley Park, IL

(708)845-7922

Residential and Commercial plumbers and plumbing contractors available in Orland Park, Tinley Park, Oak Lawn, Palos Heights, Midlothian, Oak Forest, Homer Glen, Mokena, Frankfort, and the surrounding Chicago South Suburbs. Emergency plumbers.

copper water lines.jpg

Kevin Szabo Jr Plumbing Blog

Kevin Szabo Jr Plumbing is Tinley Park, Orland Park, Oak Forest, Midlothian, Orland Hill, Homer Glen, Mokena, Frankfort, Crestwood, Palos Heights, Oak Lawn, local plumber. Read our blog for advice, tips, a good laugh, and basic home improvement.

**We are moving our old blog to our new and improved website. Too see all our posts visit kevinszabojrplumbing.blogspot.com

Filtering by Tag: best plumbers near you\

How To Clean and Paint Over Smoke Damage

RH Business Marketing Solutions

Homeowners often ask themselves, “When is the right time to paint?” They might want to freshen up their walls, or completely re-imagine their living space, but no matter the reason, the decision to paint your home, it’s not one taken lightly. 

Sure, there are ways you can speed up the process, but at the end of the day, painting a room can use up a fair share of time and resources. 

Sometimes, that decision is made for you. Especially when you’ve suffered smoke damage to your home. When there’s been a fire in your house, apartment or condo, it’s a traumatic experience. And no matter the size of the fire, you’re bound to be left with some smoke damage to your walls that you’ll want to address immediately. 

The good news? It’s actually fairly easy to clean and paint over smoke damaged walls. Just follow these easy steps, and you can get your home looking spotless again in no time. 

Step 1: Assess Your Damage

Before you get to work, look at the damage you’re dealing with. If you’re lucky, the smoke damage is only superficial. There may be soot from fire or ash on the walls, but no structural damage to the walls themselves. 

In that case, the amount of work you’ll put into painting over smoke damage should be pretty straightforward, and you can jump to the third step. 

However, if there is more significant damage, you’ll want to address that before you get to work painting over smoke damage. 

Step 2: Repair Any Smoke Damage

If you’ve found damage to your wall, you might need to bring in a professional to put up a new wall, or repair more extensive damage. But if there is damage just to the drywall, you could take it upon yourself to fix that damage yourself.

For small to medium sized holes in the wall, you can fill the hole with plaster, wait for it to dry, and then sand it down. Once you’ve patched your holes and repaired the damage of your wall, it’s time to prep the area to clean and paint over smoke damage. 

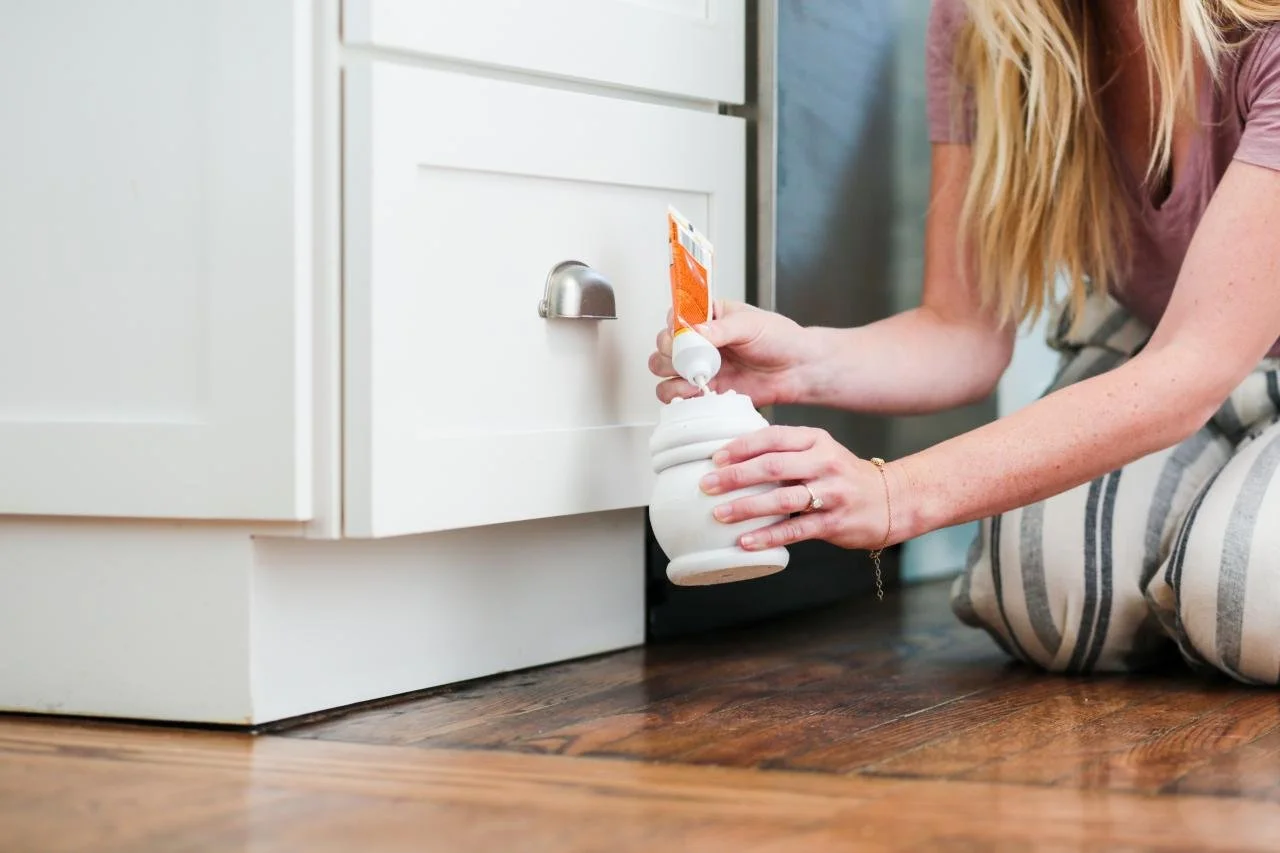
Step 3: Dry-Clean Your Smoke-Damaged Wall

Now you’re ready to start the process of cleaning your smoke damaged walls. That’s where dry cleaning sponges come in. Made of vulcanized rubber, these dry cleaning sponges are great for cleaning soot off of walls.  

For this step, you’ll need the following materials.

  • Gloves to protect your hands as well as walls, since natural oils in your skin can blot on the wall, complicating your efforts to clean your smoke damaged walls. 

  • Plastic Sheeting to place around the smoke damaged walls. Debris and ash might fall during the cleaning process, and you’ll want to avoid any ash or soot staining your floors as you clean your walls. 

  • Eye Protection such as googles will be good to make sure no soot from the fire or ash gets in your eyes.

  • Dry Cleaning Sponges are, of course, essential. The good news is that if you have extra dry cleaning sponges, you can still use these in the future. They’re effective at cleaning up more than just soot from fire, they also can blot out nicotine stains or candle soot on walls. 

The actual cleaning process to get the damage of smoke off your walls is relatively straightforward. Starting from the top of your smoke damaged walls, and working your way down, use your dry cleaning sponge with straight, overlapping strokes. Do not scrub, as that can drive soot into your walls and make it harder to get soot off your walls in the long term. 

After each stroke of the sponge, check it for debris and coloration. If it becomes clogged, or blackens noticeably, take a razor-blade or safety knife to cut off just the surface area of the sponge. 

You shouldn’t try to clean or wash these sponges, since their absorbent nature will be negated by soaking it with water or soap, but by cutting away used layers, you can get a lot of use out of each sponge, and hopefully will be able to absorb most of the soot and ash from your fire damaged walls and ceilings. 

After going through the entire affected area and cleaning soot off your walls, you’re not done yet. There’s another step for cleaning smoke off walls before you can paint over the smoke damage.

Step 4: Wet-Clean Your Smoke-Damaged Walls

Now that you’ve started to clean smoke from your walls, removing much of the soot and ash from your fire damage, it’s time for a more intense clean using a deep-cleaning product. You can use a grease-cutting agent, or a deep cleaner. The important thing is to avoid using standard, run-of-the-mill cleaning products for this step.

Your goal here should be to remove as much soot and ash as possible. This is the last step for how to clean smoke off walls, and ensures that no lasting smoke damage causes problems down the line once you’ve begun painting. 

Using your heavy-duty cleaning product, take a rag, or regular cleaning sponge, and apply it to the walls like you used the dry sponge—starting from the top and working your way to the bottom. You’ll likely want gloves for this step as well, as the cleaning agent may be caustic to your skin. 

When you thoroughly clean the area, you should be ready to begin the process of smoke painting, or painting over your smoke damage to make your walls and ceilings look like new. 

Step 5: Priming Your Soot and Smoke-Damaged Wall

Now it’s time for the show to begin—priming your smoke damaged walls, so you can effectively paint over them. If you’re wondering about any lingering odor, and are considering an odor blocking paint, the primer is where you can begin to help make sure that the smoke damage does not bleed through and require future paint jobs in the future. 

If you’re dealing with strong odors, such as those you find from nicotine stains, make sure that the primer you choose is a pigmented shellac primer, since that will be more effective than standard oil-based primers. 

As for applying that primer, we have numerous guides on how to paint your walls quickly and efficiently. There’s no real difference between applying primer and applying your actual layer of paint, just make sure to choose the correct primer, and apply your primer consistently and liberally. 

Step 6: Paint Over the Smoke Damage

You’ve repaired damage, cleaned the area, and primed it for painting. Now is the time to paint! You can go with the same color you had before, or you can take this as an opportunity to completely reinvent your room with a brand new color.

When you paint over smoke stains on walls, if you’ve done the previous steps to clean and prime the area, painting the wall on its own isn’t any different from painting a wall without smoke damage. Once you’ve prepared your walls for painting, take an interior latex paint and apply two coats, until everything looks like new! 

Final Step: Enjoy Your Newly Painted Home

And that’s how to clean clean smoke off walls, using paint and primer. Of course, cleaning and painting over smoke damage does more than just spruce up your walls. A fresh coat of paint can increase your home’s value, or completely change the feel of a room. And hopefully, with this guide at your disposal, you can paint over smoke damage and renew your home without breaking a sweat!

Guest Contributor: Jeff Good

7 Signs It’s Time You Gave Your Home a Little TLC

RH Business Marketing Solutions

Your home is one of the most essential things in your life. It keeps you and your family safe, holds all your belongings and becomes your most valuable asset over time. As such, you want to take care of your house so it continues to serve you well. These signs will let you know if it’s time for a little TLC.

1. You Haven't Cleaned in a While

Life gets busy, and sometimes, it's hard to keep up with the cleaning. Your house may fall into disrepair after gathering so much dirt and dust — leaving room for pests and other detrimental things to sneak in and feel right at home. The best plan is to attack one room each day with cleaning supplies. If you don't have the time to clean, consider hiring a maid service that can take care of the hard work for you. Then, you'll appreciate your clean home and won't have to worry about anything lurking around in the dark and dusty corners.

2. You Have High Energy Bills

The average American’s monthly energy bill is nearly $120. Some people may see this price as a symptom of living in the wrong place, but you can reduce that cost by giving your home a little TLC. Switch to more energy-efficient options, like lightbulbs and appliances, to reduce your consumption. This can also reduce your carbon footprint and positively affect the environment. Upgrading these parts of your home can lower your electric bill.

3. Your Needs Have Changed

Starter homes don't fit their owners forever, and that's OK. You may find that your current house doesn't suit your needs as your family grows. Many people sell at this point, but that doesn't mean you have to. If you're attached to your home, it might be time to look at renovations. 

Most homeowners choose to remodel the kitchen first, but if you're running out of space, you may consider converting one area into another, like an office space into a bedroom. If you love your home, rearranging your space to allow new rooms, furniture and features could help meet all your needs.

4. Your House Has Appreciated

You may not be able to tell whether your house has appreciated without getting it appraised, but you can examine the area to know whether it’s earning value over time. Homes in a growing neighborhood with an excellent school districtwill likely see higher price tags. Selling your home while the market is hot means you'll get the most bang for your buck. 

Even if you choose not to move out of your home, its appreciation should make you care about it a little more. It could be valuable one day, and the idea of eventually selling it should motivate you to keep it up and take care of it. That way, it will fetch a finer price than you could have imagined. Besides, living in a valuable home may make you choose nicer belongings and care for your current ones.

5. You Struggle With Your Furniture

How long has it been since you upgraded your furniture? It can wear down over time and be detrimental to those who use it. Consider replacing your living room suite when your couch starts to creak, as that can indicate it may fall apart soon. Similarly, mattresses need to be upgraded if you've used them for too many years — neglecting them is detrimental to your sleep, which can impact your physical and mental health.

6. You Can't Handle the Upgrades

Sometimes, it feels like everything falls apart at once. You can expect your appliances to start failing at the same time if they’re the same age. Planning might reduce this money burden, but saving isn't always an option for some families. Replacements can get costly fast. You may have to prioritize one upgrade over another until you have the funds to deal with all of them.

Similarly, you may want to renovate parts of your home but cannot afford it. In many cases, a family might outgrow a house and need to remodel it. Most people spend over $10,000 on home remodels, which can be a hefty chunk of cash and potentially hurt a wallet if not saved up. If you can't handle the costs of upgrading your house, you may look to fix it up just enough to get it ready to sell --- and then find a home that suits all your needs.

7. You Choose to Live With Brokenness

How many things in your house are broken that you simply live with? You may have found a way to work around uncomfortable situations or accept things as damaged, but doing this is no way to live. 

Start by making a list of all the broken things in your home. Then, prioritize these items by how difficult it is not to have them functional. Do you need your fireplace in the winter, or is having a working sink more important to you? Once you have your list, start working on it and give your home the love and care it deserves.

Loving the Home You Live In

Moving is inevitable sometimes. Still, if you live in your dream home, you shouldn't feel like you have to leave it just to make it suit your needs. Upgrades, fixes, and a lot of love and care can make your house the perfect fit.

Guest Contributor: Rose Morrison

Homeowners: Here's What You Should Look For In a Contractor

RH Business Marketing Solutions

Even if you’re a pro at various DIY projects, sometimes it’s best to hire an experienced contractor for larger or more complex home renovations. 

Since the beginning of the pandemic, when more people started staying at home, Google trends indicated an 8% increase in searches for general contractors in one year. However, choosing the right one for your remodeling project is essential and requires you to dig deep into their qualifications and expertise.

Thankfully, finding a good contractor is not impossible. Here are six things you should look for when hiring someone to work on your home.


1. License

Always begin your search for a contractor by making sure whoever you find is licensed. Each state has its own licensing board and requirements that general contractors must meet. Visit your state’s Department of Labor website to find a directory of contractors in your area. 

Keep in mind that hiring a licensed contractor is essential if you intend to sell your home in the future. Otherwise, your renovation project can decrease the value of your home and will likely be excluded from the transaction. 

Homeowners may also need to pay to redo the work by a licensed professional or potentially end up with other legal liabilities, even if they were unaware that the contractor they initially hired wasn’t licensed. 

It’s important to know upfront that your contractor has met industry and state standards to work.


2. Certificate of Insurance

Whoever you decide to hire as a contractor should maintain general liability and workers’ compensation insurance. Always be sure to ask right away to see their certificate of insurance to verify the policy is still in effect. 

General liability insurance ensures your contractor is covered for injuries that may happen on your property and any unnecessary damage they may cause to your home. However, it does not cover injury to their employees or subcontractors.

If your contractor hires additional people to work on your renovation, workers’ compensation insurance is a must to protect others from accident expenses and industry-related fatalities. Most states require general contractors to carry workers’ comp even if they only employ one person. 

Sole proprietor contractors may choose to opt-out of holding workers’ compensation for themselves to drive down their premiums.


3. Experience 

You will want to look for a contractor with ample experience in the project you need completed.

Search for contractors specializing in painting if you’re looking for a color makeover. Hire a roofing expert for repairs or replacements. Other specializations may include kitchen or bathroom remodels, plumbing, electrical, flooring or new construction.

You should ask the following question when interviewing a general contractor:

●      How long have you been in business?

●      What sort of experience do you have with this kind of job?

●      Do you have before-and-after photos of work you’ve done?

●      What’s your vetting process to ensure subcontractors are qualified?

●      How long have you worked with your subcontractors?

●      What steps will you take to protect my property?

Communicating your project needs and inquiring about their skills and backgrounds will give you better insight into who will be working for you. You’ll have a good idea of their professionalism and ability to do a great job.   


4. Cost of Service

You should be getting multiple estimates and bids as you search for a contractor. Find out the estimated cost of your project — materials, labor and contingency fund — as well as payment options, payment schedules and your right to cancel.

Do they accept credit cards or checks? Do they require a down payment before starting the project? 

Some red flags to be aware of when it comes to costs of services include:

●      Never pay for a project in cash. Many times, this may mean it’s a scam. You can also then use your cashed checks as a receipt.

●      Always make checks payable to a company rather than an individual.

●      Never pay more than one-third of the project costs as a down payment. 


5. Turnaround Time

Nobody wants to wait around forever for a home project to be completed, especially if it’s large enough to displace you or gets in the way of everyday life. 

Ask your contractor how long they expect a project to take from start to finish. Remember that delays sometimes occur, such as poor weather conditions or supply chain issues in obtaining the materials.

Regardless of the turnaround time outlined in your contract, be prepared to adjust your timeline and have a little bit of flexibility when unforeseen circumstances arise.


6. Reviews and Recommendations

When push comes to shove, the best way to look for a contractor is by searching for reviews, recommendations, and word-of-mouth.

Ask friends, family and neighbors who worked on their houses and how they liked the finished product. It would help if you also looked the contractor up on Google, Yelp or another site where customers can leave reviews.

Research the company’s profile on the Better Business Bureau (BBB) to read through any complaints and search for keywords that indicate a scam. You may even ask the contractor if they have a list of local references you can contact. 

These tools can be beneficial as you decide who to hire.  


Be Confident in Your Hiring Decision

Searching for a good contractor may seem like a project on its own, but the more you know about them, the more trust you’ll have in the work they can do. Following these six steps should help you make the right choice.

Guest Contributor: Rose Morrison

Blue Collar Eats - Oak Forest Bowl & The Park

RH Business Marketing Solutions

Have you stopped in at Oak Forest Bowl located on 152nd and Cicero in Oak Forest? This place has been here for over 60 years and it’s the gift that keeps on giving! There are multiple things to do here, bowling is not your only option. They have “the Park” which “includes full service bar, food menu, two volleyball courts, bean bag courts, fire pit , plenty of tables for guest to enjoy their food & drinks while dining outdoors.” (oakforestbowl.com). They have leagues for volleyball and of course, leagues for bowling. They even have birthday party specials, an arcade room and slot machines as well.

This year Oak Forest Bowl will be the hub for the 13th Annual Oak Forest Fleadh’s 5K. Registration is still open if you’d like to participate. This is where the runners will meet pre and post race. The Fleadh is about “family, fitness, and fun” and the theme is “Fleadh Around Town!”

One of the most underrated thing about Oak Forest Bowl is their food. One may not think that their food is high quality and delicious because it’s a bowling alley, but believe us, our hungry plumber, Kevin, Kim and Keith devoured the food they serve. This place is underrated, and we’re here to show you why.

“And now, let me get this straight, you guys serve breakfast here?” Kevin was shocked to find out that Oak Forest Bowl serves breakfast all day long, you can’t find that at many places. Keith, the owner, had the perfect response. “Yeah, we do, we have senior leagues in the mornings, we open 9am every day. Even the days we don’t have senior leagues, we are still open at that time, so we started doing breakfast and it became pretty popular and we actually offer it during all hours of our operation. Sometimes you’re bowling and it’s 8pm, and you want an omelette or skillet, we can help you out. It’s to give everybody choices, we do have a lot of regular bowlers as well, and we try to make a pretty wide variety on the menu, because if you’re here every week you don’t want to eat the same hamburger or a hot dog.”

The pizzas they have are handmade. Keith explains that they make their own dough, and use their own homemade sauce and a homemade cheese blend. “We take pride in it, we feel like we took the steps up and got positive reviews, and why stop there, we try to go all out.”

Kevin ordered the Italian Beef Pizza, and he was amazed with how great it tasted. “This is good beef, I can tell this is good quality beef.” Keith explains how they go to a pizza convention in Las Vegas, The International Pizza Expo. After going there that’s when they decided to go full force with the pizza and the different unique creations not usually known, but taste so great together.


Kim Malecky-Iles is the Executive Director at the Oak Forest Chamber and she joined Kevin and Keith in trying the food. Kim is Kevin’s favorite co-host, they love sharing ideas about supporting local businesses like Oak Forest Bowl over some delicious food.

Kim was amazed with the cheese sticks, “if you are a cheese stick fan, this is where you want to go. It’s not all batter, it’s really good!” Kevin even agreed with her after trying the cheese stick that it is definitely a good cheese stick. “So much cheese, mozzarella, so good. So flavorful, it melts in your mouth. Fresh, gooey, and just amazing.” Kevin explained that the cheese sticks were “a mouthful”. Kim and Kevin both recommend you try these. Keith agrees, you should also try them, but he’s a little biased! “Can you see why these cheese sticks are one of my favorite things on the menu? We make quite a bit of these, we didn’t realize we would sell so many, which is a good problem to have!”

The chicken tenders that Kim and Kevin tried were also great quality. Kevin said they were calling his name and he was so glad he tried them. Kim tried the Buffalo while Kevin tried the garlic parmesan. Kim explained, “not too spicy, crunchy, and triple the size of where you normally get tenders.”

When everyone was done eating, they all agreed that this is a great spot for the 13th Annual Fleadh 5k hub because the food and the atmosphere are great.

We can’t wait for the Fleadh, which is March 5th, 2022. If you’d still like to register to be in the parade or the 5K, registration is open.

Register for the 5k: www.raceroster.com/55632

Register for the Family Parade:
http://www.oak-forest.org/formcenter/oak-forest-3/13th-annual-oak-forest-fleadh-2022-famil-91

We will be hiding a $1000 golden ticket again this year along the route of the parade, will you be the lucky one to find it? Keep your eyes open!

What I Wish I Knew Before Starting My Home Renovation

RH Business Marketing Solutions

Home renovations can be a daunting task. There are so many things to consider before starting, from the budget to the type of renovation you want to do. Here are some tips on what you should know before starting your complete home renovation.

One of the most important things to consider before starting a renovation is what you want the end result to be. Do you want a complete home renovation, or are you just looking to update certain parts? Knowing what you want will help make sure that your renovation goes as smoothly as possible and that you don’t spend money on renovations that you won’t be pleased about in the end.

Have a realistic idea of your budget

Planning a home renovation can be stressful and confusing.  What should you do first? How much will the project cost? Where should you start? It is important to have realistic expectations about what the budget will be before starting; otherwise, it can lead to frustration and disappointment. One way that people often underestimate their budgets is by not planning out all aspects of their renovations beforehand or by overestimating how long the renovation process will take them.

Create a realistic budget and stick to it

In order to create a realistic budget, it’s important to understand exactly what needs renovation, how much time it will take, and what materials are needed for each phase of work that needs to be done. If you are unsure, or if you have limited knowledge of your home renovation project, it is best to speak with a contractor to get their advice on what will need doing, how much time it will take, and why. It can also help to look at similar projects in your area for guidance. Another reason that budgets may not be realistic is that they fail to account for materials and supplies.

Often there are unexpected expenses that people hadn’t taken into consideration before starting, such as replacing all of the cabinets with new ones, or any appliances that may need to be replaced. It is best to create a separate budget for materials and supplies in case any of these expenses come up. Budgeting for things like appliances, lighting fixtures, paint, and flooring is important to avoid any excess costs after the renovation is complete.

Keep a positive attitude throughout the process

It is extremely important to keep a positive attitude throughout the process. By staying positive, you will be able to better handle any problems that come up and will be more likely to finish the renovation on time and within budget. Here are a few tips for keeping your spirits high during your home renovation.

Pick a project you will enjoy Even with a positive attitude, some parts of the renovation process can be exhausting or frustrating. If you pick a project that you truly enjoy, such as painting, you will be able to stay engaged in the process and hopefully push through any rough parts.  If you truly can't stand your project and don't feel comfortable starting it, consider getting help from a friend or relative who might be able to assist.

Create a schedule and stick to it. Making a schedule will allow you to create a timeline for the project and ensure that you finish all of your tasks within a reasonable amount of time. If you happen to run out of time, it is okay to finish the project another day or ask for help.

Enjoy your new home!

It is true that you will have some inconveniences as a result of your renovation. However, it is also true that those inconveniences will be temporary and the benefits far outweigh them. Most people find their new space more comfortable, attractive, and enjoyable than their old one after they finish renovations. Imagine coming home to a house just how YOU want it! Instead of being surrounded by everything someone else wants for you or what was handed down from generations ago. You’ll have all the modern conveniences with none of the clutter or outdated items you don’t care for anymore. In addition to feeling better about yourself in your own home, there are many other benefits associated with renovating: lowered utility bills from upgraded insulation and energy-efficient appliances, additional living space, and less maintenance.

Renovating a home can be a large pill to swallow in the beginning, but it is worth the effort in the end. By creating a realistic budget, staying positive, and following a schedule, homeowners can minimize stress and ensure that their renovation goes smoothly. After the renovation is complete, homeowners will enjoy living in their new space and reap the benefits of having updated appliances, insulation, and more living space.

Guest Contributor: Andrew Adams

How to Save Time and Money on Big Home Projects

RH Business Marketing Solutions

It's no cakewalk to complete a big home project because they tend to stack up when in the renovation process. It's best to not lose your focus and concentration on the task ahead and take one step at a time. With these viable methods, you will be able to save time and money on your big home projects without any concern. Sometimes projects can pop up unexpectedly when things break down, and you may need ways to buffer the expenses and time consumption!


Have an Organized Budget

Maximum efficiency when it comes to your monetary goals can be tricky when building home projects. It's very easy for a few smaller projects to pile up and become a large task overall. As the needs of your home increase, so does the demand for more funds to accomplish everything. Keeping a receipt of everything you purchase is important to document in your organized budget. Spontaneity is your enemy when it comes to home renovation, and letting your emotions take hold can drive the prices up. If you're looking to save money, then calculate your budget and leave a bit of wiggle room because plans can fluctuate. Staying organized will give you a sense of confidence and a grasp over the situation so the final price isn't a shock.


Take Your Time Planning Overall

When it comes to the materials, design, and matching the quality of your new projects, you must plan it out well for the best results. This phase can take some time so it's best to accept it and not rush through the process. Otherwise, you risk hasty decisions that could be regretted later. This is a time for brainstorming and contemplation regarding any particular design. For example, you could simply put a square of a particular wallpaper design up to see if it hits your eye right. There are many ways to plan out your project, but it's definitely a creative and individual process. You can benefit from other ways to save money on big home projects and never pay full price again! You will be looking at whatever work is accomplished for a long time which is why it's imperative this step is taken into consideration.

Sell Things You Don't Use for Profit

One unique way to save money and space is to sell things you come across around the house that you don't need. Many people don't bother and throw things away, but you can shave off a percentage of the project cost if you are patient and sell it instead. Clearing out your home will also give you an advantage when conducting the projects as there is more space to work and less clutter. If you have a lot of stuff you don't use, then this is the perfect time to have a garage sale or consider selling online. This will really help you save a lot of money depending on how many possessions you own. It's definitely a handy way to potentially cut the cost of any given project in half!

Benefits of Purchasing Power Equipment

When renovating outdoors, it's important to have all the logistics covered and OPE Dealers helps you with cutting costs and saving precious time. Time is definitely money when it comes to renovating, and it's easy to waste time without professional guidance with outdoor projects. These dealers utilize outdoor power equipment software to effectively carry out tasks like inventory management, sales, and attaining the necessary equipment. Experience is another valuable quality because they are aware of many facets of the industry that a novice might miss while taking on a solo venture. Outdoor renovations can be particularly labor-intensive and you need whatever equipment you may need to get the job done


These Methods Will Help You Save Money on Your Biggest Projects!

These are the right concepts to keep in mind when furthering your interests in larger home projects. You will gain more control over the situation and can save resources with a wiser approach. This is a modern time full of opportunities to handle certain projects yourself with instructional videos online. This type of specialized knowledge for renovation used to be more elusive and is available to access in detail regarding the subtleties of any home craft.

7 Children's Outdoor Play Area

RH Business Marketing Solutions

Spring is slowly approaching and it’s time to get planning on how you can make enrichment areas outdoors for them to play in. We found the best play areas you can easily create that will have your child happier than can be to get outside and play.

One big thing that parents are incorporating into play time is sensory. Sensory is important for a child because it allows your child to get hands on and experience their surroundings and the area through their senses, and it’s important for kids to be able to use their hands to explore. A sensory path is a great idea in incorporating a couple of different materials to let the kid explore freely. One good piece of equipment that can enhance sensory perception and allow children to play at the same time is a gaga ball pit. You can set it indoors or outdoors, as long as you have enough space for the octagonal pit. The game is played like dodgeball, but milder. Playing with a gaga ball can be a fun hands-on activity for anyone of any age. If you are putting it in the sun, we advise you to be careful with the materials you choose because you don’t want to get material that will heat up in the sun and potentially burn the child.

Majority of children love to get on their hands and knees and crawl all over the place. Some can’t walk yet and this is a great idea for those who can walk and those who can’t. Instead of your child getting all dirty from crawling on the grass and dirt, you can create a little obstacle for the children to crawl in, and they will be so excited whether it’s simple or intricate. In the Spring/Summer pool noodles are very easy to get ahold of and the foam puzzle pieces might be something you already have since they’re so popular. You can start the obstacle small, and then easily add onto it with the more supplies you buy. It is also a great way to make other games out of it.

We’ve all seen the wooden building blocks that babies and younger children use to help work on their fine motor skills. This is a great idea to incorporate in your backyard because it helps them continue to work on their fine motor skills with this puzzle which is pretty much the same thing as the wooden building blocks. This type of activity can also be used in different games, such as trying to match the colors, scatter the “blocks” around the yard, and let them use their gross motor skills as well as the fine motor skills.

We all know children have the wildest imaginations, and this is a great object to let them explore. Lots of kids like to use their imagination whenever they’re place into a seat with a steering wheel. This is a great object to let them use their imagination and explore the way they would like. It is even friend-friendly in case there are other children playing.

DIY Tic Tac Toe! This is perfect to get children learning how to play tic tac toe. This game is simple for children to comprehend and can incorporate their fine and gross motor skills. Let the children pick the object they’re using for the game and let them run around and explore to get the gaming pieces to use.

DIY your own rock garden! This is a cute area that is sure to bring color to your backyard. Let the children paint as many rocks as they would like and as time goes on you will have tons of colorful rocks. You can create your own rock garden, or scatter them around the backyard, either way it is sure to add color and uniqueness to your back yard.

For those children who love to dig, create a digging area for them to explore! It is best to add rubble or dirt for them to dig into instead of digging into the actual backyard grass, but having a designated area can help the children learn to only dig in that area, and leave the rest of the backyard alone. A digging area is great because you can keep reusing the area for multiple digs and when they get tired of it, you just start over!